Wellys Dev
-
Comparing the Labrador
Where I compare the Labrador with the $300 Digilent Analog Discovery 2 and determine if using a “rail-to-rail” operational amplifier matters.
Sources
- LM358 Datasheet
- OP484 Datasheet
- Analog Devices Op Amp Inputs, Outputs, Single-Supply, and Rail-to-Rail Issues
- Texas Instruments A Single-Supply Op-Amp Circuit Collection
Research
This video, Rail to Rail Op Amps P1 got me thinking as to the issues with the LM358. So to determine if it mattered on my previous amplifier design, I went back and redid the circuit. I used the OP484, as it was an op-amp I had and it is specifically a “Precision Rail-to-Rail Input and Output…”. I thought it would be interesting to do two things:
-
RP2040 MicroPython Coding Setup
Where I explain my process for developing code on the RP2040 board.
Sources
Python User (Discussion below)
- Sublime Text or your favorite code editor
- macOS Serial
Background
When developing software for microcontrollers, the longtime standard was the Arduino. It required a modified version of C++, which allowed writing software quite close to the hardware, however, it had two specific issues. One, the language itself is very particular and it is not elegant and two, the compile/load/run (CLR) loop can be laborious and time-consuming.
-
RP2040 Blink Continued
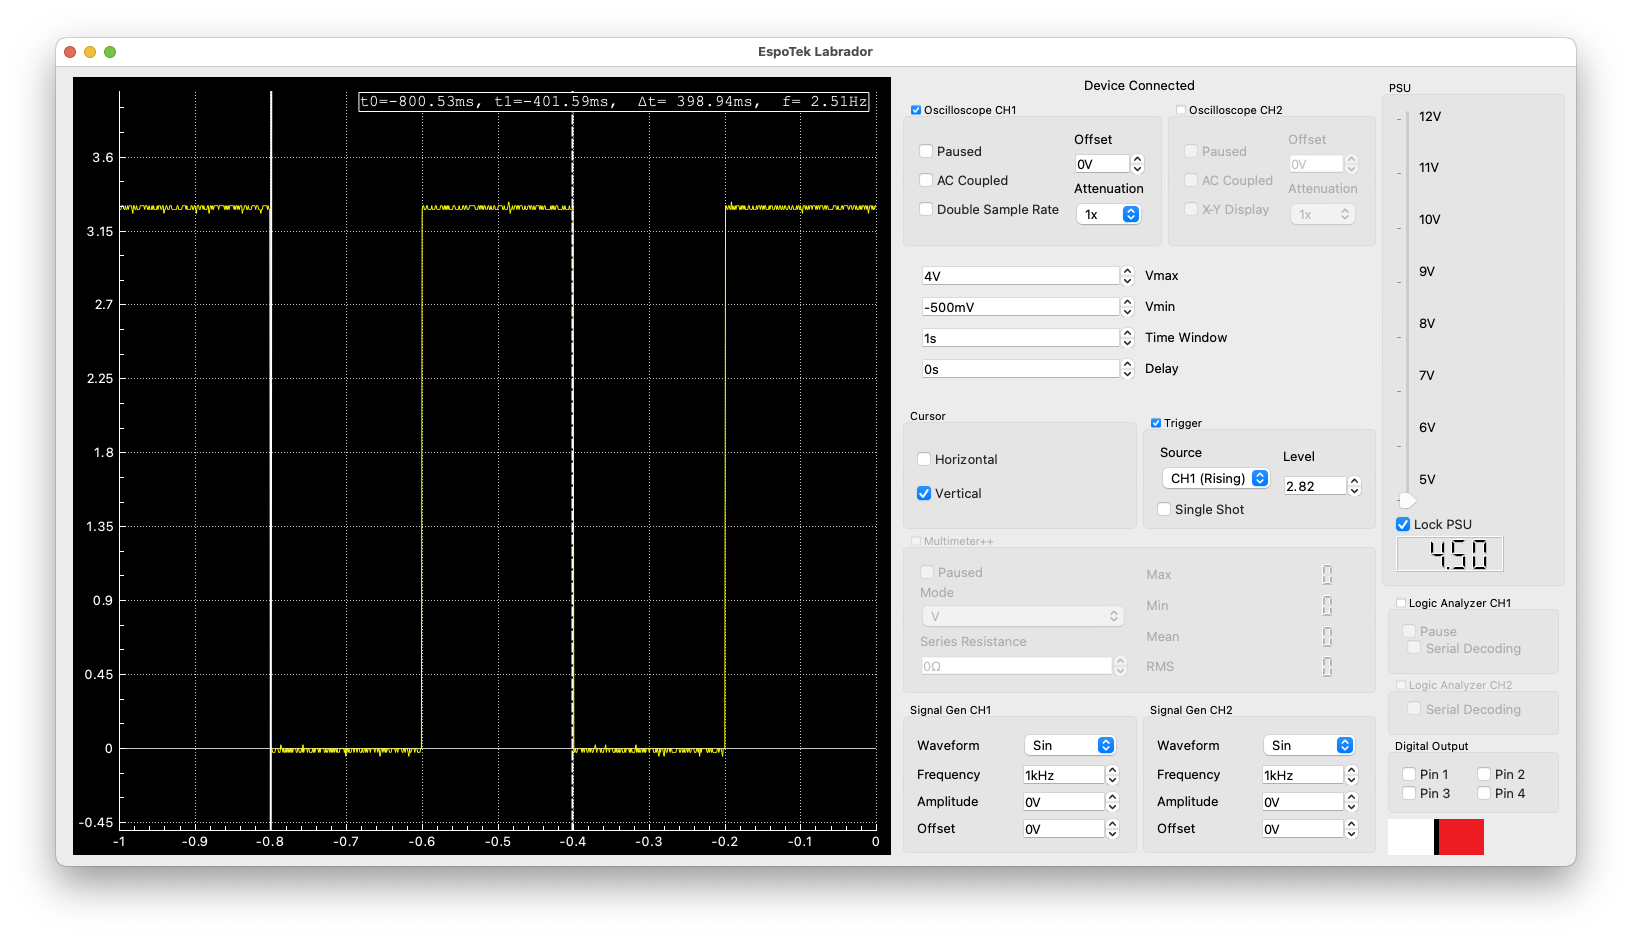
Where I use the Labrador to test a different way of implementing Blink on the RP2040 using timer().
Sources
Background
I started reading the Python SDK above and noticed this example on page 12.
Its a method of blinking the LED in the background, which allows the processor to do other work. Let’s try it and see how well it works using the Labrador.
Code
from machine import Pin, Timer

led = Pin(13, Pin.OUT)
tim = Timer()
def tick(timer):
    global led
    led.toggle()

tim.init(freq=50, mode=Timer.PERIODIC, callback=tick)

-
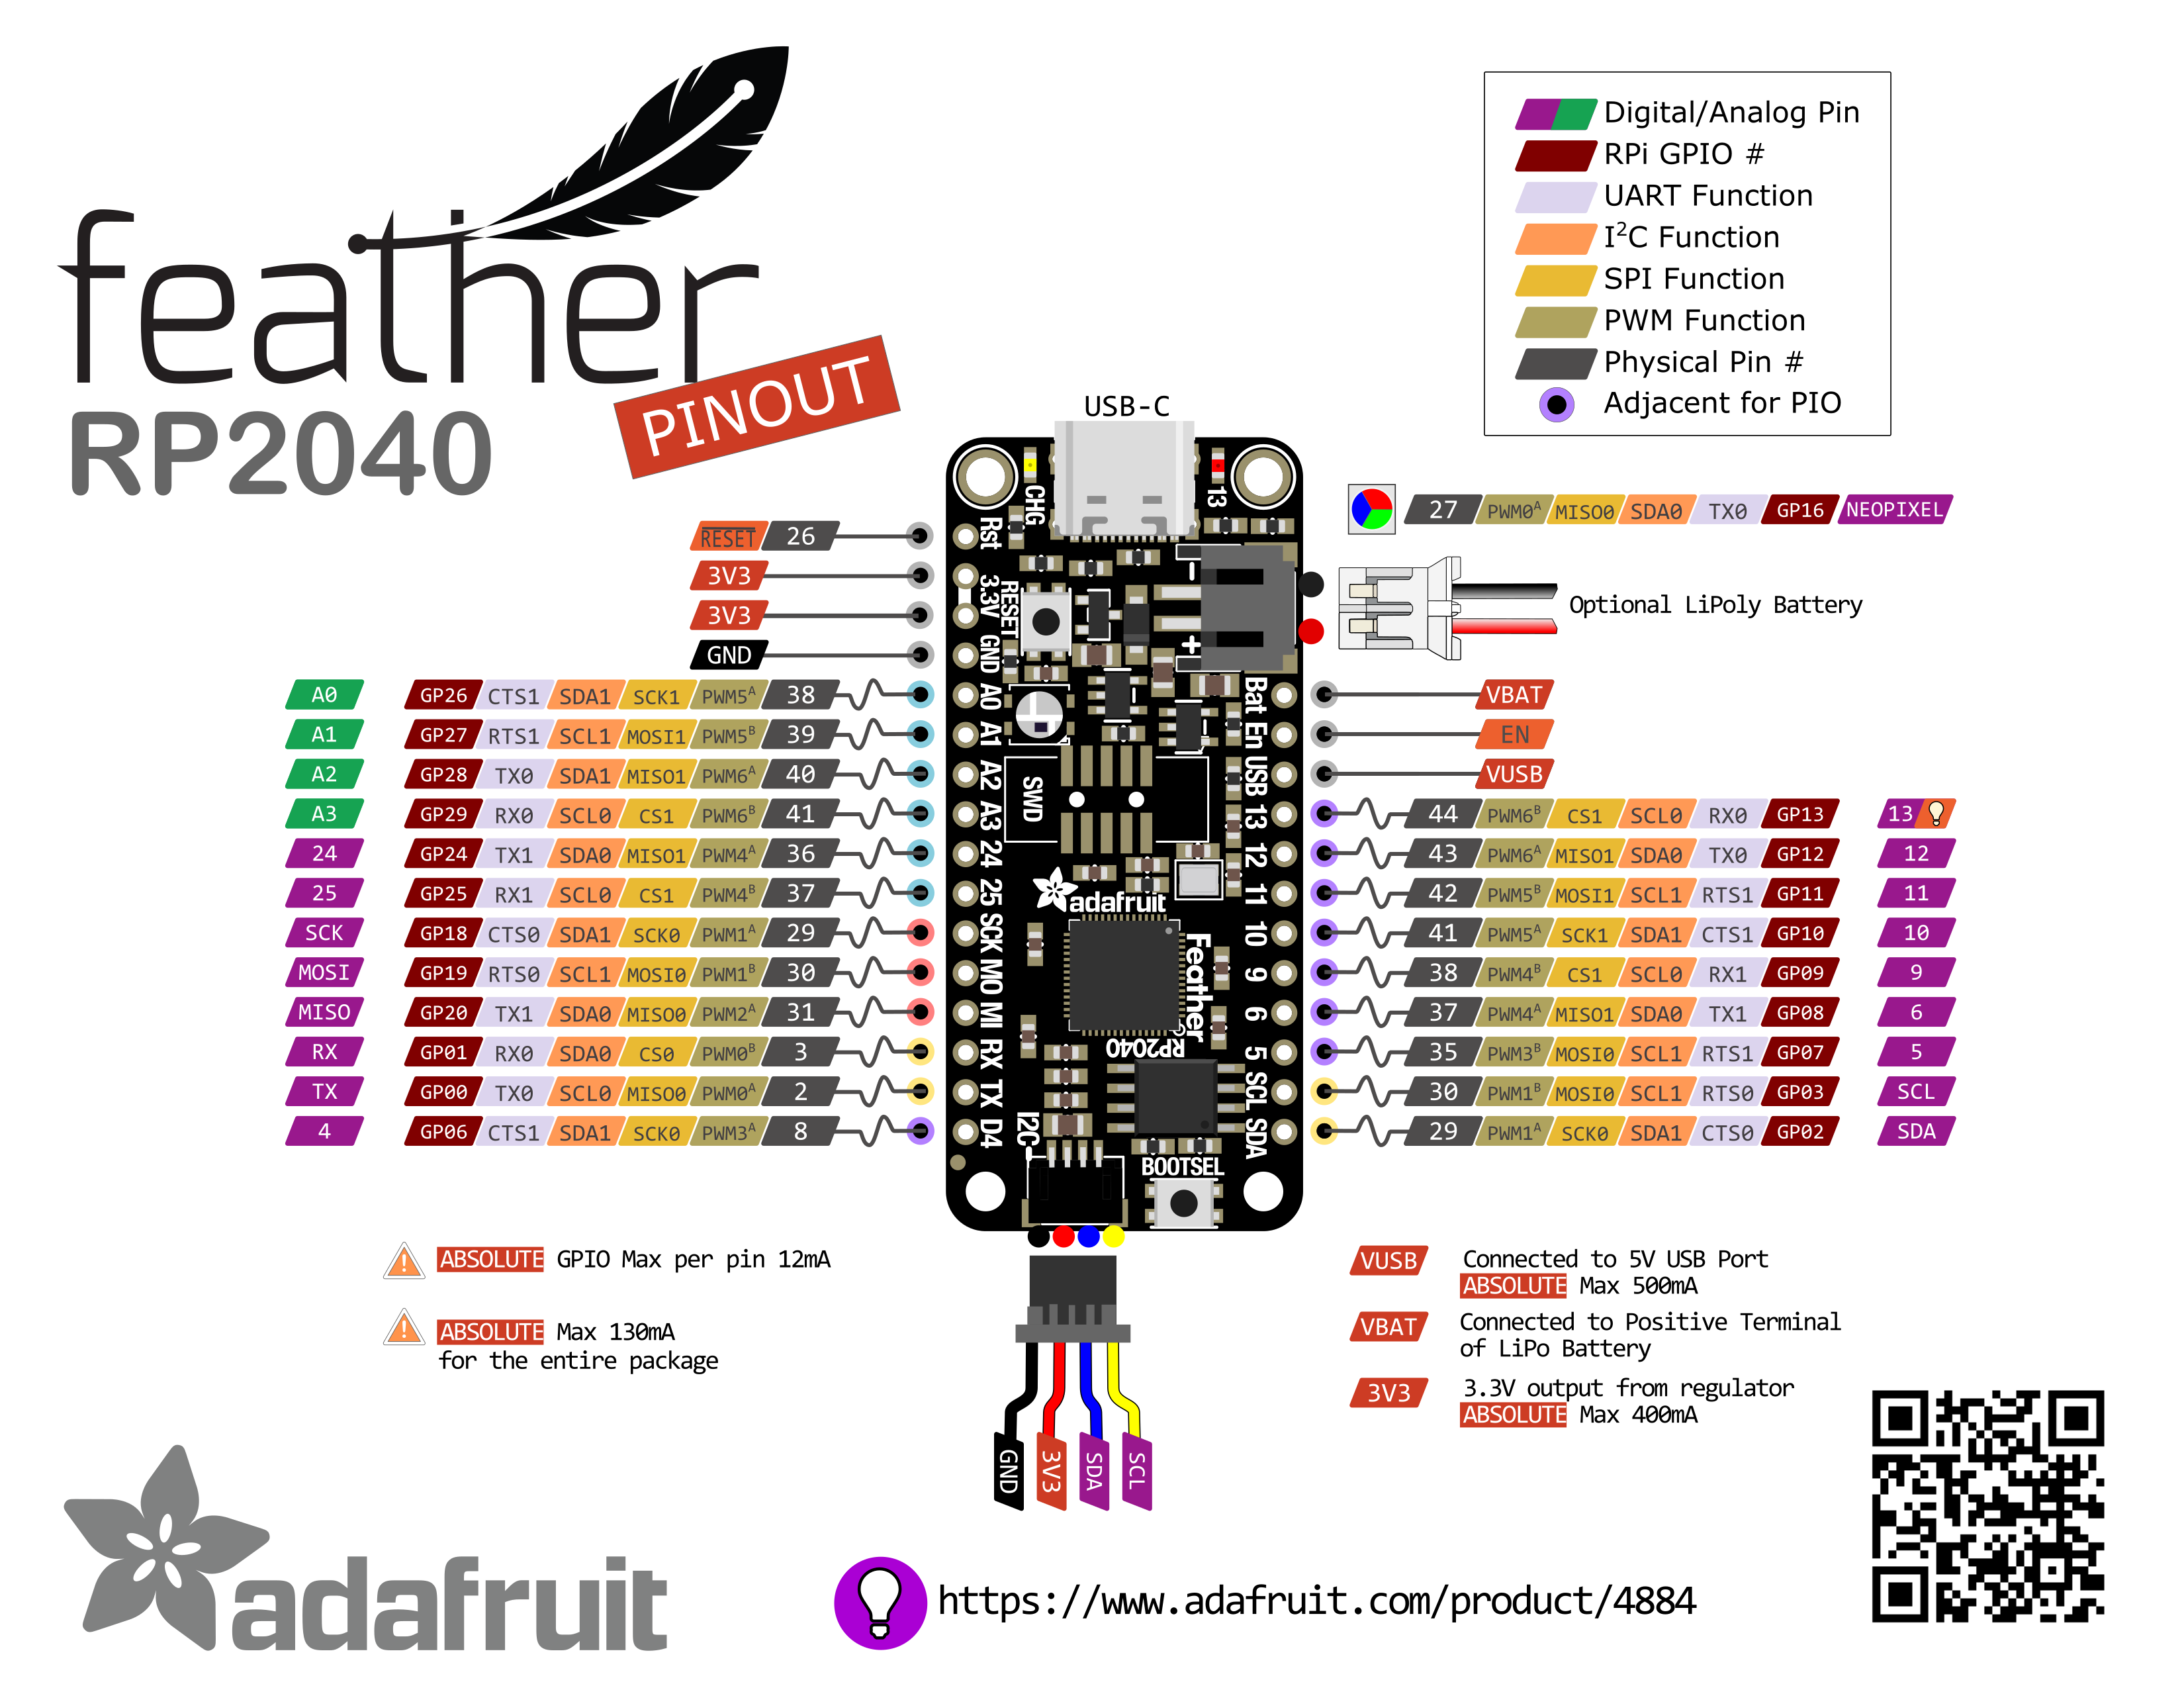
Introducing Adafruit Feather RP2040
Where I begin to work with the Adafruit Feather RP2040 (Feather) and MicroPython (uP) and use the Labrador to test the board.
Using Blink Test to Confirm Board Works
Using an Interactive Pin Test to Confirm Header Works
Sources
- Adafruit Feather RP2040
- Raspberry Pi RP2040 Getting Started
- RP2040 Datasheet
- Arm: Raspberry Pi RP2040: Our Microcontroller for the Masses
- Get Started with MicroPython on Raspberry Pi Pico
- Raspberry Pi Pico Python SDK
- MicroPython RP2 Docs

Background
After being disappointed with the uP development for the ESP32, I thought it would be fun to try the latest and greatest, hottest, just out of design, the Raspberry Pi RP2040 Microcontroller. I was able to secure two Adafruit Feather versions and will use those to test.
-
ESP32 MicroPython Coding Setup
A short entry to explain how to code using MicroPython on the ESP32.
Background
In my introduction to Micropython, I mentioned how I wrote MicroPython for the ESP32 on a Mac. As I stated, Phillip van Allen has a nice process, however I like my process more. This entry will review how I develop code as it might be helpful to others.
Mac Process
Serial Monitor
I use a paid application called Serial for serial communication with devices. There are free products, however, I found when using Serial, I’m more productive and I’m able to setup custom settings for each device to maximize throughput while taking care of the idiosyncrasies of each device. I’m also able to connect and disconnect Serial from the device easily and quickly, which is why my approach works so well.
-
Testing MicroPython with the Labrador: PWM
Where I continue to use the Labrador to test the PWM functionality of the ESP32.
Sources
- Makeability Lab Lesson 3: Fading an LED with PWM
- ESP32-GetStarted: PWM
- MicroPython PWM
- Espressif: LED Control
Background
We continue to use the Labrador to evaluate how the HUZZAH32 operates. In this case, we’ll dive into how to use the H/W PWM functions as compared to doing it in software.
The PWM functionality is called LEDC by Espressif, the manufacturer of the ESP32. This stands for LED control and it works quite well for fading, controlling brightness etc of an LED. That said, we can understand it far better if we observe the signals using the Labrador.
-
Testing MicroPython with the Labrador: Blink
Where I use the Labrador to test specific functions of the ESP32 running MicroPython.
Sources
- Quick reference for the ESP32
- ESP32-GetStarted
- Adafruit HUZZAH32
- ESP32-DevKitC I think this is the same as the HiLetGo version I have
- ESP32 Makeability Lab
Background
The best way to begin to understand a board is to play with it. In more technical terms, this means writing software and learning how the board responds. The higher the capability of the board, the greater the need for examining the board with high functioning tools. In our case, we are going to keep things very inexpensive, however, extremely capable and powerful.
-
MicroPython
Where I investigate using MicroPython on the HUZZAH32.
Background
I have spent quite a few years using Python to develop applications. I like the language, however I believed it wasn’t a good candidate for microcontrollers. Given the strong development behind both CircuitPython and MicroPython, I though it would be a good idea to test it and determine via testing and not assumptions.
Sources
Getting Started
I followed the steps Wolf Paulus provides on his website and had no problems. I am using macOS Big Sur with the Apple native USB drivers. Which means I’m using /dev/tty.usbserial-01F4D567 and not /dev/tty.SLAB_USBtoUART. I haven’t had any problems…yet.
-
ESPForth 7.0
Where I find a much, more evolved version of ESPForth. While investigating a bug I found in ESPForth (now called ESPForth6), I ran across a new version of ESPForth 7.0, which I’ll refer to as ESPForth7.
Sources
Comments
Each time I used ESPForth6, I would experience a bug with the word “constant”.
So I began to investigate ESPForth. Arduino-Forth who had been using FlashForth has now begin to investigate it. Which led me to the sites above. The good news is that I downloaded the ino file for ESPForth 7.05 and it compiled and loaded the first time.
-
PinTest
Where I write an Arduino program to test pins on a specific board in order to confirm a Forth HAL for the same board.
Pin Testing
When writing software which will control a circuit, it is best to confirm the behavior of circuit using known or familar test software before attempting to write with a new language. For example, I am developing a HAL/Primitive/User layer for the ESP32 using ESPForth. As the board, the Adafruit HUZZAH32 has an Arduino framework already developed for it, it is a good idea to test the board using the Arduino C++ code before testing it with the ESPForth words.