I discuss designating ESPForth as ArduinoForth, which is Forth words calling the Arduino framework.ESPForth is one of the easiest and least expensive ways to learn Forth, however it is based on the Arduino framework. This entry continues to explore how to use ESPForth calling Arduino routines on the Adafruit ESP32 HUZZAH32.
Change of plans (again)#
This entry is pretty much deprecated for two reasons:
- There is a bug (or I don’t understand it) in CH Ting’s version of ESPForth in the word “constant”. Through several attempts over multiple months, I haven’t been able to have it consistently store a value. I looked at the C++ code and wasn’t able to determine the issue. Ultimately, this prevents one from writing a readable Hardware Abstraction Level (HAL), as much of an HAL are constant definitions.
- While attempting to solve #1, I ran across a new version of ESPForth, ESPForth 7.0.
Change of plans#
For several days, I attempted to use the HUZZAH32 in its native mode, meaning I look at the registers such as GPIO_OUT_W1TS_REG and set specific pins to achieve what I need. I ran into significant issues, with some pins working well, while others had inconsistent results. It was this inconsistency that caused me to rethink how I approached this specific version of Forth, ESPForth.
I call it ArduinoForth, where I use the Arduino framework using Forth words. This allows me to continue to write in Forth, where its interactivity and extensibility shine while “standing on the shoulders of the Arduino framework.”
Here’s an example of why I made this decision. My original HAL (excerpt) looked like this:
\ Short side of board JP3
\ BAT
\ EN
\ USB
Hex
$2000       constant GPIO13 \ A12 LED Confirmed
$1000       constant GPIO12 \ A11 Failed HAL, Confirmed Prim
$8000000    constant GPIO27 \ A10 Confirmed
$2          constant GPIO33 \ A9 Failed
$8000       constant GPIO15 \ A8 Failed HAL, Confirmed Prim
Take a look at the “Failed Hal, Confirmed Prim”, this meant I was able to set a pin as output if I used a Forth word calling the Arduino framework, however it didn’t work using a Forth word setting a bit in a register. Not only that, I was mixing hexadecimal pin positions in Forth words with decimal pin numbers in ArduinoForth words. It was taking twice as long to do anything productive, not to mention the inconsistency in results were driving me mad!
From here, I’m going forward with ArduinoForth, where I use the Arduino framework as the basis of the Forth HAL and primitives, and use Forth words as my user interface.
What does this buy me?
Development speed, the Forth environment is far more superior in the write/run cycles of microcontrollers than C++. And the Ardiuno framework allows me to focus on the User Interface as compared towards writing a HAL from scratch.
Documentation#
In my GitHub repository, there is a ESP32Forth_65 pdf, that is a wonderful document for understanding ESP32 Forth. Most of it has been written by CH Ting, however, I have added additional words and comments as to the implementation in this repository. I can’t thank CH Ting enough, for the hard work he has done in creating this Forth and documenting it so well.
In the repository, I also include a file load.txt in the data folder. This file contains a number of Forth words to use on the HUZZAH32. The Hardware Abstraction Level (HAL) which corresponds to the C++ version pins_arduino.h, will translate the Ardiuno pins and functions into Forth words. I will continue to evolve it over time. This blog entry describes some of the work required for that evolution.
Note: To have the file data/load.txt loaded by espForth, you will need to use the ESP32 Sketch Data Upload tool. Here is a good tutorial as to how to use it: Random Nerd Tutorials:Install ESP32 Filesystem Uploader in Arduino IDE.
Sources#
- ESP32 Software Documentation
- ESP32 Resources
- Random Nerds ESP32 Pinout Reference
- pins_arduino.h
- Adafruit HUZZAH32
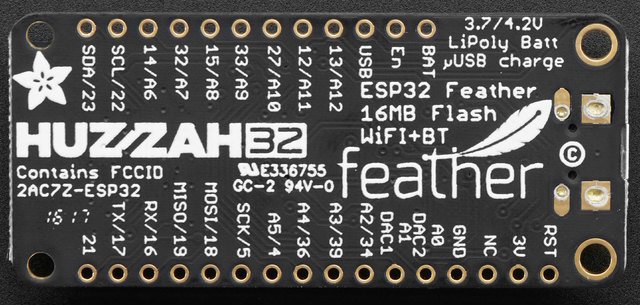
Pinout of HUZZAH32
Documentation of words in load.txt#
If issues in load.txt#
The best thing to do after a loading a load.txt file, is to enter “words” and confirm from the display that all of the words in load.txt are displayed. If you aren’t seeing all of the words you have in load.txt, press reset on the ESP32 board. This will reload everything and will indicate an error where Forth was unable to load a word. For example, I forgot the space between the “:” and PINTST in load.txt and after pressing reset, I saw:
23e0  0 0 0 0 0 0 0 0 0 0 0 0 0 0 0 0 0 0 0 0 0 0 0 0 0 0 0 0 0 0 0 0  0Load file: 2291 bytes.
 :PINTST?
 Done latest loading.
which meant I had an error in the word, “PINTST”. As you can see there isn’t a space between the colon and the letter P. After fixing this error, I had another error:
23e0  0 0 0 0 0 0 0 0 0 0 0 0 0 0 0 0 0 0 0 0 0 0 0 0 0 0 0 0 0 0 0 0  0Load file: 2292 bytes.
 DELAY?
 Done latest loading.
However, this wasn’t due to an error in DELAY, I was using the word DELAY prior to it being defined in PINTST.
HAL#
It would be best to have a HAL that corresponds to the pins_arduino.h file. This makes code much more readable. That said, I’ve had significant issues with the “constant” word in this version of ESPForth. It doesn’t seem to work.
With that in mind, I stopped attempting to assign pin numbers using constant and simply documented pins in the load.txt file.
PWM ( pin dutycycle/8192 chan frequency – , Set pin for PWM )#
[See ESP32 Software Documentation LED Control for more information as to how the PWM works.]
- As this uses the Arduino framework, all parameters are decimal
- Set the frequency
- Set the duty cycle to parameter/8192 (i.e; use 4096 for 50%)
- Connect the channel to the pin
: PWM ( pin dutycycle/8192 chan frequency  --  , ALL DECIMAL Set pin for PWM )
    over freq swap over duty pin ;
( EX: decimal 5 4096 0 1000 PWM -- pin 5, 50%, chan 0, 1kHz )
( EX: decimal 21 2700 2 2000 PWM -- pin 18, 33%, chan 2, 2kHz )
TOGLED ( – , toggle led )#
- Read Port 0
- XOR with LED (bit 13) to flip bit
- Write back out
: TOGLED ( --  , toggle led )
    p0in LED xor p0 ;
DELAY ( millis – , same as Arduino delay, locks out until delay ends)#
- Get the current time in milliseconds
- Add desired delay = End Time
- Get current time again
- Determine if less than End Time
- If not, exit loop and drop delay off stack
: DELAY ( millis --  , same as Arduino delay, locks out until delay ends)
    gtime + begin dup gtime < until drop ;
( EX: 5000 delay -- locks out for 5 seconds )
BLINK ( millis – , blink led on/off for period of milliseconds )#
: BLINK ( millis -- , blink led on/off for period of milliseconds )
    begin dup delay togled ?keyt until drop drop ;
( EX: 500 blink -- blinks off/on for 500 millisecs )
ALTERNATE ( period cfa – , alternate a word per period )#
: ALTERNATE ( period cfa -- , alternate a word per period )
    begin dup rot dup delay swap execute swap ?keyt until drop drop drop ;
( EX: 500 ' togled alternate -- blinks off/on for 500 millisecs )
#
: DELAYM ( micros --  , same as Arduino delay, locks out until delay ends)
    gtimm + begin dup gtimm < until drop ;
( EX: 5000 delay -- locks out for 500 milliseconds )
BLINKM ( micros – , blink led on/off for period of microseconds )#
: BLINKM ( micros -- , blink led on/off for period of microseconds )
    begin dup delaym togled ?keyt until drop drop ;
( EX: 500 blink -- blinks off/on for 500 millisecs )
TESTIF ( f – , show results for if test )#
: TESTIF ( f -- , show results for if test )
    if  ." true " else ." false " then ." both " ;
( EX: 1 test true both )
( EX: 0 test false both )