Using an ESP32 board as a web-based oscilloscope.#
It works! (Kinda)#
It is an interesting approach, however, it doesn’t lend itself well to measurements. I wouldn’t recommend it as a piece of test equipment, it might prove interesting as an IoT approach.
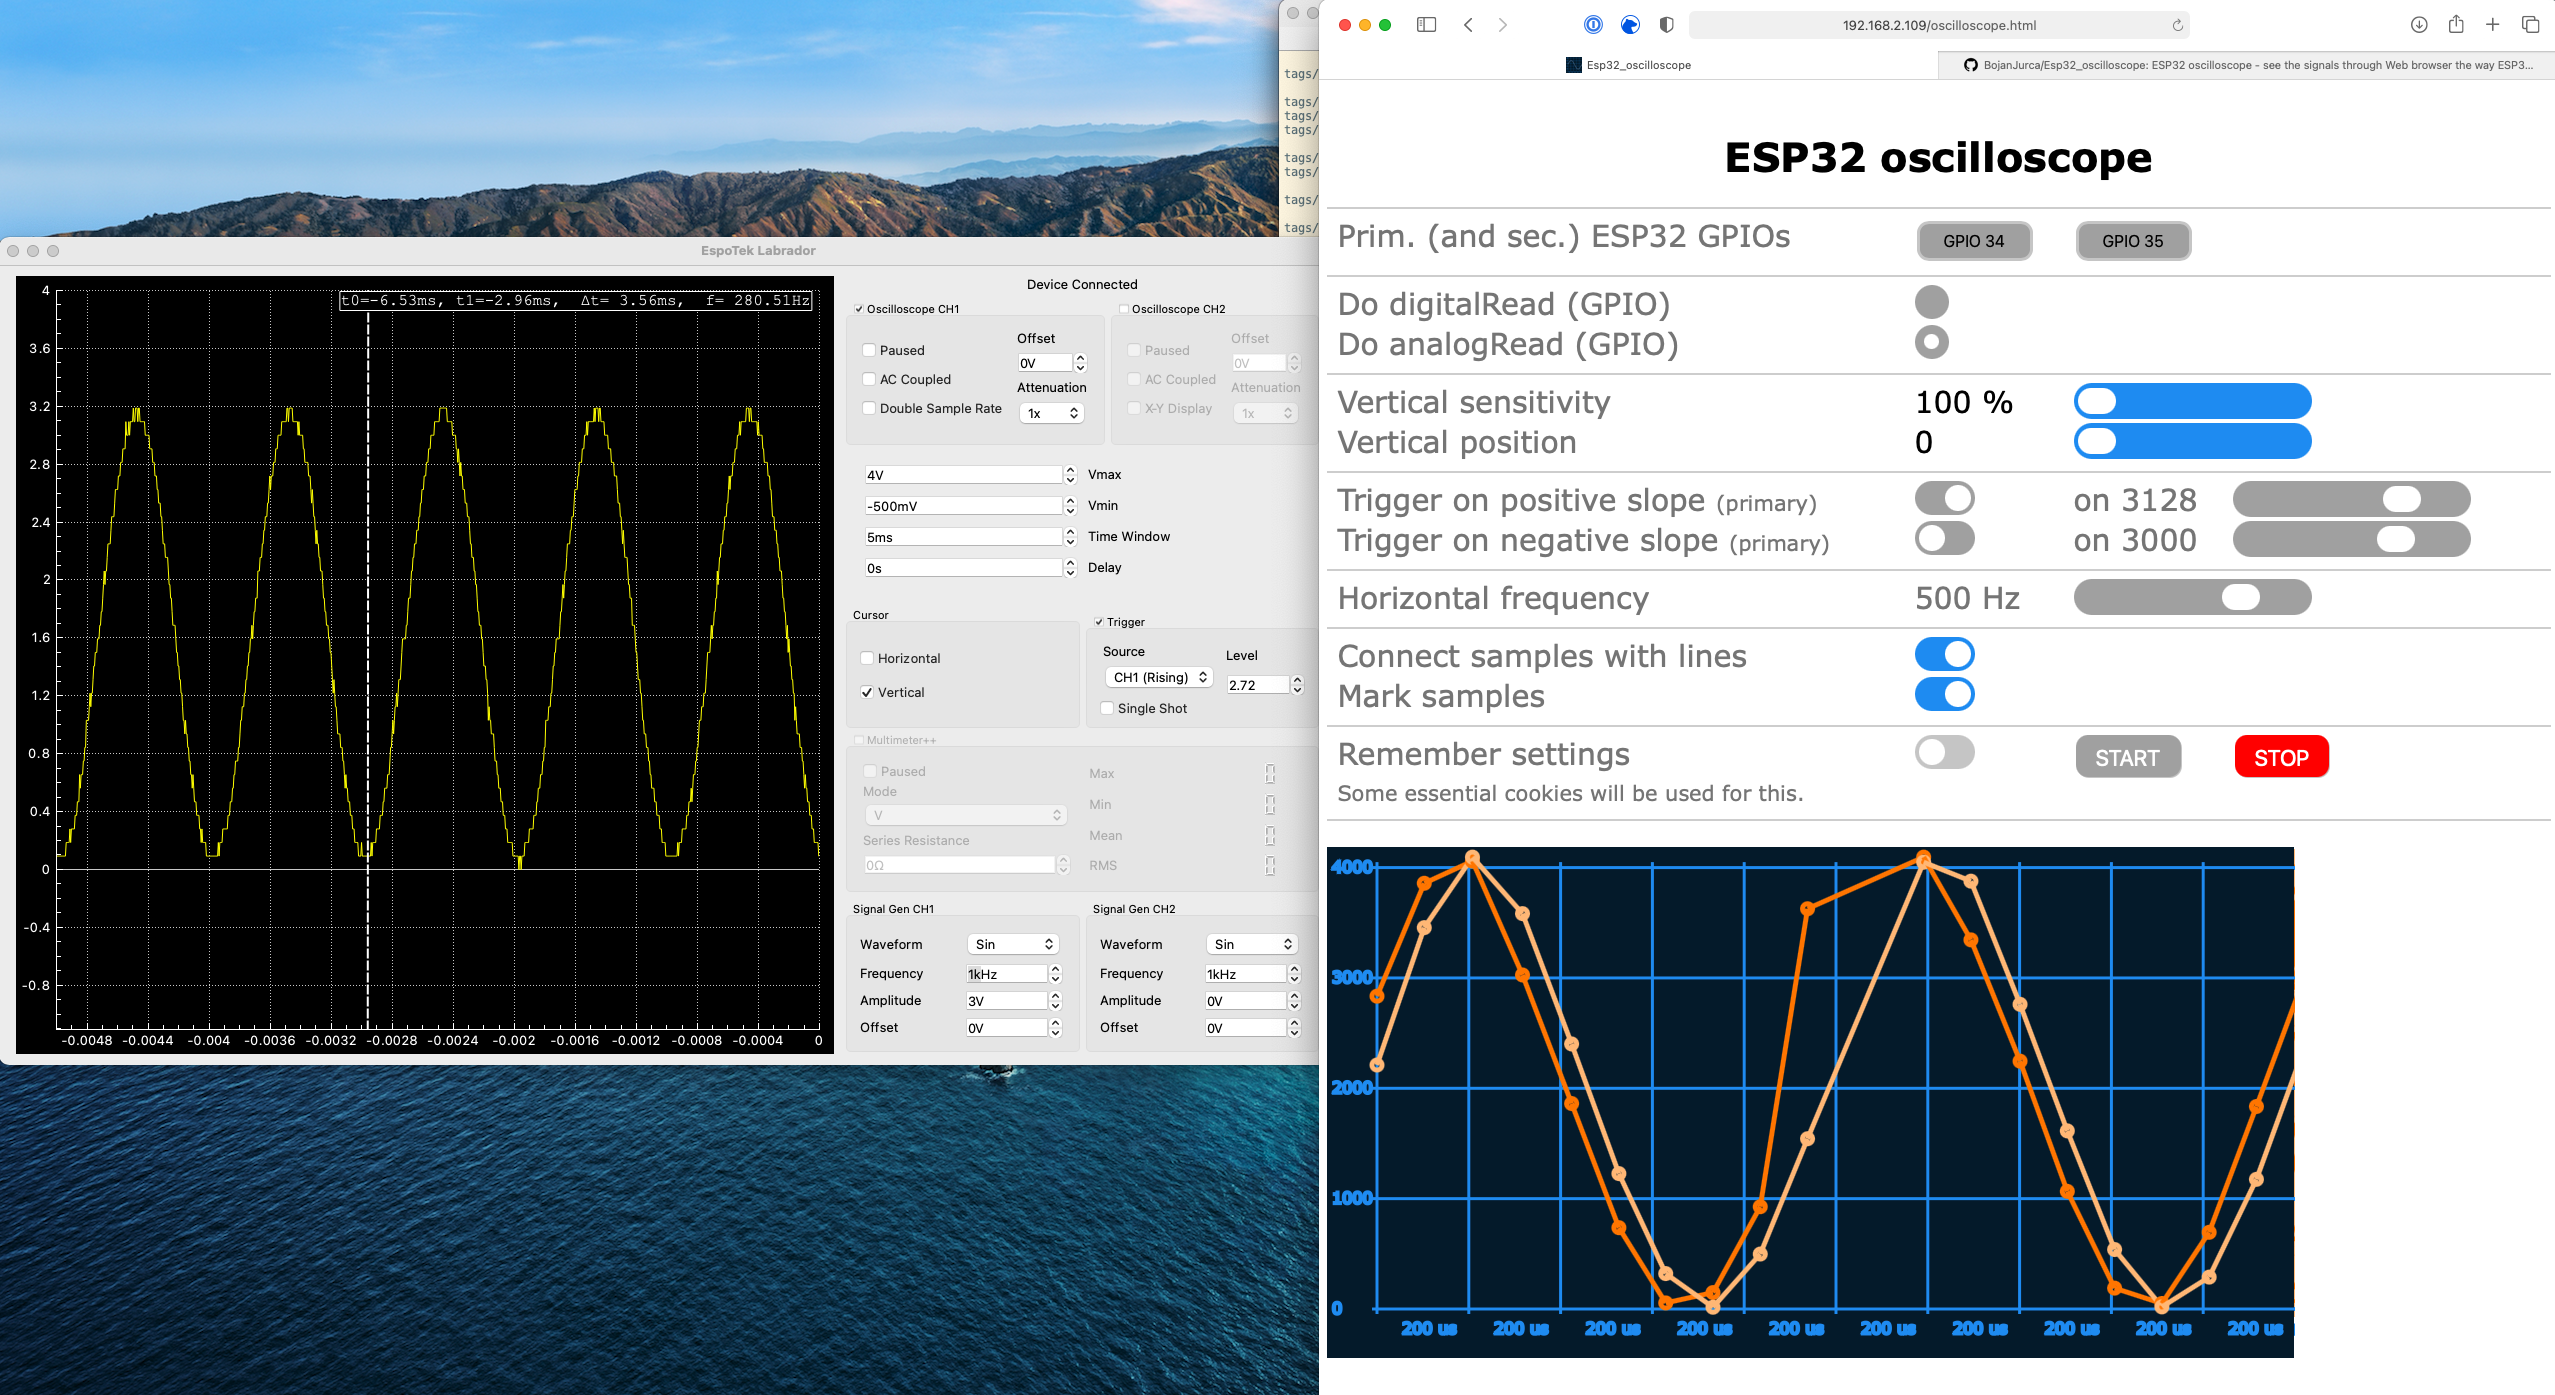
Labrador vs. ESP32 Oscilloscope
- You must use ADC1 to measure analog signals while using the Oscilloscope. As ADC2 pins are used by the WiFi functionality. I attempted to use GPI02 as it was in the original image, and it wouldn’t work. I switched to an adjacent pin, same issue. Switched to ADC1 (8 channels: GPIO32 - GPIO39) and everything worked as one would expect.
- The primary and secondary waves show a phase shift, which isn’t correct. This is more an artifact of attempting to draw two signals.
- The “Horizontal Frequency” threw me for a loop. The title is correct, however, its easier for me to think in the time domain. It will make sense if you set the “Horizontal Frequency” to the frequency of the signal and you will see one period. If you increase the frequency, you see less of a period…I wanted to increase the “number” to see more periods, instead you decrease the “number”. To see 5 periods of a 1Khz signal, you set the Horizontal Frequency to 200Hz?
- It appears that the numbers for “Trigger on…” are for sample values, meaning they range from 0-4095, which makes sense for a 12-bit ADC.
Here is one more screenshot, showing a Labrador 5Khz signal and how the ESP32 displays it.
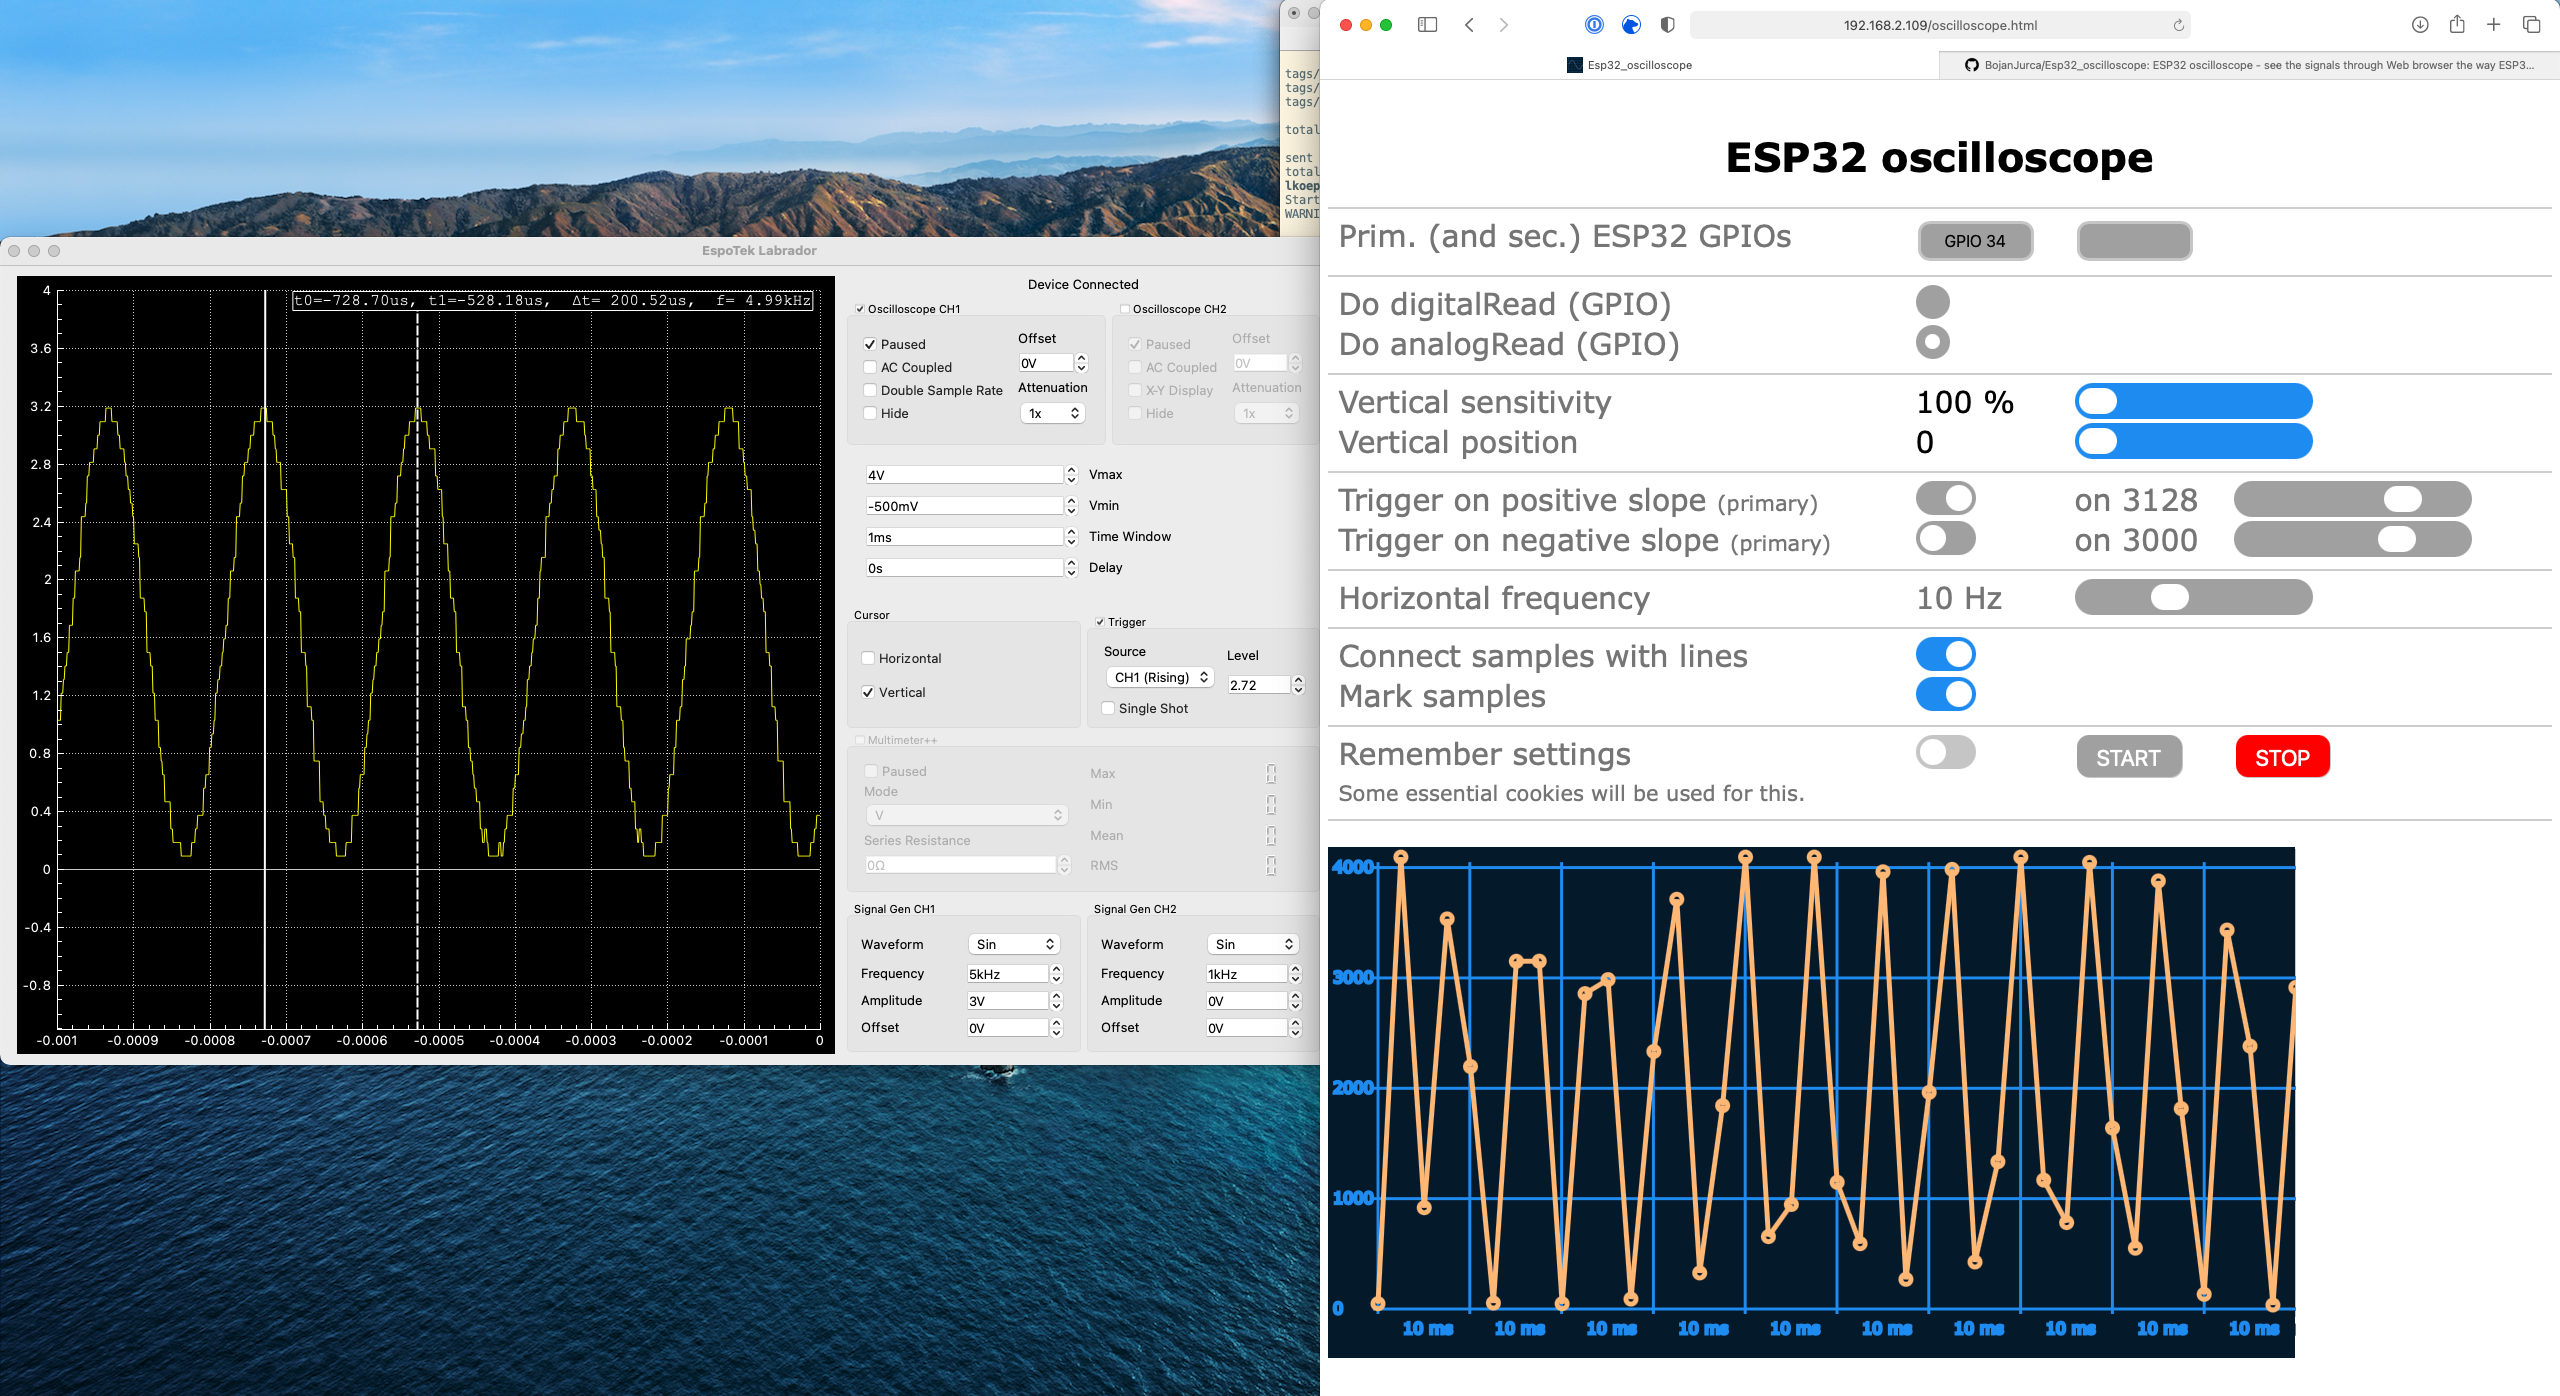
Labrador vs. ESP32 Oscilloscope at 5Khz
Sources#
- ESP Oscilloscope
- If Tools -> Partion Not Showing “That Tools > Partition Scheme menu is a custom board option, meaning it is defined on a per-board basis. For some reason, certain of the ESP32 boards have this custom board option, but not all of them. So if you were to select something like Tools > Board > Robot Zero One, you would then see that menu appear.”
- Deep Dive on Partition Tables
- man ftp Just in case you forgot how to ftp via the commandline
- Reference for ESP32 DEVKIT
- ESP32 Sketch Data Upload for FAT File System Before I understood the second bullet, which is “Tools -> Partitions shows up on a board basis…” I did a lot of searching on FAT partitioning. This is an interesting link.
Board Used:#
I bought the HiLetGo version of the ESP32-S board on Amazon for $10.99. I wanted an inexpensive board to test out using the ESP32 Oscilloscope for two reasons:
- It would be inexpensive for students wanting a cheap oscilloscope
- If it didn’t work, it wouldn’t be a significant loss
The specific issue I had with this board was finding the right pinout. I believe it is this one, that I found on the Fritzing website
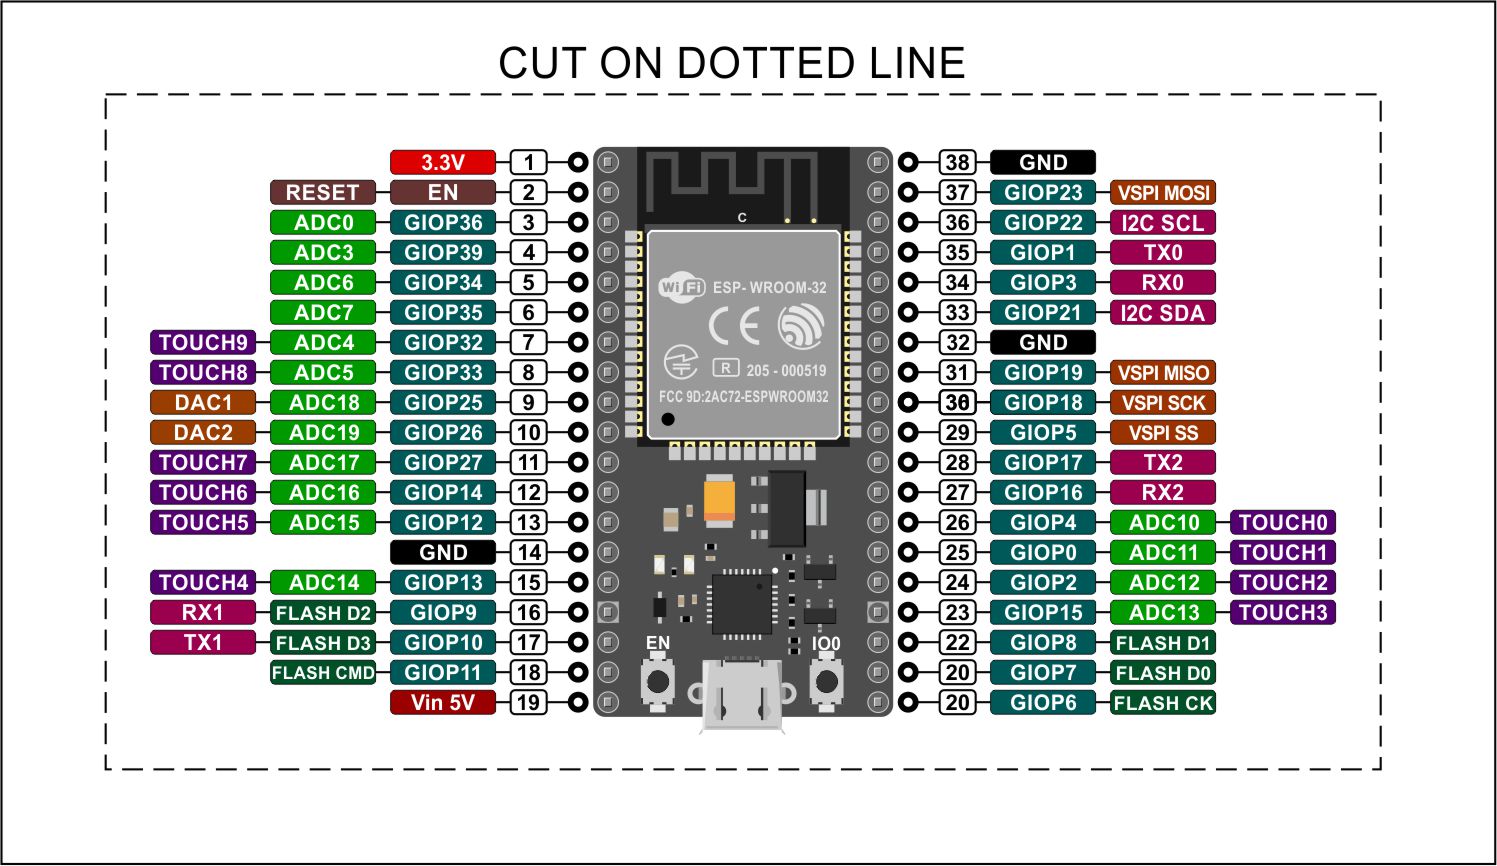
Pinout for HiLetGo ESP32-S
Comments on Setup Instructions in Github README#
- Copy all files in this package into Esp32_oscilloscope directory. The best thing to do is to use git clone to copy the folder on to your computer
- Open Esp32_oscilloscope.ino with Arduino IDE. No issues with this step
- Find and change YOUR-STA-SSID to your WiFi SSID and YOUR-STA-PASSWORD to your WiFi password. No issues with this step
- Oscilloscope uses FAT file system so select one of FATFS partition schemas (Tools | Partition scheme | …) Big Issue! Tools | Partion only appears for select boards. AND you must find one that has the FATFS file system. I was able to use ESP32 DEV Module as my board. It has the necessary FATFS file system. (See image)
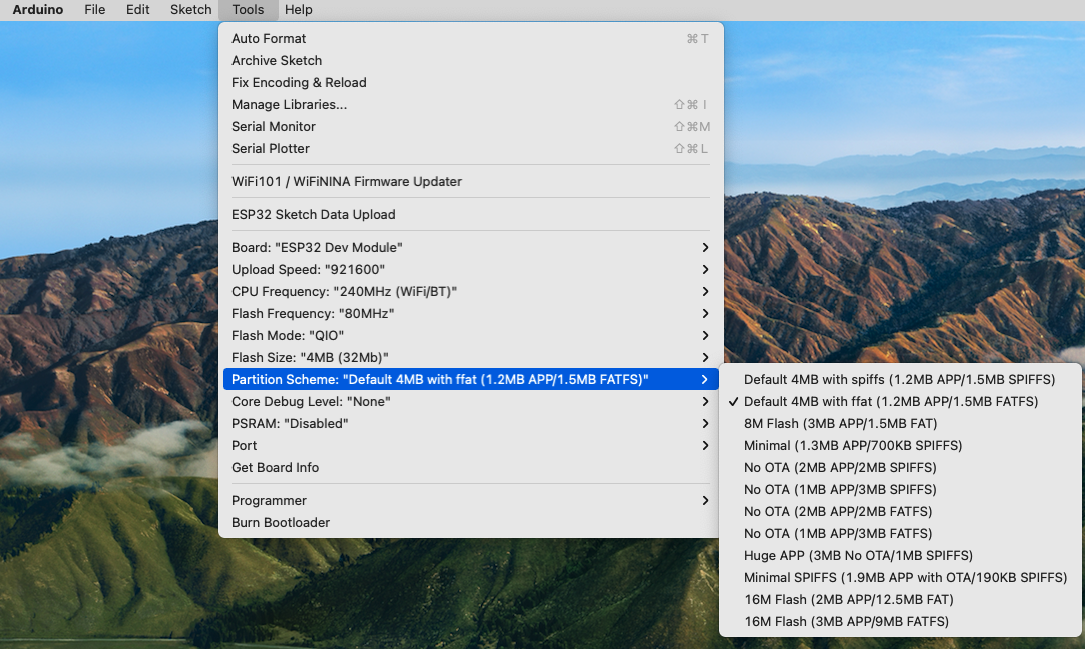
Arduino Tools | Partition Image
- Compile sketch and run it on your ESP32 for the first time. Doing this, ESP32 flash memory will be formatted with FAT file system. WARNING: every information you have stored into ESP32’s flash memory will be lost. On the HiLetGo board, I had to press Boot for several seconds, just prior to the Arduino attempting to connect. Keep pressing until success or failure. (For the latter, just keep trying.)
- FTP to your ESP32 (By using ftp command line utility or Windows explorer. User name and password are not required) and upload the following files into /var/www/html directory:This worked once I found a system (Kubuntu) which had a ftp program. Instructions are perfect. Use cd in ftp to change directories on remote system.
C:\esp32_oscilloscope>ftp YOUR-ESP32-IP Connected to 10.0.0.3. 220-ESP32 FTP server - everyone is allowed to login User (10.0.0.3:(none)): 331 enter password Password: 230 logged on, use "/" to refer to your home directory "/" ftp> put android-192.png /var/www/html/android-192.png 226 /var/www/html/android-192.png transfer complete ftp> put apple-180.png /var/www/html/apple-180.png 226 /var/www/html/apple-180.png transfer complete ftp> put oscilloscope.html /var/www/html/oscilloscope.html 226 /var/www/html/oscilloscope.html transfer complete ftp> ls 200 port ok 150 starting transfer -r-xr-xrwx 1 owner group 1818 Aug 24 10:47 /var/www/html/android-192.png -r-xr-xrwx 1 owner group 1596 Aug 24 10:47 /var/www/html/apple-180.png -r-xr-xrwx 1 owner group 39515 Aug 24 10:47 /var/www/html/oscilloscope.html 226 transfer complete ftp> - Open http://YOUR-ESP32-IP/oscilloscope.html with your browser.
Additional Notes:#
Success on the Arduino Serial Monitor looks like this:
clk_drv:0x00,q_drv:0x00,d_drv:0x00,cs0_drv:0x00,hd_drv:0x00,wp_drv:0x00
mode:DIO, clock div:1
load:0x3fff0018,len:4
load:0x3fff001c,len:1216
ho 0 tail 12 room 4
load:0x40078000,len:10944
load:0x40080400,len:6388
entry 0x400806b4
[        27] [file system] mounted.
[        66] [network] starting WiFi
[        66] [network] [STA] connecting STAtion to router using DHCP.
[       186] [network] [STA] WiFi client started.
[       198] [ftpServer] started on 0.0.0.0:21.
[       198] FTP server has started.
[       209] [httpServer] started on 0.0.0.0:80.
[       209] WEB server has started.
[      2284] [network] [STA] connected to WiFi WiFiG.
[      2304] [network] [STA] got IP address: 192.168.2.109.
Success on the Arduino Compilation/Upload Step looks like this:
Sketch uses 781970 bytes (59%) of program storage space. Maximum is 1310720 bytes.
Global variables use 38964 bytes (11%) of dynamic memory, leaving 288716 bytes for local variables. Maximum is 327680 bytes.
esptool.py v3.0-dev
Serial port /dev/cu.usbserial-0001
Connecting.....
Chip is ESP32-D0WDQ6 (revision 1)
Features: WiFi, BT, Dual Core, 240MHz, VRef calibration in efuse, Coding Scheme None
Crystal is 40MHz
MAC: 24:0a:c4:58:e9:c4
Uploading stub...
Running stub...
Stub running...
Changing baud rate to 921600
Changed.
Configuring flash size...
Auto-detected Flash size: 4MB
Compressed 8192 bytes to 47...
Writing at 0x0000e000... (100 %)
Wrote 8192 bytes (47 compressed) at 0x0000e000 in 0.0 seconds (effective 2817.1 kbit/s)...
Hash of data verified.
Compressed 18656 bytes to 12053...
Writing at 0x00001000... (100 %)
Wrote 18656 bytes (12053 compressed) at 0x00001000 in 0.2 seconds (effective 909.8 kbit/s)...
Hash of data verified.
Compressed 782080 bytes to 475578...
Writing at 0x00010000... (3 %)
Writing at 0x00014000... (6 %)
Writing at 0x00018000... (10 %)
Writing at 0x0001c000... (13 %)
Writing at 0x00020000... (16 %)
Writing at 0x00024000... (20 %)
Writing at 0x00028000... (23 %)
Writing at 0x0002c000... (26 %)
Writing at 0x00030000... (30 %)
Writing at 0x00034000... (33 %)
Writing at 0x00038000... (36 %)
Writing at 0x0003c000... (40 %)
Writing at 0x00040000... (43 %)
Writing at 0x00044000... (46 %)
Writing at 0x00048000... (50 %)
Writing at 0x0004c000... (53 %)
Writing at 0x00050000... (56 %)
Writing at 0x00054000... (60 %)
Writing at 0x00058000... (63 %)
Writing at 0x0005c000... (66 %)
Writing at 0x00060000... (70 %)
Writing at 0x00064000... (73 %)
Writing at 0x00068000... (76 %)
Writing at 0x0006c000... (80 %)
Writing at 0x00070000... (83 %)
Writing at 0x00074000... (86 %)
Writing at 0x00078000... (90 %)
Writing at 0x0007c000... (93 %)
Writing at 0x00080000... (96 %)
Writing at 0x00084000... (100 %)
Wrote 782080 bytes (475578 compressed) at 0x00010000 in 7.0 seconds (effective 899.2 kbit/s)...
Hash of data verified.
Compressed 3072 bytes to 127...
Writing at 0x00008000... (100 %)
Wrote 3072 bytes (127 compressed) at 0x00008000 in 0.0 seconds (effective 1001.5 kbit/s)...
Hash of data verified.

Leaving...
Hard resetting via RTS pin...