Where I discuss how to implement and use git to develop code in C for the Arduino Uno.
Sources#
Introduction#
In this post, I’ll describe how to use git to add the Lab content. I’ll also offer some guidance as to how to use git in your own projects. I am not a git expert and I’ll try not to stray too far from status->add->commit-push…
Big Picture#
Git is a version management application. It allows you to make incremental changes in your code, saving and commenting those changes then providing the capability to roll-back your changes should you desire. It is also the version management system used by software professionals to manage extremely large software deployments with teams measuring in the thousands. I’m describing git from the former example…
Install Git (Optional, if not already installed)#
The best way to use this repository (or any Github repository) is to install git and add the repository by cloning. This allows you to update it easily when the repository is updated.
Windows#
Windows doesn’t have a standardized Unix/Linux environment, unless you’ve installed WSL. In this case, we’ll install Git for Windows. Click on Download and save the file to your Downloads directory. Install Git for Windows by double-clicking on the downloaded file. It will ask a series of questions and for now go with the defaults.
Once installed, go to the Windows search bar and enter git <cr>, which will start git in the command line. Enter:
git --versionto confirm git was installed.
macOS#
For macOS systems, git probably won’t be installed. To test that:
git --versionIf you don’t get a message showing git and its version, it isn’t installed. To install use: (*Note: If you don’t have homebrew already installed, see this )
brew install gitOnce installed, perform the git –version command in the command line.
Linux (and Windows Subsystem for Linux)#
For Linux systems, git is probably already installed. To test that:
git --versionIf you don’t get a message showing git and its version, it isn’t installed. To install use:
sudo apt install gitOnce installed, perform the git –version command in the command line.
Get the Lab Content#
It is important to follow the next steps exactly, as git will make certain assumptions about the folders in the repository. A mis-spelled folder could create a lot of work, later on. Open a command line terminal such as Windows Terminal in Windows, Konsole in Linux or Terminal in macOS. Change to your main documents folder, typically called Documents or use the folder where you keep your school work. This action will create a subfolder in your desired folder for this class.
# copy and paste this command in your terminal application
cd Documents
Download the 10C Class repository by using the following command.
# copy and paste this command in your terminal application
git clone https://github.com/lkoepsel/Labs_10C_Class.git
Git will create a folder called Labs_10C_Class in your Documents or school work folder and will download the repository into the folder.
Now go into the Labs folder:
# copy and paste this command in your terminal application
cd Labs_10C_Class
This next step will create your development folder called dev, by duplicating templates. This will serve as your development folder and is ignored by git. Doing all of your work in this folder is very important as changes made in other folders will cause git to fail if an update is needed.
DO NOT make changes in the templates folder as those changes will be lost if the class repository is updated. Use the dev folder for your classwork.
# copy and paste this command in your terminal application
cp -r templates dev
Find Your Serial Connection#
Just as we did in the previous step, when we tested our setup with avrdude, we need to ensure we are communicating the correct serial port. If you don’t remember or need to confirm your Uno serial port, do the following:
Connect your Arduino Uno to your computer and open the Arduino IDE. Go to Tools -> Port -> serial port (Arduino Uno) to confirm the port for the Uno. In Windows, it was COM3, in macOS, it was /dev/cu.usbmodem3101 and in Linux, it was /dev/ttyACM0. Write down this port name as you will need it for the step later using the averdude command.
Note: This port name may change if you plug the serial cable into another physical port.
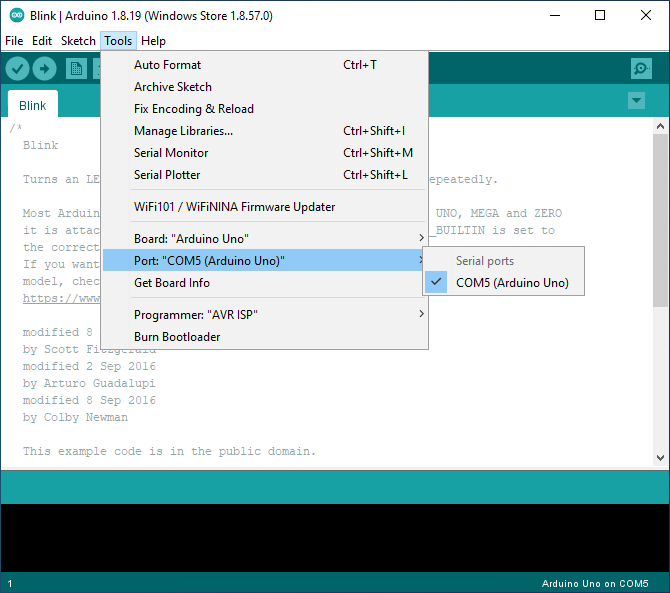
Use the Arduino IDE to determine Serial Port
Set the Serial Port in env.make#
The env.make file contains local information as to your specific computer and Uno combination. It is not tracked by git, as we want to be able to customize it for our specific system. Therefore, we need to do the following:
- Copy the env.make file from the Labs 10C repository
- Save it to the root level of our repository
- Change the serial port to our specific port
Ultimately, we want to make sure the Serial variable points to the correct port. To do this, use your code editor (Sublime Text, Notepad++, Kate etc) and open the env.make file. See image below as to how to find it on the repository:
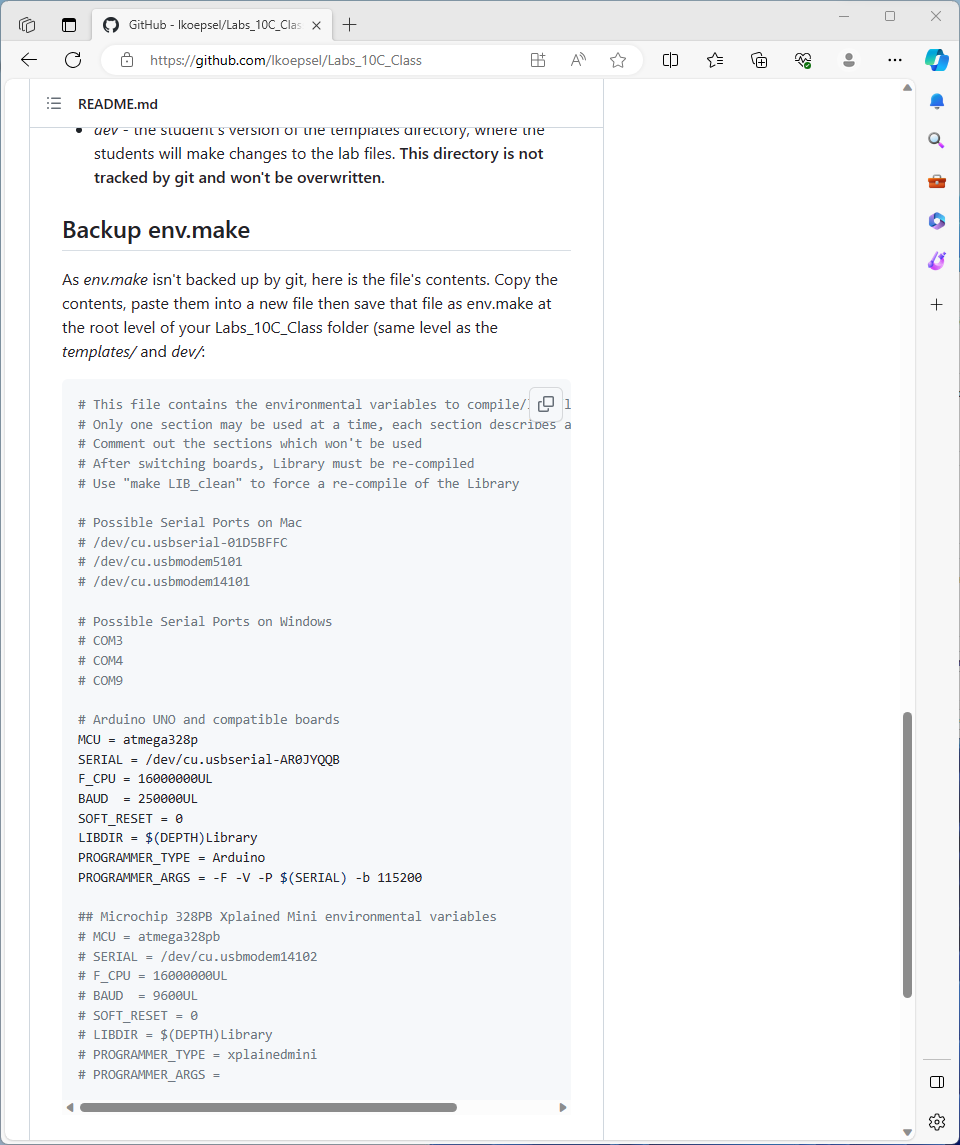
env.make contents on Git repository
In the file, you will see the lines below, change the value for SERIAL to match the one you saw with the Arduino i.e, COM5, /dev/cu.usbmodem3101, /dev/ttyACM0 etc. Make sure you are changing the lines which are not commented, the commented lines will have a "#" in front of each line.
# Arduino UNO and compatible boards
MCU = atmega328p
SERIAL = /dev/cu.usbmodem3101
F_CPU = 16000000UL
Save the file and go on to the next step!
Next Step#
OPTIONAL Content#
The following content is optional and can help you understand the git process in greater detail.
An overview on how to clone a repository (Optional)#
This overview uses the 10C Class repository and shows more detailed steps as how to clone it. Use this guide if you wish to better understand how to clone a repository.
In your browser, go to the Labs github page.
- Click on the green code button
- Make sure HTTPS is in bold and has a red line under it
- Click on the end of the line with the two over lapping boxes sit (copy icon).
This will copy the name of the repository into your clipboard.
Github Page for the 10C Labs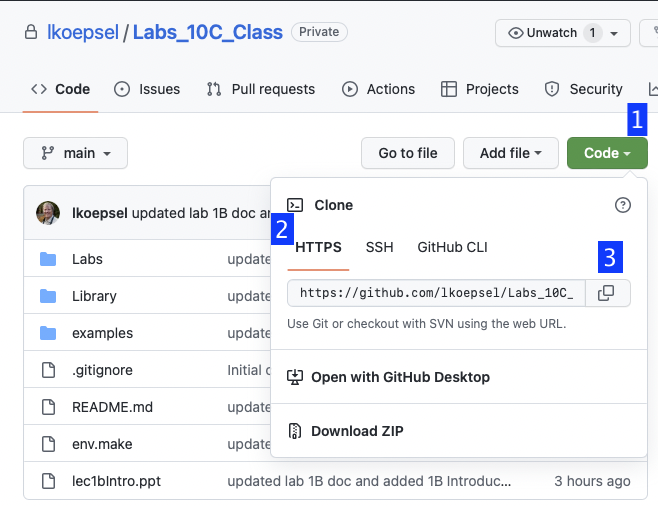
In your terminal program:
- Type “git clone " (make sure there is a space after clone)
- Right-click and select Paste.
- Confirm you have the following text below
- Press return
# copy and paste this command in your terminal application
git clone https://github.com/lkoepsel/Labs_10C_Class.git
Git will create a folder called Labs_10C_Class in your Documents or school work folder and will download the repository into the folder.
An Overview of the the git Process (Optional)#
The application, git, is a tremendous tool to use and one which will be important to know as an engineer. This section provides some light guidance, if you wish to begin using it yourself.
The process of using git is the process of supporting version tracking in code development. For example, you have a small application consisting of two files called main.c and main.h. The code has been working, however, you want to make some substantial changes. Here is an overview so you can see a simple git process:
- The folder for the two files is called myApp so you cd into myApp:
cd myApp- You initialize the folder to be tracked by git:
git init
Initialized empty Git repository in /Users/lkoepsel/Documents/myApp/.git/- You make changes to the files and to confirm those changes have been seen
git status
On branch main

No commits yet

Untracked files:
  (use "git add <file>..." to include in what will be committed)
  main.c
  main.h

nothing added to commit but untracked files present (use "git add" to track)- You add the files to be “staged”. (At present we’ll ignore this concept, it simply means the two files haven’t been added to the repository yet. So let’s add them.) -A means, all changed files.
git add -A- This is the big step, now let’s commit them so that the repository automatically creates a new version of the code.
git commit -m "This is my first commit"
[main (root-commit) 2daa3fb] This is my first commit
 2 files changed, 2 insertions(+)
 create mode 100644 main.c
 create mode 100644 main.h
This is the process of tracking your code, and you perform these steps as often as you want. Too often and it becomes tedious, however, not enough and you will rue the day. (Speaking from experience.)
You are now ready to work!