Where I expand on creating a web server application on a Pi Pico W by incorporating web sockets.
Repository#
Introduction#
In the first part of this entry, I introduced the ability to develop an HTTP-based web server using solely HTML to control the Pi Pico pins. I focused on HTTP protocol as you can write everything in the relatively simple language, HTML and it works. I used checkbox or radio button inputs to a form to control pins on the Pico. This is a far more simple approach than using JavaScript. It does introduce some significant delays as each form submission must make a complete round trip (i.e. a page reload).
This round-trip can be difficult for the user, as the delay may lead to double-clicking or the feeling of a non-responsive interface. Another description of this protocol, is request/response. The browser makes a request and the server fulfills the request with a response. The communication is half-duplex where communication is only one-way at a time and each communication requires a new series of handshaking.
For many embedded projects, this type of protocol is acceptable or even desired. For example, if a browser is used to setup a board and the board then runs on its own for a period of time. A time and temperature logging application would be a good example. The setup page on version 7 in the previous entry is a great example as well. (I recommend you install it and look at the first page in comparison to the second. The former does quite well with a half-duplex communication link, while the second page does not.)
Another approach would be to keep the communication open between the browser and the server and allow full-duplex communication. This would be ideal for an application where the user requires immediate feedback as to what they have done. The protocol for this approach is called web sockets.
Web Sockets#
A web socket allows for real-time communication between the browser and the server. You click on a button in the browser and it is transmitted to board (no form, no submit button). This is very useful where the user desires to have an immediate response. To use web sockets, you need to use JavaScript, which makes the software, a bit more complicated.
I’m going to go through this slowly, for some it might be too slow, however, I believe it will ensure the best understanding of how to implement this versatile protocol. I’ll also add the capability to communicate with the board via a desktop Python program. This allows for greater automation between the desktop computer and the Pi Pico W board.
Websocket Development Tools#
MicroPython Code Editor#
I prefer and strongly recommend Sublime Text as I also have some great automation tools for using CoolTerm and MicroPython. Or use what you normally use for editing code.
Web Development Browser#
It is very important to have the ability to view traffic between the browser and the Pico. Doing so, allows you to more quickly fix errors or at least understand why they are occurring. Google’s Chrome browser has excellent web development tools and in my case, I’ll be using the Arc, which is Chrome-based, however, has superior privacy controls.
MicroPython Utilities#
There are two utilities which I discuss on the microserver repository. The MicroPython utility mpremote and my build application, mpbuild. I discuss how to use them on the repository and I strongly recommend you spend some time with them, particularly the commands mpremote littlefs_rp2 and mpbuild buildfile to erase and install a microserver application. You will need to use the command line for both of these utilities, I use Warp on macOS. Alternatives are iTerm2 or Terminal on macOS, Terminal on Windows and konsole on Linux.
CoolTerm#
CoolTerm is my recommended serial application for interacting with the Pico. Make sure it is open, the computer is connected to the Pico and CoolTerm is connected to the right serial port.
Websocket Application: Echo#
This is a very simple application, which the microdot developer uses to demonstrate a web socket. It accepts a line of text and echo’s the line of text back to the browser using a web socket. Use mpremote littlefs_rp2 to delete the files on the Pico, then install this application with mpbuild mpbuild/files_v1ws.txt.
Once the file is loaded on the board, you reset the board and go to the IP address displayed in your CoolTerm window. It will be the IP address, for example 10.0.1.6 followed by a :port address as in :5000 (the default port for Microdot). The page will look like this:
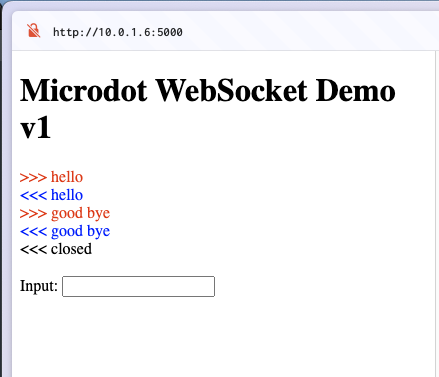
echo page showing web socket interaction
However, I recommend you press Alt-Cmd-Ior View->Developer->Developer Tools to view the output in your browser. Which in this case, it will look like this:
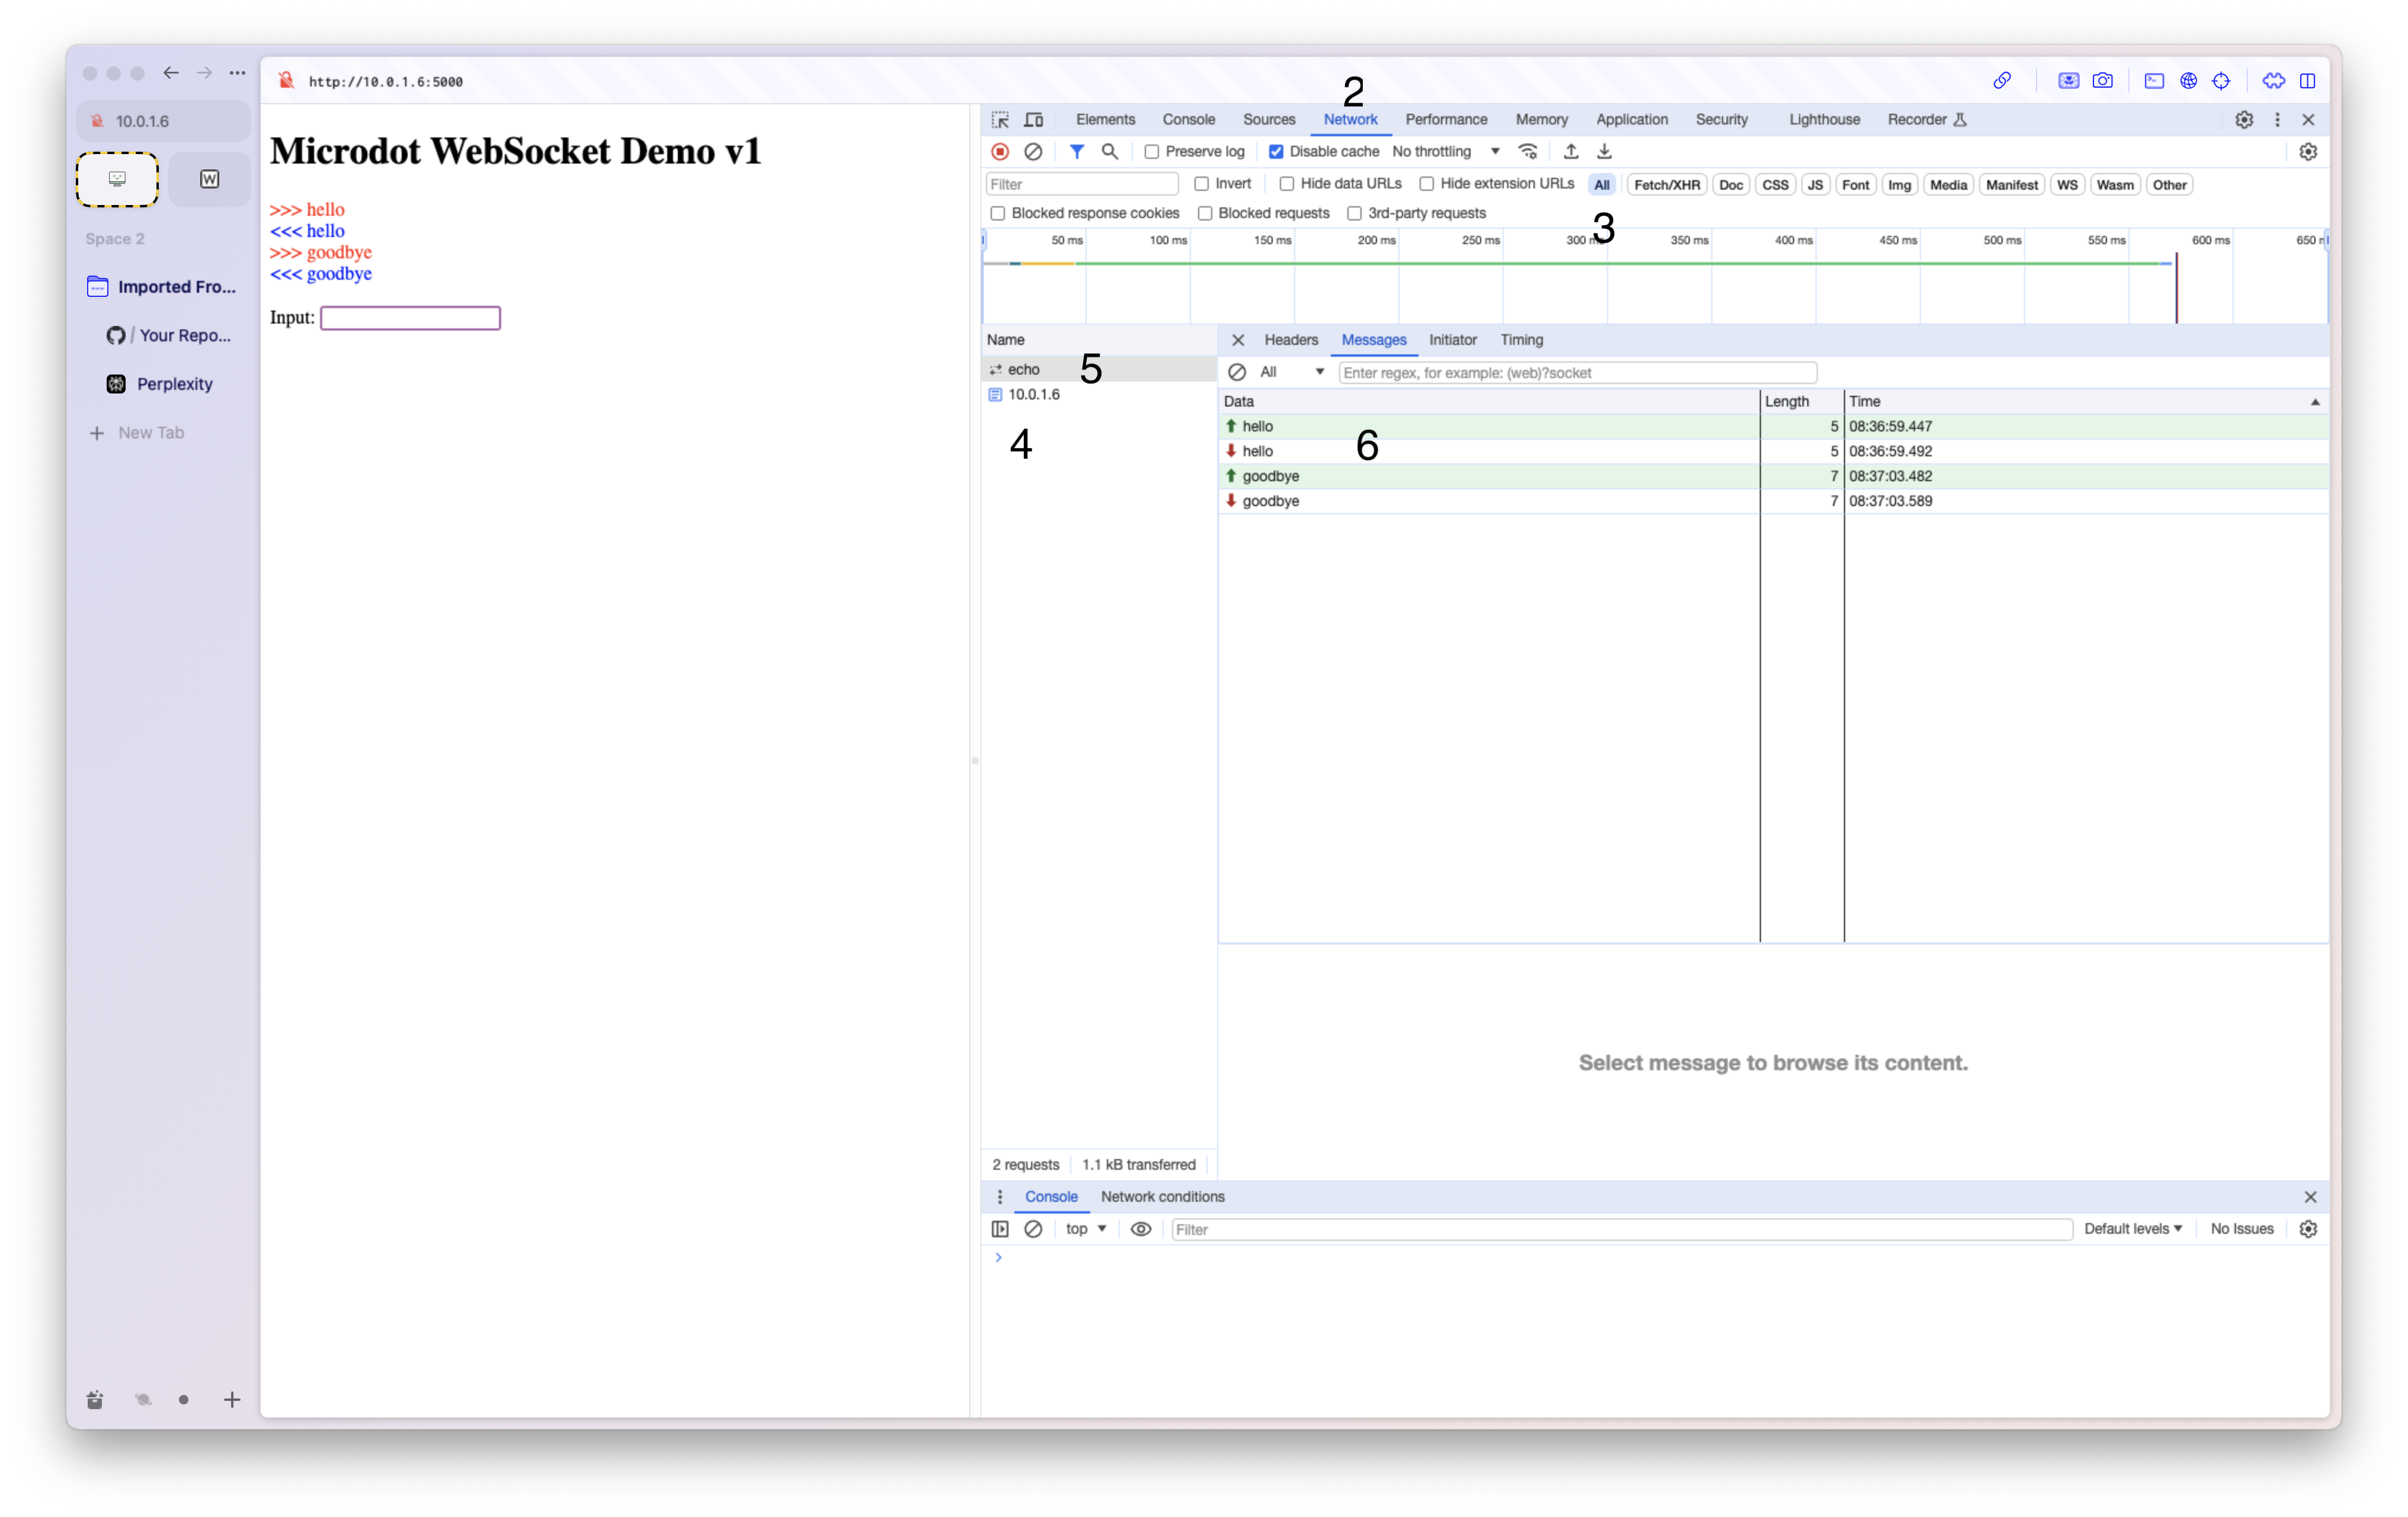
echo page with Dev tools
To get to this specific view, do the following:
- Click on View->Developer->Developer Tools to show the window
- Click on Network tab at the top
- Ensure All is clicked showing all data (second line from top)
- Do a refresh of the browser to display all activity, you will now see all of the files sent under Name
- Click on echo for the web socket URL, which will display Headers Messages Initiator Timing in the adjacent window, click on Messages to show the JSON data being exchanged.
- Click on a specific line if you wish to see more details
Web Application Demo v2#
In the following applications, I’ll begin to discuss in greater detail as to what the code is doing. In this first example, we have a very simple on/off demonstration. Click the bulb in yellow, an LED lights, click the “empty” or blank bulb, the led will turn off.
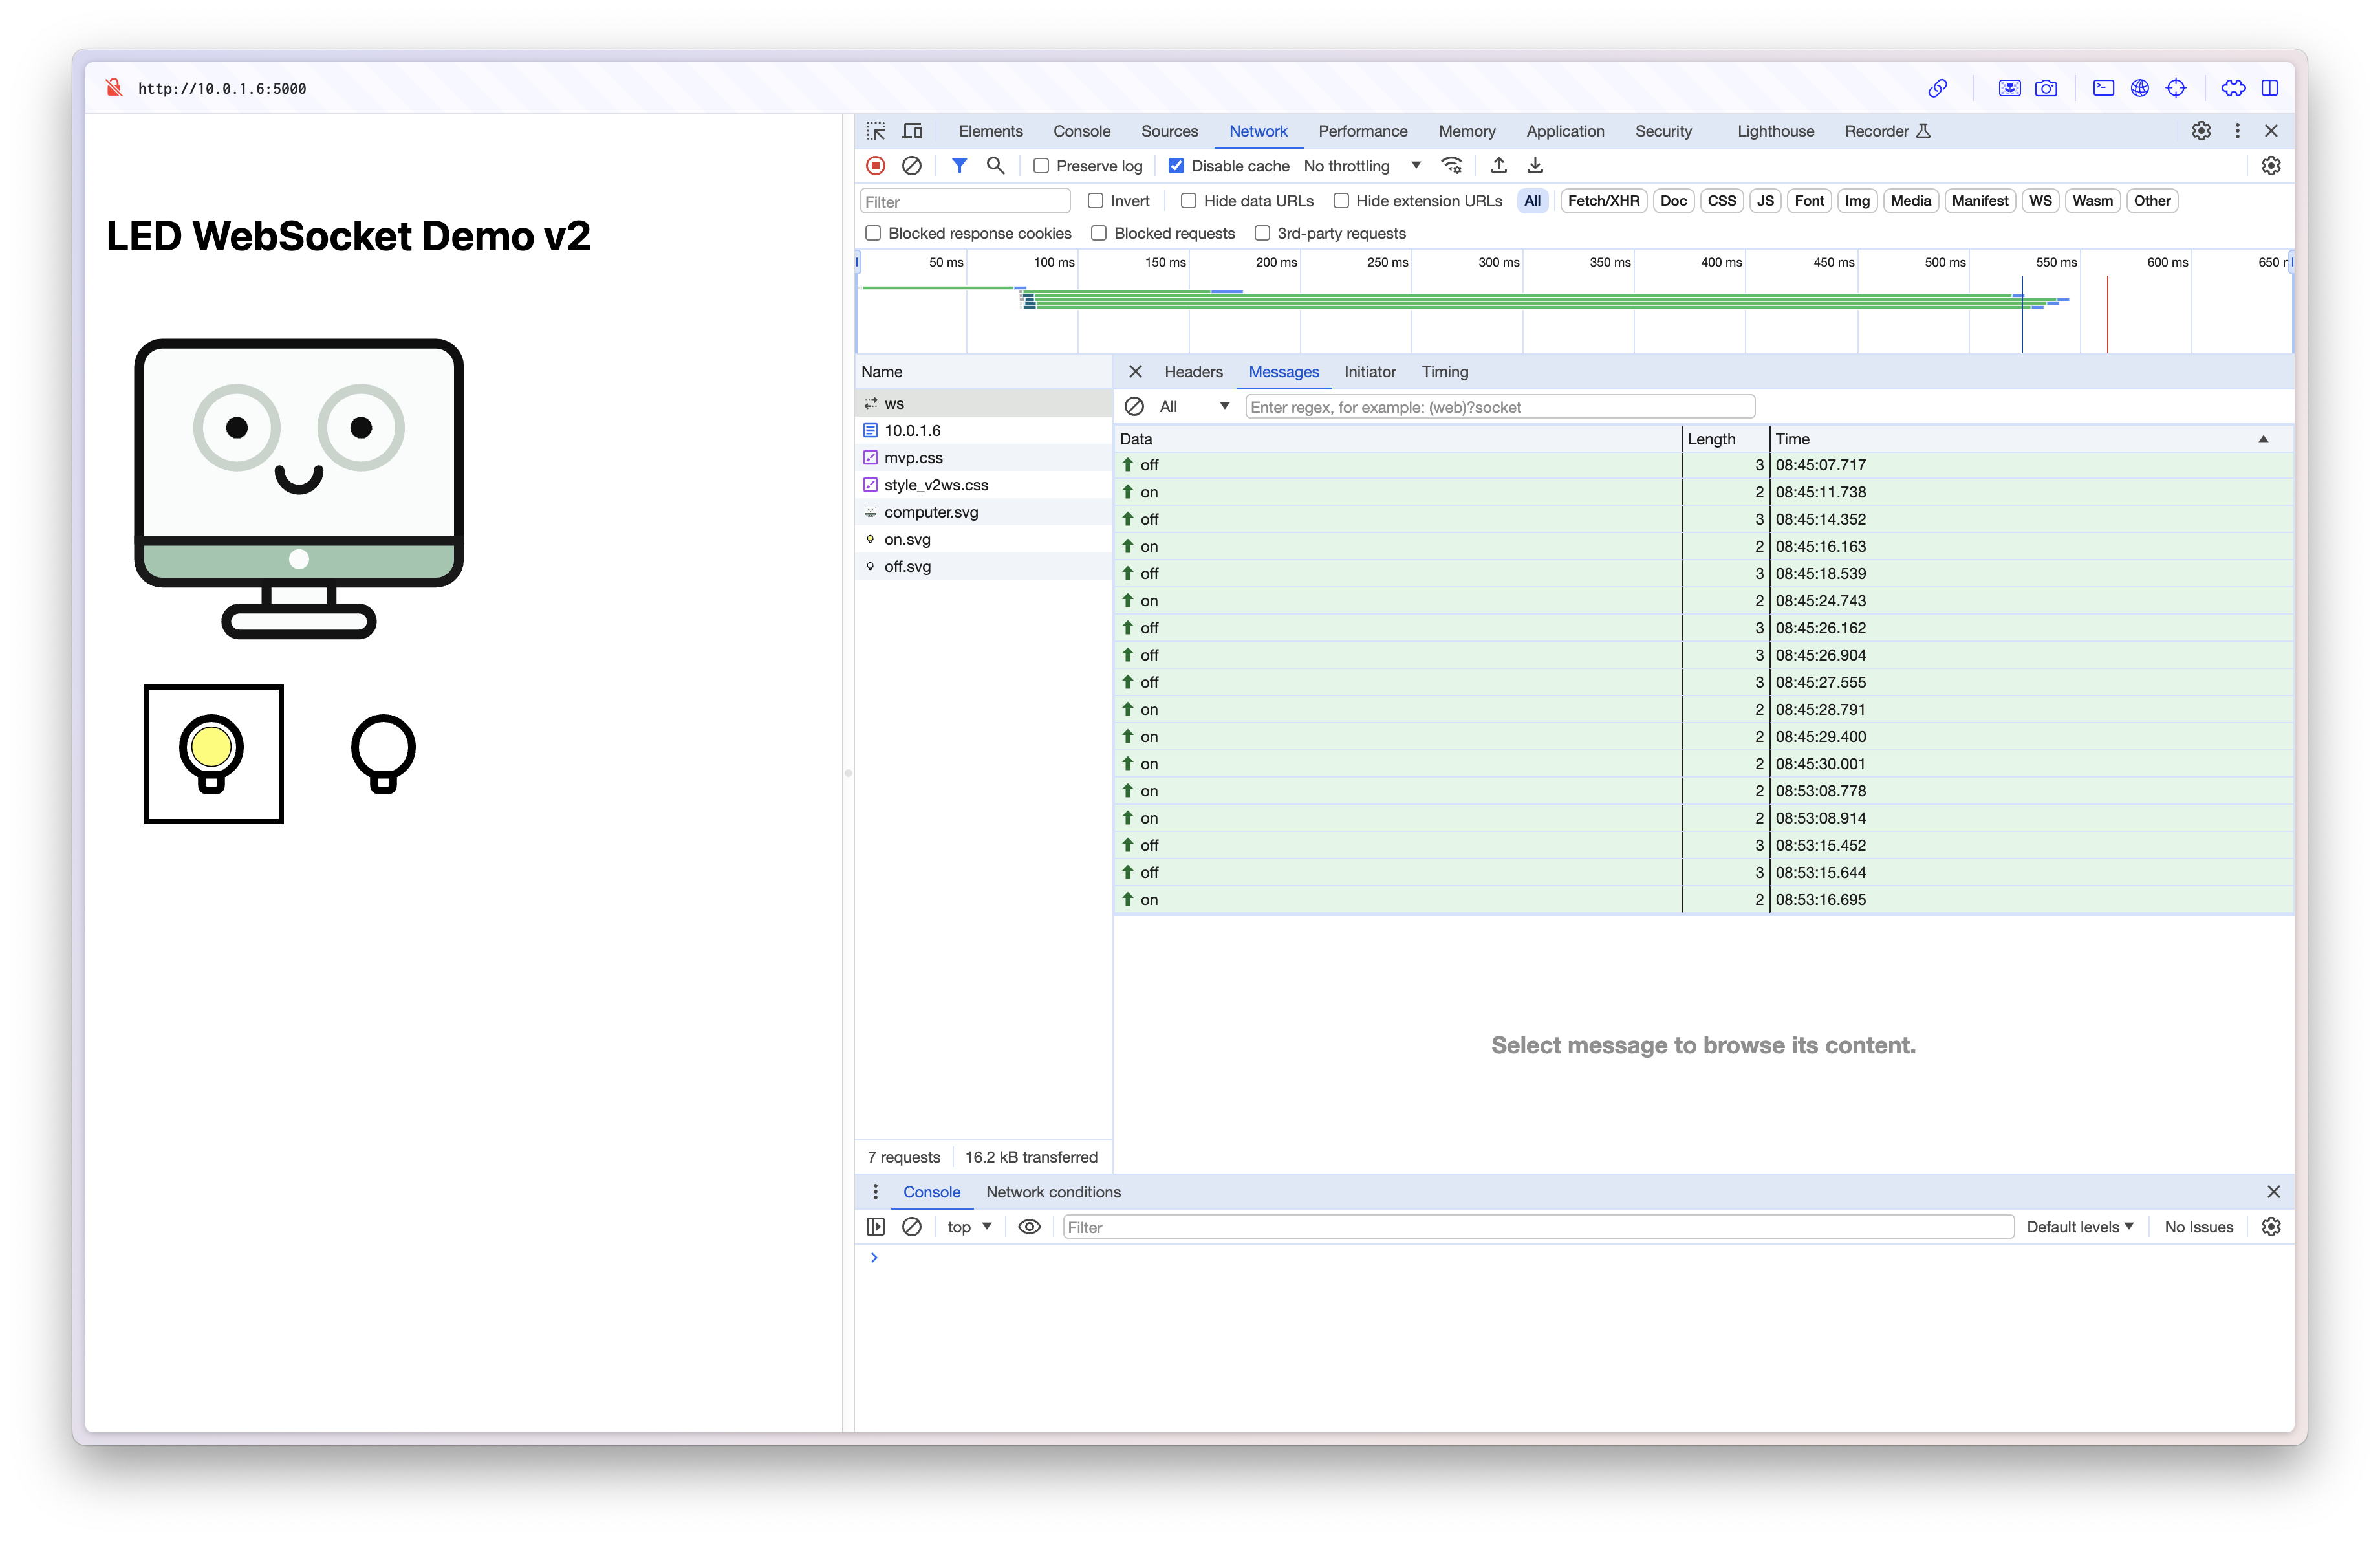
Demo v2
As you can see from the image, each time I click, I get a corresponding on or off in the web socket (ws) feed. And by clicking as fast as possible, I was able to get a roughly 20ms time delta (08:53:15.644 - 08:53:15.452) between clicks. How’s that for responsive!
MicroPython Review - light_leds_v2ws.py#
The critical code for the web socket is this:
|
|
A very simple check of the data being received. If the board gets an “on”, it turns the LED on, and “off”, it turns the LED, off. Note the object builtin is the on-board LED.
HTML Review - index_v2ws.html (html)#
I use a radio button with a value of “on” or “off” to set the value being communicated. The html code is this:
|
|
Note that I use a class of “visually-hidden” to replace the radio buttons with images. This isn’t critical, however, it makes a nicer display.
Javascript Review index_v2ws.html (script)#
|
|
-
Line 3 - creates the JS connection to the web socket. While the python program will request the connection with the @with_websocket decorator, the JS socket object will be used for communication.
-
Line 6 - creates an array called radios, in which are all of the radio buttons identified on the page. In this case, there are two, one with the value on and the other with the value, off.
-
Lines 10-13 - this code is a listener, which listens for a change in state of any of the radio buttons. When that happens, it sends the value of that radio button via the web socket.
This works, because grouped radio buttons on a web page, can only have one value or to put another way, “Only one radio button in a given group can be selected at the same time”. When working on code like this, I recommend keeping Mozilla’s web documentation open to particular element.
Refactor#
If you wanted to simplify (refactor), the MicroPython code, you could have the webpage use the values “1” and “0”, instead of on/off. This would simplify the MicroPython code to be:
|
|
The code above works well, however, you do lose the error checking. Either approach works, the refactored version might be valuable in a more complicated situation where you want a faster response. Both versions are now in the light_leds_v2ws.py file.
Web Application Demo v3#
The third demo changes the user interface from one of two bulbs to click to a single link “click” and an image which changes based on the state of the bulb. When you observe the traffic in the Dev Tools, a load of an image is cancelled if it fails to load before the next click. You can see this with a “red circle with an x” to the left of the image as well as the word “(cancelled)” under status.
MicroPython Review - light_leds_v3ws.py#
Almost no change from v2, with the exception the check changes from on/off to true/false. What is unfortunate, is that JS uses lower case true/false vs Python’s use of capital case, True/False, which ensures you have to do exact matching instead of using a boolean (if data:). It also prevents us from refactoring the code to be a single line, as we did in version 2.
HTML Review - index_v3ws.html (html)#
Use a checkbox which returns a value of “true” or “false”. The checkbox remains hidden and the state of the checkbox is the active data element. The HTML code is this:
|
|
Javascript Review index_v3ws.html (script)#
The JS is again a three part program using a checkbox, instead of two radio buttons:
- Create the web socket
- Setup the watch variables
- Execute code based on the state of the checkbox.
|
|
- Line 3 - create the web socket.
- Lines 8-10 - setup the checkbox, similar to the previous radio button. In this case, there is a checkbox, which is checked(true) or not(false). The variable, stateImage contains the image appropriate to the checkbox value. And setStateImage is a function which examines the value stateImage and sets the image accordingly.
- Lines 16-19 - the active code watching the checkbox, setting the image and sending the state.
Web Application Demo v4#
This application makes considerable progress to having great value. It enables you to turn at least four LEDs on and off, using web sockets. Let’s take a look at the interface:
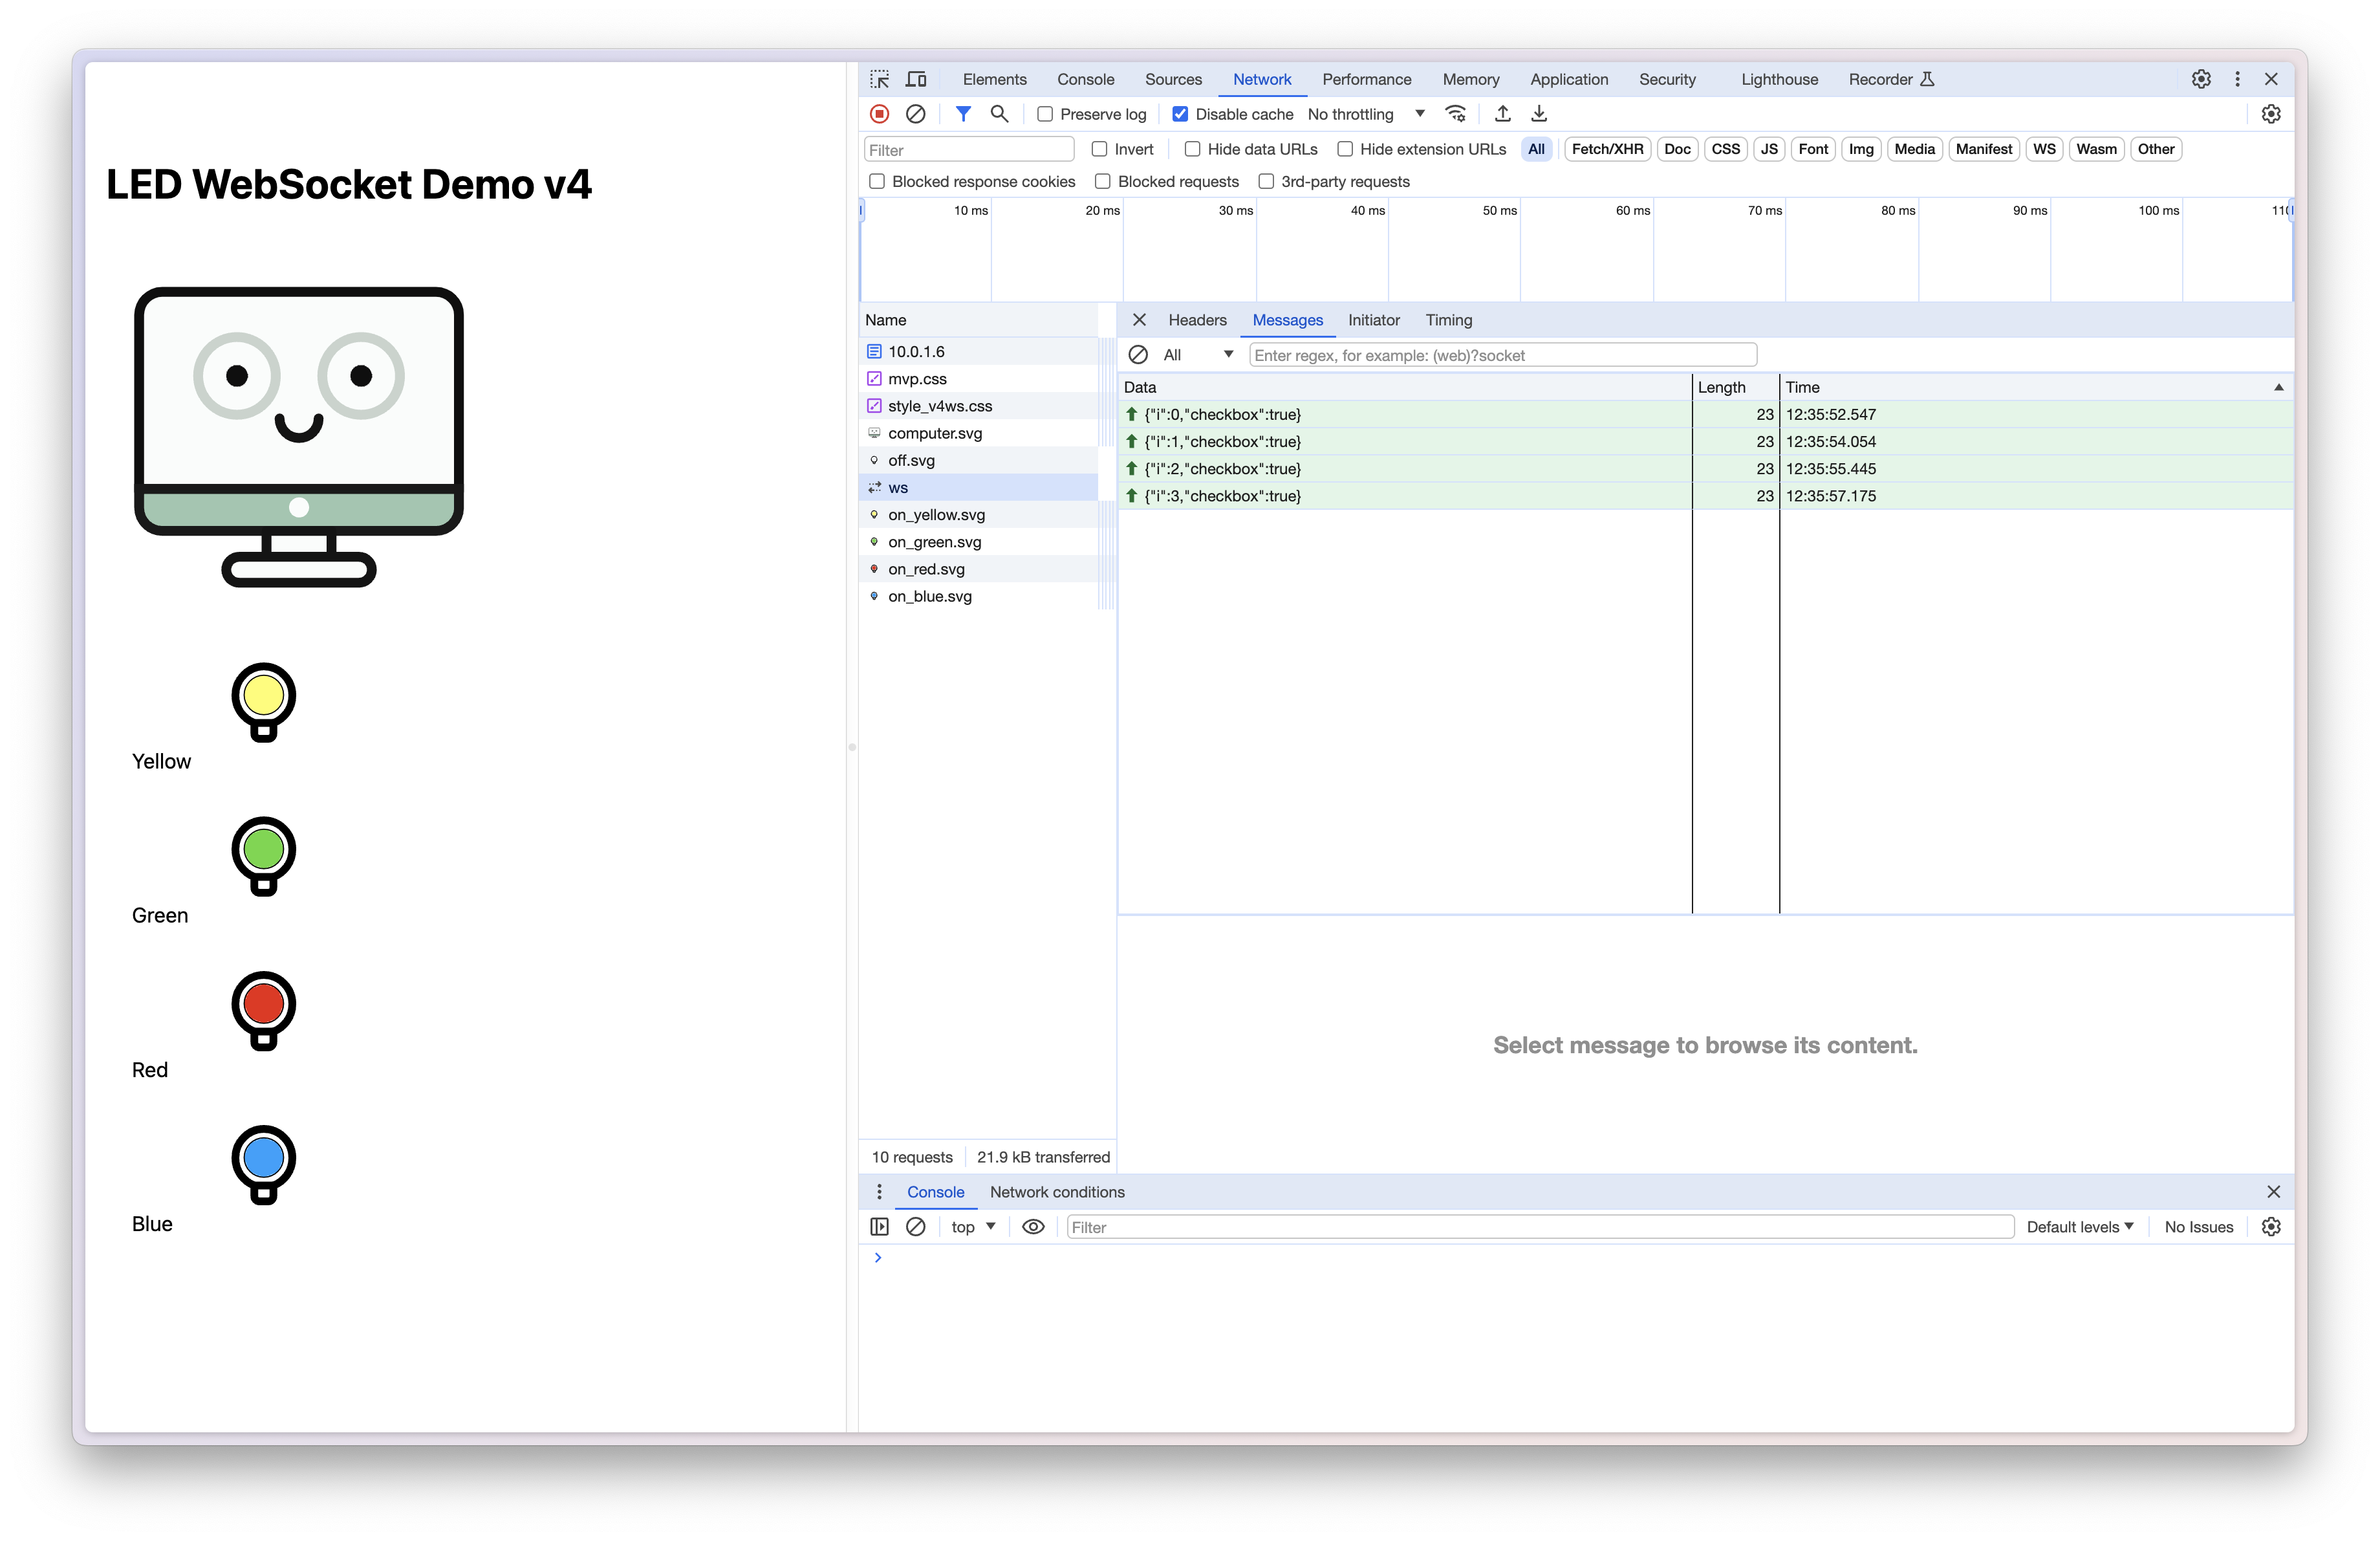
Demo v4
Notice the more complex data being transferred. The data has two values and now it is transferred as JSON data. This simplifies the python program required to understand the data. The interface is more colorful, with the color of the indicator matching the color of the LED. All told, this is a nice and usable UX.
MicroPython Review - light_leds_v4ws.py#
The MicroPython code remains extremely simple.
Early in the code, I used the following to setup the LEDs as well as create a list containing their object.
|
|
By using JSON data, this enables us to use the web socket message directly in our code:
|
|
We receive the data, we convert the JSON data into a dictionary then use the contents to set the appropriate LED and specified value. This approach is similar to the simplified approach in the enhancement to the v2 demo.
HTML Review - index_v4ws.html (html)#
The HTML isn’t radically different than what was in v3, except it has been duplicated 4 times. I would consider using a template for this in the future to reduce code, code size and reduce bugs. Similar to the template changes in the HTML code for index_v7.html.
|
|
Javascript Review index_v4ws.html (script)#
The JS in theory remains a 3-step process, however, it is a bit more complicated. I’ll breakdown each part separately.
Web socket connect#
This section remains simple, though a couple of extra items are setup so that they are global in scope.
- Array for the checkboxes to track the state, image and color of each div
- Web socket
- Array allows us to simplify how to reference the “on” images or color for each LED div
// Array to store all checkboxes and create web socket
const checkboxes = [];
const socket = new WebSocket('ws://' + location.host + '/ws');

// Array of 'on' image files
const onImages = [
"on_yellow.svg",
"on_green.svg",
"on_red.svg",
"on_blue.svg",
];Setup#
Since there are multiple steps which have to happen when a box is checked, we’re going to watch the div holding the checkbox, instead of just the checkbox. This allows us to change the image and examine the checkbox value.
- To perform the setup required to listen for these events, we need to ensure the page is complete, ‘DOMContentLoaded’.
- We create a local array which tracks all of the div’s with a class of “led”
- Which means we use a previously declared array “checkboxes” as our tracking array, keeping track of the state of the checkbox, the image shown and what image we shown when on (essentially the color of the led)
|
|
Execute#
Finally, we execute!
- We cycle through the checkboxes array, pulling three variables out to simplify processing:
- checkbox - contains the state of checked, true/false
- image - current image, off or color
- onImage - the color pertaining to the index (uses array onImages)
- We send a JSON array of the state and index to the web socket
- Update the page with led color and state
|
|
Web Application Demo v5 Time Test#
This application changes direction, it is now intended to measure response time, using web sockets. Let’s take a look at the interface:
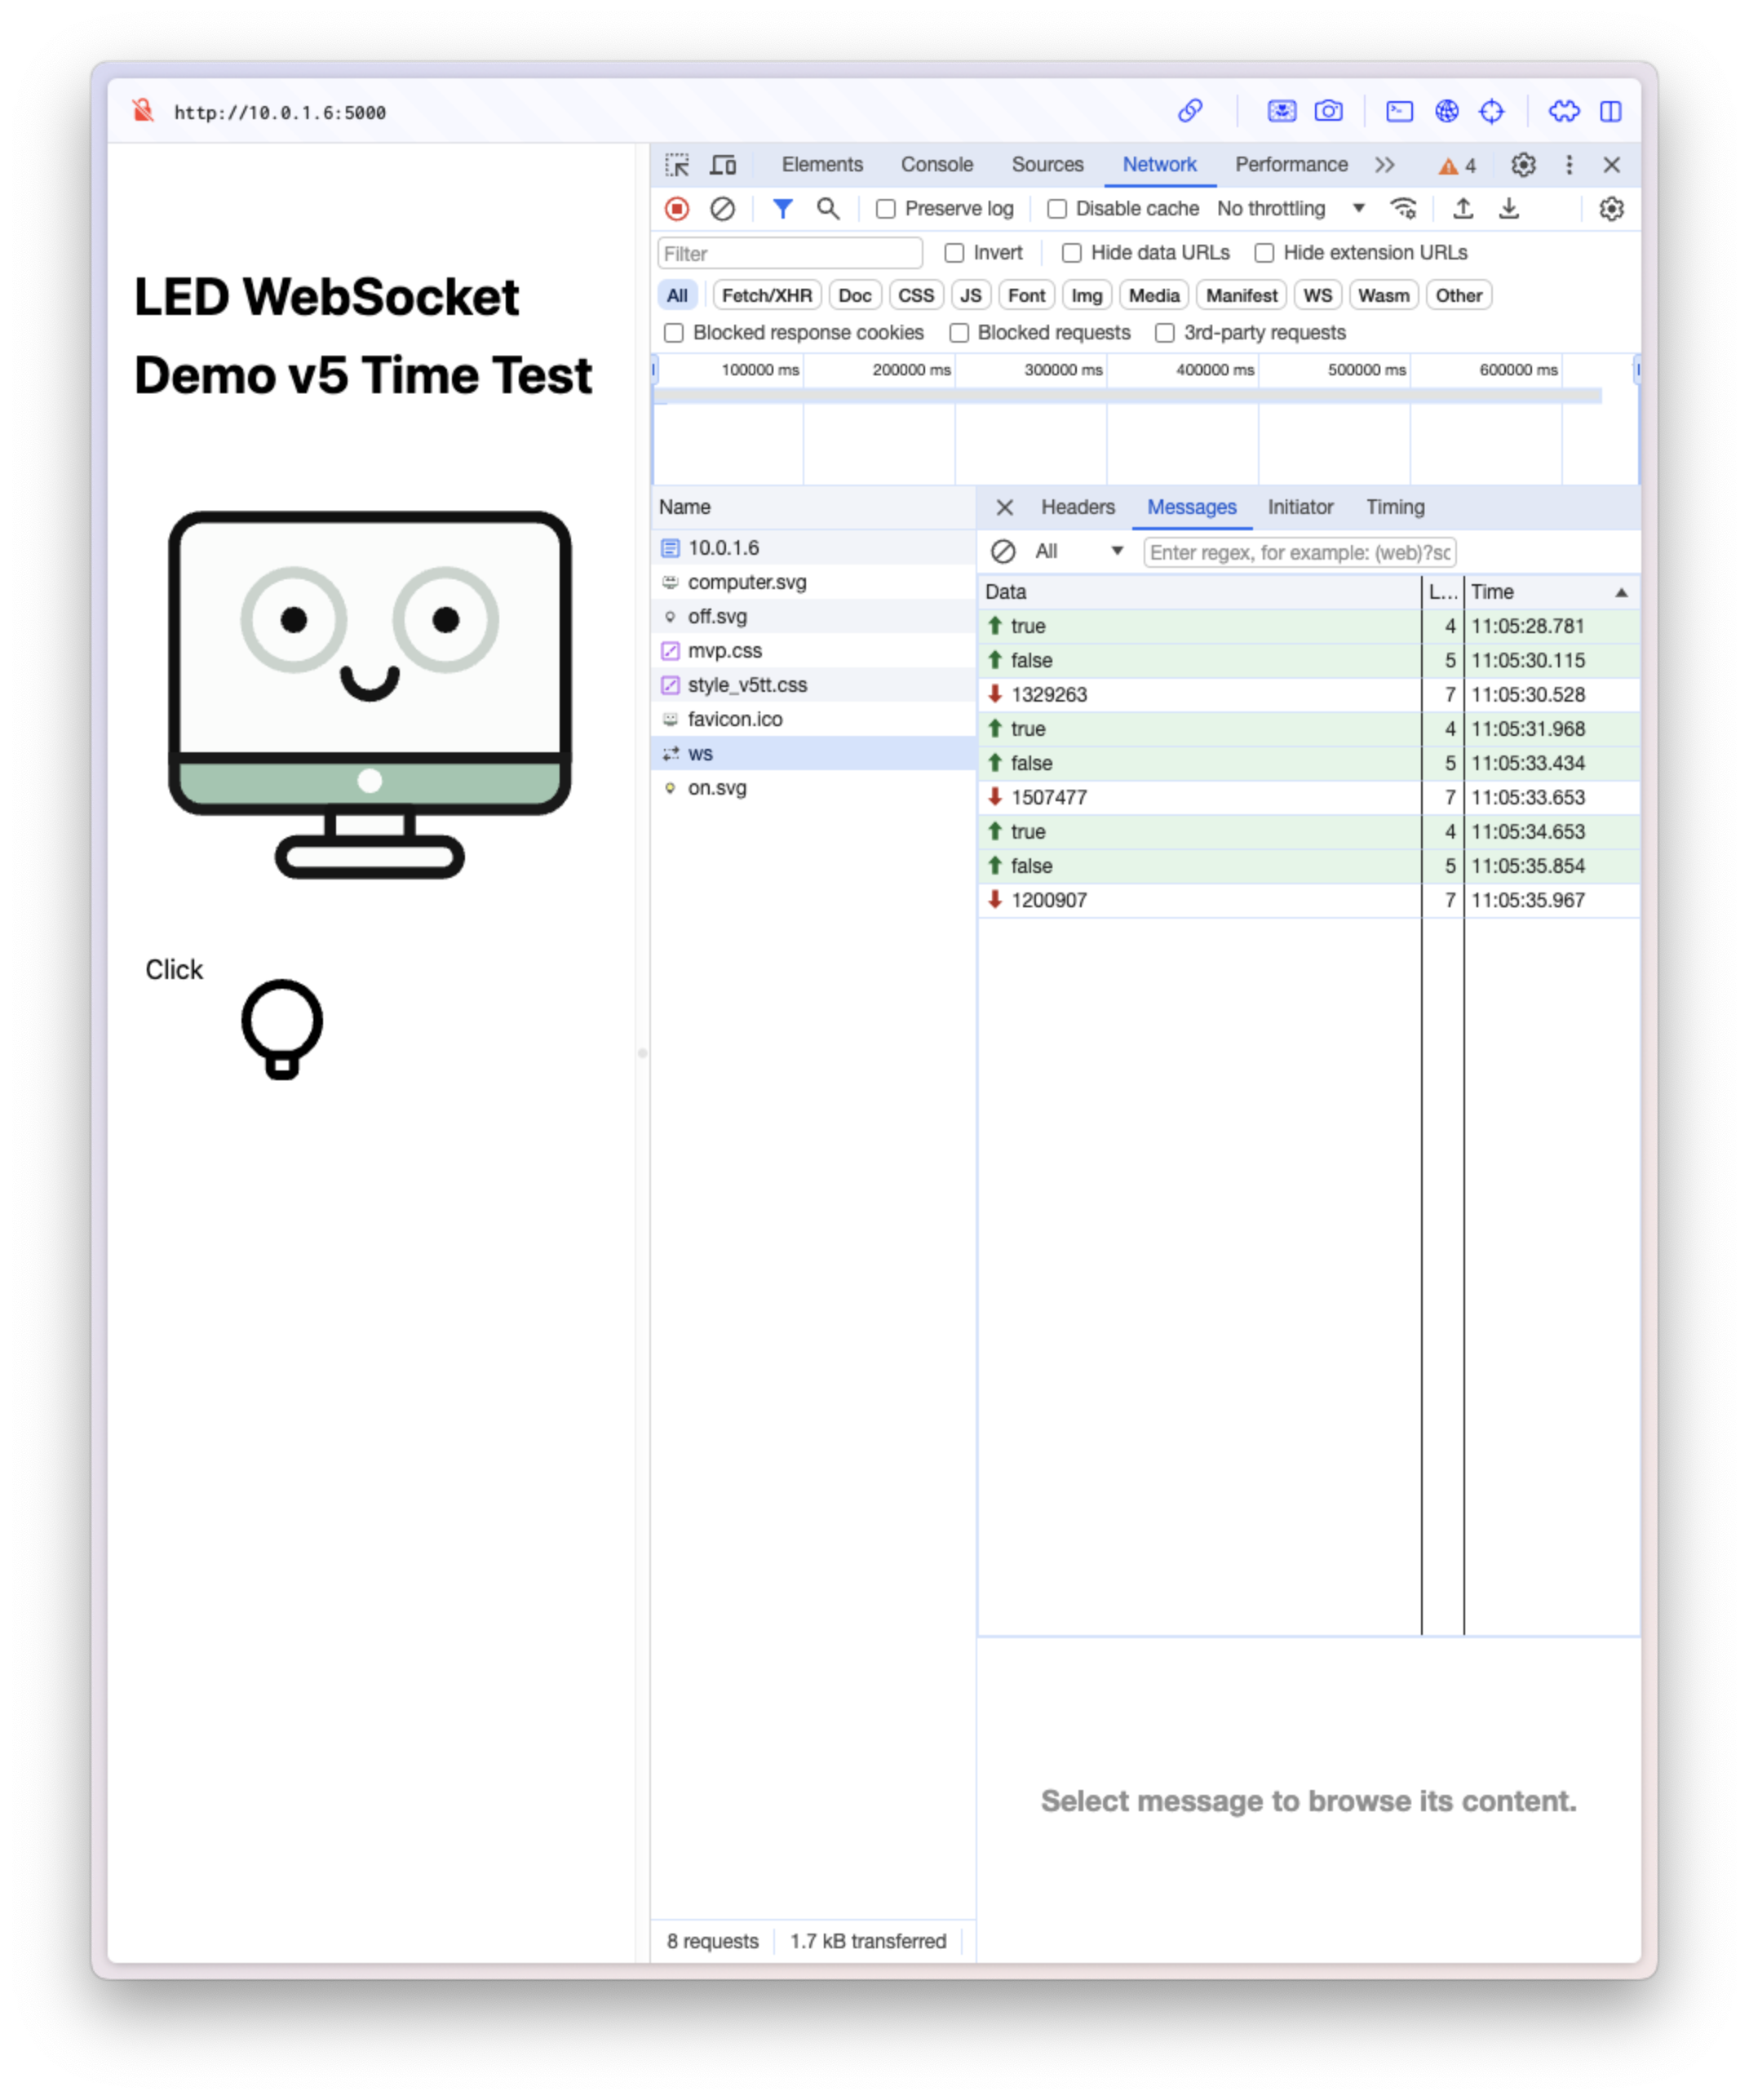
Demo v5
We’re back to a simple click and one bulb, however, the first click starts a timer with ’true’ and the second, stops the timer with ‘false’. If you look closely, you can see the browser’s time stamp vs. the calculated. For the first one, there is difference of .078 seconds or 78 milliseconds (4.5%) between what the browser reports and what the MicroPython program measured.
MicroPython Review - light_leds_v5tt.py#
The MicroPython code is almost the same as version 3. I add two lines, one to start the timer (line 7) and one to measure the elapsed time (line 9).
|
|
Line 7 starts the microsecond timer and line 10, ends the timer. The blinking led adds a bit of overhead, which we will remove in the next version.
HTML Review - index_v5tt.html (html)#
The HTML is to version 3, save for the specific style sheet and header.
Javascript Review index_v5tt.html (script)#
The JS is also the same as version 3.
Response Times Note:#
I thought it would be interesting to compare the elapsed time as measured by the MicroPython program to the times reported by the browser. Here are the three times shown in the image above (elapsed time is rounded to 3 digits to ease comparison):
| Elapsed | Browser |
|---|---|
| 1.329 | 1.334 |
| 1.507 | 1.466 |
| 1.201 | 1.201 |
Why Response Times?#
The previous version demonstrated measuring response times, why would we do that? I believe its helpful to understand the inherent speed of a system. How fast can it cycle through a process? To know a systems response time, is to know to for which applications it might be suitable.
The testing of the response times of this combination of MicroPython, Microdot, the Pi Pico W and web sockets is best performed using automation. In other words, don’t use a browser-based test, use a desktop Python test.
The tests doing just that reside in the desktop folder in the repository. The versions correspond to the same versions of MicroPython/HTML/JS code. To test simply load the desired application on to the Pico then use Python to run the test.
Response time/Variability with 100 ms#
For example, after loading files_v5tt.txt via mpbuild, I can then run `python desktop/set_pico_v5tt.py. This will result in the following output:
(Based on pinging the Pico every 100ms (.1s), the elapsed times are below, along with the percent delta between elapse time and 100ms.):
python desktop/set_pico_v5tt.py
Testing with 0.1 s, press Ctrl+C to quit
Elapsed time:   135.97 ms, % delta:  26.45
Elapsed time:   105.39 ms, % delta:   5.11
Elapsed time:   157.27 ms, % delta:  36.42
Elapsed time:   106.03 ms, % delta:   5.68
Elapsed time:   192.46 ms, % delta:  48.04
Elapsed time:   105.30 ms, % delta:   5.04
Elapsed time:   105.29 ms, % delta:   5.03
Elapsed time:   101.31 ms, % delta:   1.29
Elapsed time:   118.99 ms, % delta:  15.96
Elapsed time:   105.18 ms, % delta:   4.93
Elapsed time:   102.14 ms, % delta:   2.09
Elapsed time:   105.58 ms, % delta:   5.29
Elapsed time:   102.99 ms, % delta:   2.91
Elapsed time:   106.34 ms, % delta:   5.96
Elapsed time:   102.94 ms, % delta:   2.86
Elapsed time:   114.16 ms, % delta:  12.40
Elapsed time:   105.01 ms, % delta:   4.77
Elapsed time:   116.03 ms, % delta:  13.82
^CStopped Test
Response time/Variability with 1000 ms (1s)#
python desktop/set_pico_v5tt.py
Testing with 1.0 s, press Ctrl+C to quit
Elapsed time:  1005.20 ms, % delta:   0.52
Elapsed time:  1047.10 ms, % delta:   4.50
Elapsed time:  1004.84 ms, % delta:   0.48
Elapsed time:  1000.97 ms, % delta:   0.10
Elapsed time:  1001.99 ms, % delta:   0.20
Elapsed time:  1005.14 ms, % delta:   0.51
Elapsed time:   977.58 ms, % delta:  -2.29
Elapsed time:  1005.51 ms, % delta:   0.55
Elapsed time:  1371.13 ms, % delta:  27.07
Elapsed time:  1006.03 ms, % delta:   0.60
Elapsed time:  1017.56 ms, % delta:   1.73
Elapsed time:  1047.90 ms, % delta:   4.57
Elapsed time:  1007.48 ms, % delta:   0.74
Elapsed time:  1006.62 ms, % delta:   0.66
Elapsed time:  1008.23 ms, % delta:   0.82
Elapsed time:  1006.65 ms, % delta:   0.66
Elapsed time:  1147.20 ms, % delta:  12.83
Elapsed time:  1005.45 ms, % delta:   0.54
Elapsed time:  1005.25 ms, % delta:   0.52
^CStopped Test
Response Time/Variability with 10 ms#
python desktop/set_pico_v5tt.py
Testing with 0.01 s, press Ctrl+C to quit
Elapsed time:    10.81 ms, % delta:   7.46
Elapsed time:    12.70 ms, % delta:  21.24
Elapsed time:    13.20 ms, % delta:  24.24
Elapsed time:    25.45 ms, % delta:  60.71
Elapsed time:   161.93 ms, % delta:  93.82
Elapsed time:    12.39 ms, % delta:  19.30
Elapsed time:    11.97 ms, % delta:  16.43
Elapsed time:    11.12 ms, % delta:  10.10
Elapsed time:    13.10 ms, % delta:  23.65
Elapsed time:    92.53 ms, % delta:  89.19
Elapsed time:    12.82 ms, % delta:  22.01
Elapsed time:   117.06 ms, % delta:  91.46
Elapsed time:    12.67 ms, % delta:  21.05
Elapsed time:    30.15 ms, % delta:  66.83
Elapsed time:    12.71 ms, % delta:  21.33
Elapsed time:    11.34 ms, % delta:  11.82
Elapsed time:    11.30 ms, % delta:  11.51
Elapsed time:    12.62 ms, % delta:  20.79
Elapsed time:    12.60 ms, % delta:  20.60
^CStopped Test