Where I demonstrate how to reload Optiboot on an ATmega328P (Arduino Uno) and reload the Catarina bootloader on to an ItsyBitsy 32U4 board as well.
Introduction#
Sometimes a board’s bootloader can become corrupted or you have consciously overwritten the bootloader (See Forth on this site), and you want to reload it. This page demonstrates how to do this with the ATmega328P (Uno) and board with the AVR 32U4 (Adafruit ItsyBitsy 32U4). It also discusses the different bootloaders available for the 32U4.
ATmega328P Process (Arduino UNO)#
I used a AVR ISP Breadboard Adapter from Adafruit, which made the connection from the Snap SIL connector to the Uno much easier. Using the adapter, I connect 6 wires from the Snap to the breadboard like this:

Breadboard with Uno and Snap connected
Wiring Details#
| Description | SNAP SIL | Uno ICSP | Wire Color |
|---|---|---|---|
| NC | 1 | ||
| VTG | 2 | 2 | Red |
| GND | 3 | 6 | Black |
| MISO | 4 | 1 | Yellow |
| SCK | 5 | 3 | Orange |
| RESET | 6 | 5 | White |
| MOSI | 7 | 4 | Green |
| NC | 8 |
Then connect the adapter to the Uno using a 2x3 ribbon cable. If you don’t have the 6 pin adapter, you could use male to female dupont cable, where one end would fit the pins on the Uno and the other into the single in-line connector on the SNAP.
If you are handwiring from the SNAP terminal to the 6 pin UNO ICSP connector, Pin 1 has a very small dot beside it, just above the “I” of “ICSP”. See image:
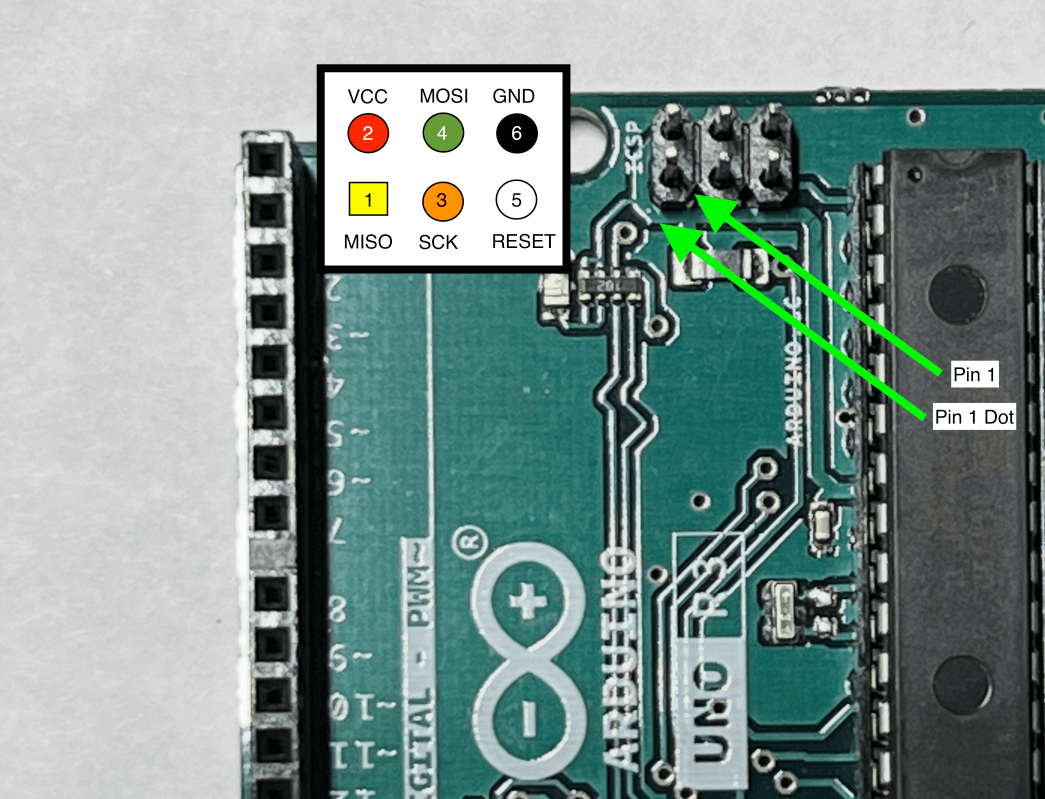
Arduino Uno ICSP Connector
Bootloader for Uno#
The bootloader for the Arduino Uno is well-documented and supported. Its called Optiboot. The easiest thing to do is to drill down to this location. Then download the file optiboot_atmega328.hex. Put it in the folder where you will be executing the avrdude command, the Desktop is fine.
Open a Terminal session#
Using your desired terminal software, I use Warp on macOS. Alternatives are iTerm2 or Terminal on macOS, Terminal on Windows and konsole on Linux. Enter the following commands (ensure the hex file from above is in your current folder):
# 0. Connect the SNAP to the Uno. ICSP cable, cable pin 1 to top row to Uno pin 1,
# Connect USB to SNAP, Connect USB to Uno
# 1. Test the connection
avrdude -p m328p -P usb  -c snap_isp -t
part
quit
# 2. Set fuses and lock bits to enable re-loading of boot loader
avrdude -p atmega328p  -c snap_isp -P usb -e -u -U lock:w:0x3f:m -U efuse:w:0x05:m -U hfuse:w:0xDE:m -U lfuse:w:0xFF:m
# 3. Burn Arduino bootloader & set lock bits to lockbootloader section
avrdude -p atmega328p  -c snap_isp -P usb -U flash:w:./optiboot_atmega328.hex -U lock:w:0x0f:m
Disconnect all of the cables. I recommend testing by using the Arduino IDE and uploading blink to confirm the bootloader is operational.
Bootloader for 32U4#
In working with several students wanting to use the Adafruit ItsyBitsy 32U4 board, the board appeared to be bricked. It wasn’t recognized by several computers and the led didn’t blink upon power up. The Adafruit page wasn’t helpful, though it did indicate there was a bootloader available. This page was far more helpful, indicating the board could be reloaded with a bootloader, particularly, the Adafruit version.
32U4 Process (Adafruit ItsyBitsy 3.3V 32U4)#
- The board I was using was a 3.3V version, so it is important not to connect 5V to the board.
- I use a Microchip SNAP programmer, which has a cable with a connector. The pinout of the connector is here as well as the image below:

SNAP pinout, note ISP highlight
- The pinout of the Adafruit ItsyBitsy 32U4 is here as well as below:
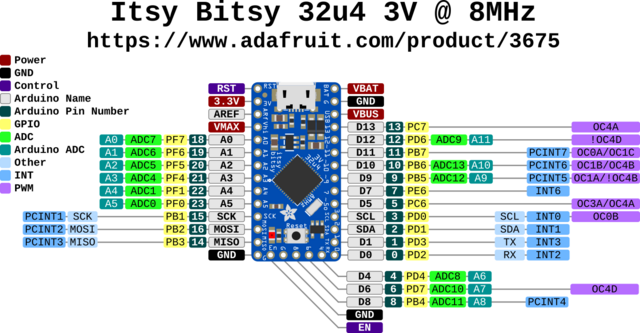
Adafruit ItsyBitsy 32U4
-
Using the images above, we can create a table of pin connections:
Description SNAP SIL 32U4 NC VTG 2 2 GND 3 14 MISO 4 13 SCK 5 11 RESET 6 1 MOSI 7 12 NC -
Download the Catarina bootloader from the Adafruit link above. It is also available here on Github.
-
Using the helpful instructions from the gist above, I performed the following using avrdude 7.3 in the Terminal:
# check using a terminal command, this will print information on the chip
# its useful to confirm the board connection and everything is working
avrdude -c snap_isp -P usb -b 19200 -p m32u4 -t
# type q to quit
q
# set the fuses to program the bootloader
avrdude -c snap_isp -P usb -b 19200 -p m32u4 -U lfuse:r:low_fuse_val.hex:h -U hfuse:r:high_fuse_val.hex:h
# Upload bootloader, assuming in same folder as hex program
avrdude -c snap_isp -P usb  -b 19200 -p m32u4 -U flash:w:Caterina_itsybitsy5V.hex
Disconnect all of the cables. I recommend testing by using the Arduino IDE and uploading blink to confirm the bootloader is operational.
Additional Notes on the Bootloaders for the 32U4#
There seems to be a little bit of concern as to the Catarina bootloader. There are various references that it can be easily corrupted. Given what happened here, I share this concern. The Catarina bootloader is designed to be used with the Arduino IDE, as it allows uploading software without hardware intervention. As it is designed to be used with the Arduino IDE, I’ll continue to use it, understanding that it might fail occasionally.
There is another bootloader, called DFU for Device Firmware Upgrade, it comes preprogrammed on the 32U4 chips from the factory. It requires a hardware reset in order for the board to enter program mode.
An AI View: Catarina vs DFU#
I used Perplexity AI/ChatGPT 4 Turbo to describe the differences and here is what it advised (along with the citations at the end): (The text below describing to differences isn’t quite accurate, however, its a worthwhile comparison. The links at the bottom are of greater value.)
Introduction#
The Microchip AVR 32U4-based boards, such as the Arduino Leonardo, can be programmed using different bootloaders, which are small programs that run on the microcontroller to load your main application code. Two commonly used bootloaders for the AVR 32U4 are the DFU (Device Firmware Upgrade) bootloader and the Catarina bootloader. Each bootloader has its unique features and methods for loading code onto the microcontroller.
DFU Bootloader#
The DFU bootloader is a universal bootloader for AVR microcontrollers with USB capabilities, including the ATmega32U4. It adheres to the USB DFU class specification, allowing for in-system programming directly over the USB interface without needing an external programmer or to remove the microcontroller from its circuit. This bootloader is pre-programmed in the factory on the ATmega32U4 and other AVR USB microcontrollers. It supports operations such as reading/writing the Flash and EEPROM, reading the device ID, and full chip erase. The bootloader can be activated by specific conditions such as a hardware event (e.g., pressing a button connected to the HWB pin) or software conditions (e.g., a specific command received over USB)[1][5].
Catarina Bootloader#
The Catarina bootloader is a variation of the LUFA (Lightweight USB Framework for AVRs) CDC (Communications Device Class) bootloader, specifically tailored for the ATmega32U4 microcontroller. It is used by the Arduino Leonardo and other Arduino boards based on the ATmega32U4. Unlike the DFU bootloader, Catarina creates a virtual serial port over USB, making it easier to integrate with the Arduino IDE and other development tools that communicate over serial. This bootloader is activated by a double-tap of the reset button, which causes the board to enter bootloader mode for a short period during which new code can be uploaded[2][4].
Key Differences#
- Activation Method: The DFU bootloader can be activated by hardware conditions or software commands, while the Catarina bootloader typically enters its mode through a double reset button press.
- Communication Protocol: DFU uses the USB DFU class for programming, requiring specific tools like Atmel’s FLIP or dfu-programmer. In contrast, Catarina uses a virtual serial port, making it compatible with standard serial programming tools like the Arduino IDE.
- Use Case: DFU is more universal and can be used with a wider range of programming tools but requires more setup. Catarina is optimized for ease of use with Arduino-based projects.
Origins#
- The DFU bootloader is part of the standard firmware provided by Microchip (formerly Atmel) for its USB-capable AVR microcontrollers[1].
- The Catarina bootloader is a development by the Arduino community, based on the LUFA project’s CDC bootloader. Its source code and documentation are available on GitHub[4].
In summary, the choice between DFU and Catarina bootloaders depends on your specific needs and development environment. DFU offers a more universal solution with direct USB programming capability, while Catarina provides easy integration with Arduino development tools.
Citations:
-
https://www.eevblog.com/forum/microcontrollers/atmega32u4-bootloaders-hwb-pin-usb-programming/
-
https://www.avrfreaks.net/s/topic/a5C3l000000UatVEAS/t155613
-
https://forum.arduino.cc/t/atmega32u4-bootloader-can-it-be-changed-to-another-one/418383?page=2
-
https://forum.arduino.cc/t/new-version-of-caterina-bootloader/483909
-
https://community.platformio.org/t/atmel-usb-dfu-bootloader/11888
-
https://electronics.stackexchange.com/questions/583174/atmega32u4-reset-circuit-and-bootloader
-
http://blog.komar.be/using-atmels-dfu-bootloader-abi-on-atmega32u4-in-avr-gcc/
-
https://www.avrfreaks.net/s/topic/a5C3l000000USBQEA4/t122130
-
https://forum.arduino.cc/t/atmega32u4-bootloader-can-it-be-changed-to-another-one/418383