Where I show a simple method of using gdb to debug code on the RP2040 (Pi Pico board).
Sources#
- Raspberry Pi Pico SDK: Raspberry Pi Pico SDK
- Raspberry Pi Pico Pinout
- GDB Documentation
- Guide to Faster, Less Frustrating Debugging - Norman Matloff
- gdb Resources
Setup .gdbinit#
The Guide recommends at the very least, add “target remote localhost:3333” to your .gdbinit file. To make our edit/compile/link/load round trip easy, I recommend the following for your .gdbinit:
target extended-remote :3333

define cll
make
target extended-remote :3333
load
monitor reset init
end

define mri
monitor reset init
end
Save this file to your home folder. On entry it will automatically, perform the target command, per the Guide. It will also add a command for a set of commands as well as a long command. Both of these will simplify what needs to happen to compile/link/load a file being debugged.
Setup Your Screen#
Per my instructions on setting up Linux, its best to setup your screen so that it lends itself well to debugging. I use the following: (same as the previous entry)
- Divide the screen into a left half and right half. (In your mind, so far…)
- Open your code editor (in my case, Kate) and place it on the left half of the screen with my code under test open in the editor.
- Open a terminal window in the right half, however, shorten it so that it consumes only the top half of the right half (meaning the top right quarter of the screen). In this window, we’ll have two tabs:
- One tab will be openocd, which must remain open for it to work. Leave it open.
- Open a second tab, which will run gdb, this is where our debugging commands will go.
- In the bottom right quarter of the screen, open another terminal window and begin execution of “minicom -b 115200 -D /dev/ttyACM0”, this will be the console output from the target Pico.
Your screen will look similar to this:
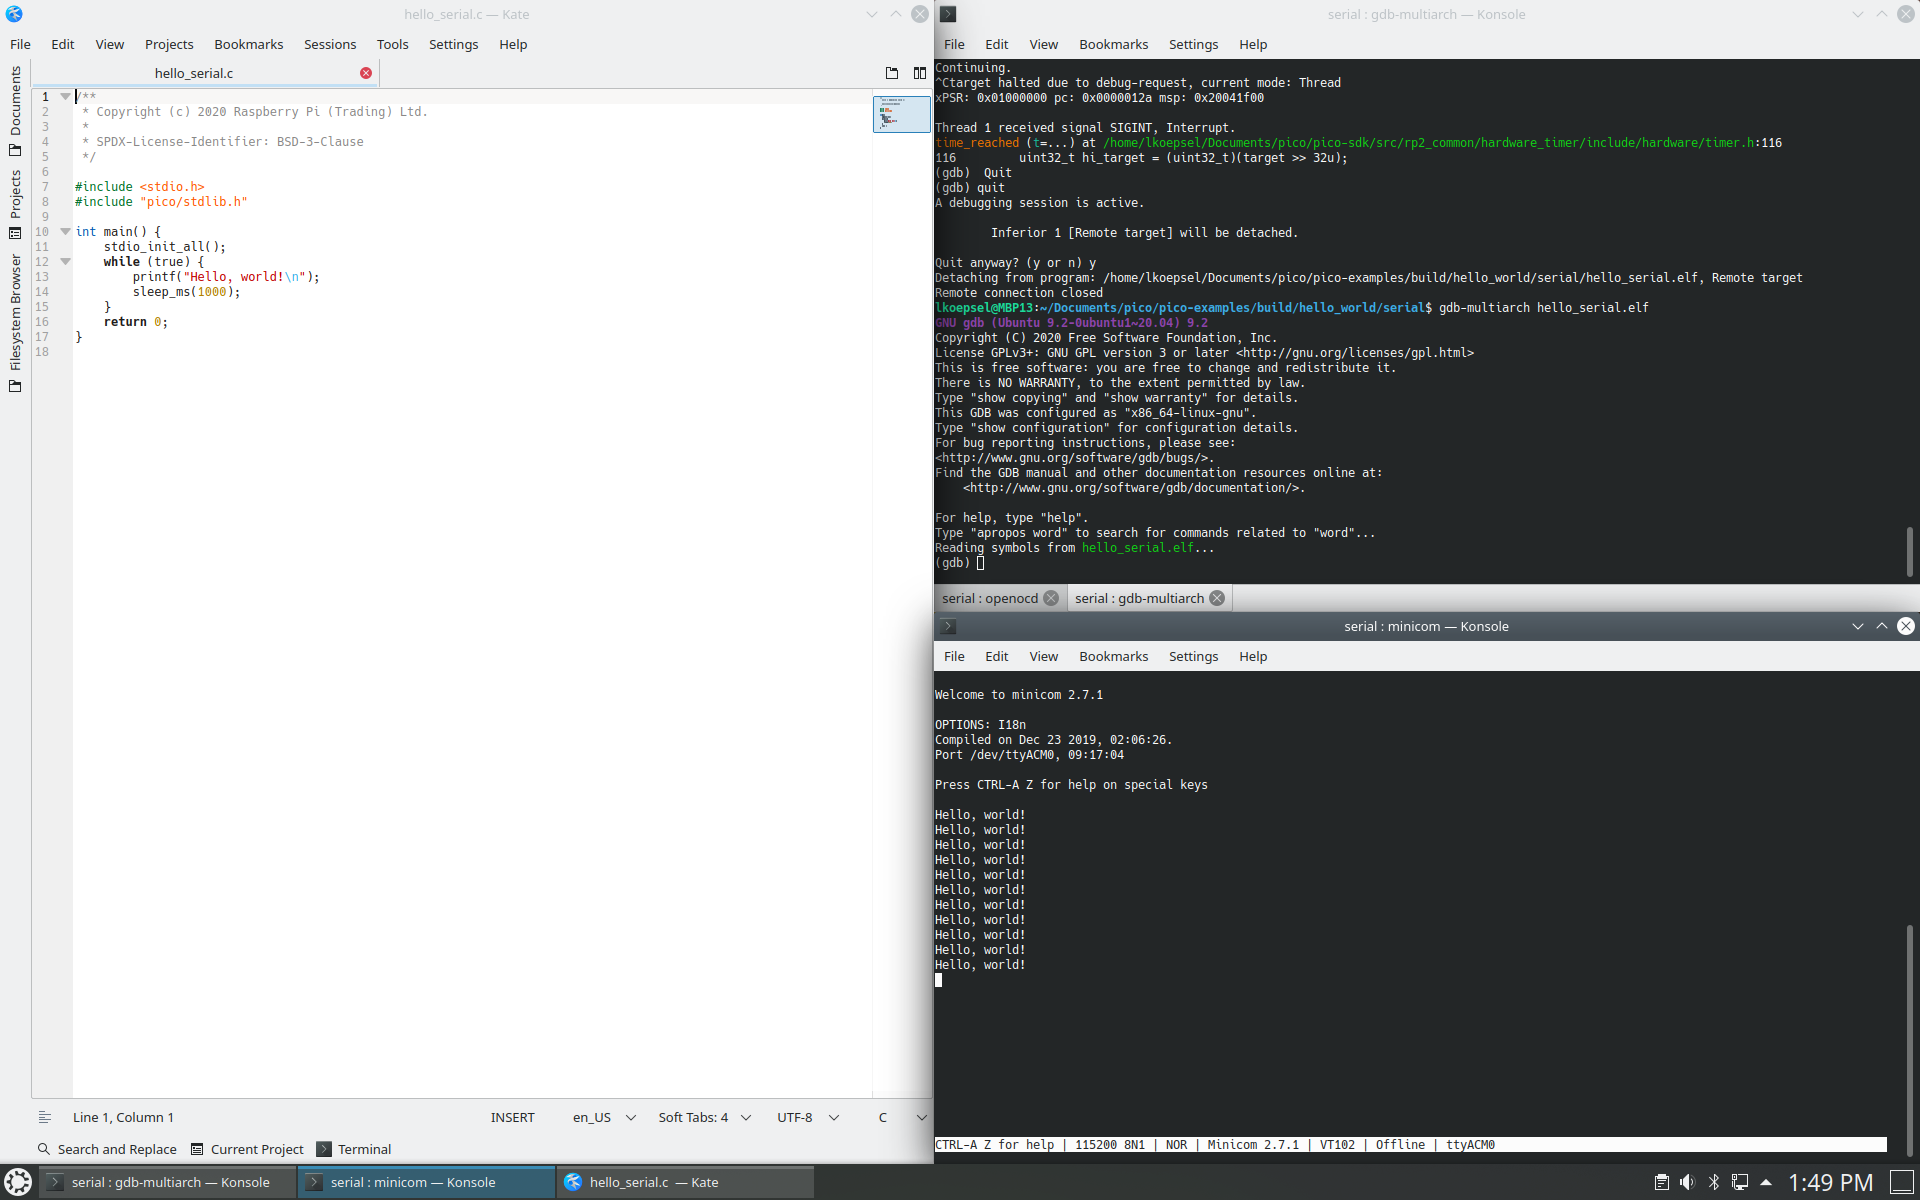
Debugging Hello_World on Linux
An example#
The full text of this example is at the bottom of this entry. I’ve shortened it to make it easier to describe, however, at times it helps to see the entire thread. I’m going to use the serial version (remember you can’t debug USB connections) of Hello_World to show how to debug a program. In this first example, we won’t debug, we will simply make a change to the program then reload it.
Setup the Screen#
- In the left window:
cd pico-examples/hello_world_serial/serial/ kate hello_serial.c - In the right, top quarter window:
cd pico-examples/build/hello_world/serial openocd -f interface/picoprobe.cfg -f target/rp2040.cfg - In the same window, the second tab:
cd pico-examples/build/hello_world/serial gdb-multiarch hello_serial.elf - In the right, bottom quarter window:
minicom -b 115200 -D /dev/ttyACM0
With luck your screen will look similar to this:
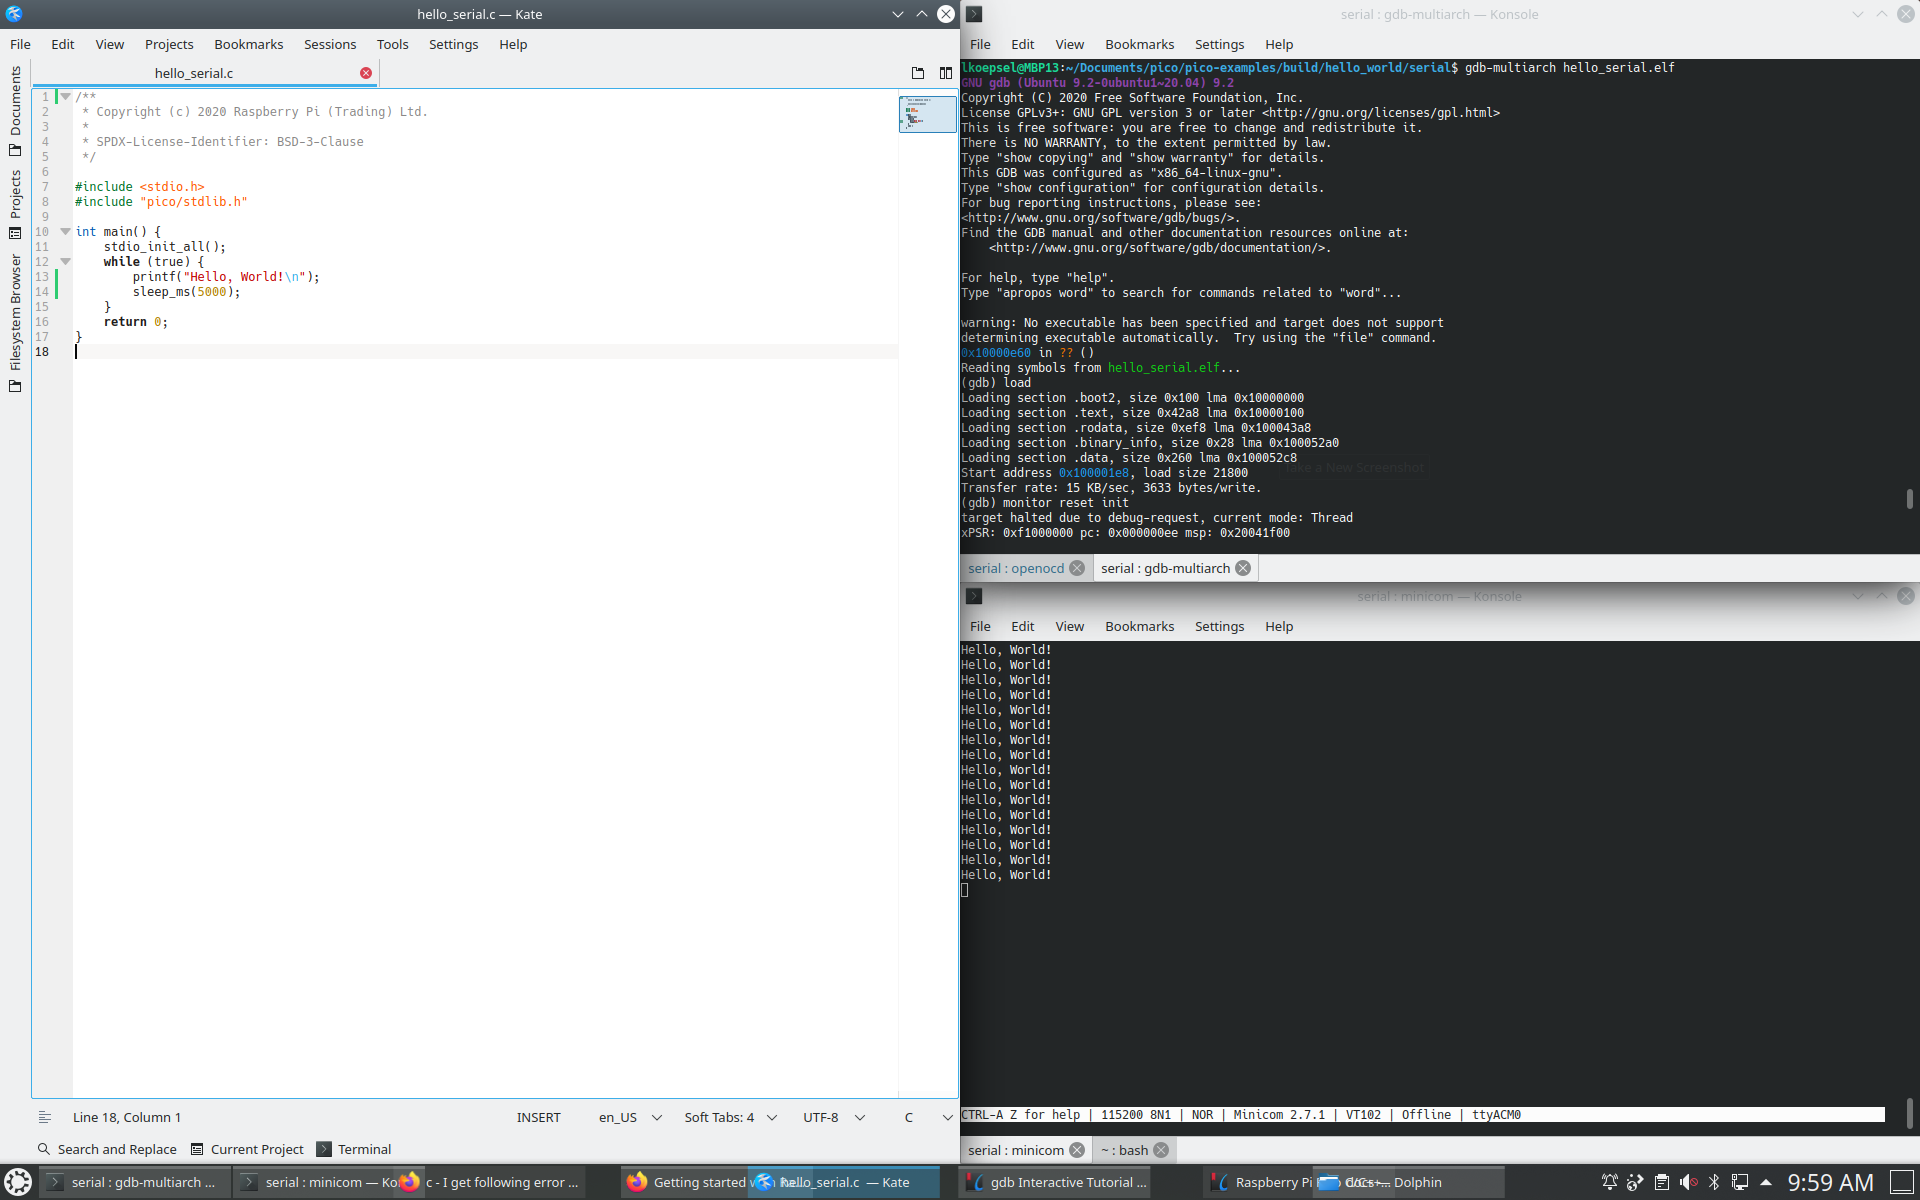
Debugging Hello_World on Linux v2
Change the Code#
- In your code editor, change the text on line 13 to something other than “Hello, World!”, I changed it to “Hello Lief!” and save the file.
- In the top quarter window, second tab running gdb do the following: (do not enter the text “(gdb)”)
# Ctrl-C to stop execution
(gdb)
# enter cll for the commmand in the gdbinit file compile-link-load
(gdb) cll
# enter c for continue
c
If the gdbinit file was loaded correctly, the command cll will exist and it will perform the following steps:
- make
- target extended-remote :3333
- load
- monitor reset init and when you hit “c”, your new message will appear. In my case, my “Hello World!” text changed to “Hello, Lief!”.
You just completed an Edit -> Compile -> Link -> Load -> Debug loop for developing code! This loop is the roundtrip required to write and debug code. What makes this specific “trip” special is that you can complete it using just two applications, your code editor (in this case, Kate) and gdb (using the command cll). From here on…for the rest of your embedded development, everything else will be a variation on this approach.
Note: If/when you use the Arduino IDE or VS Code, it will simplify these two windows to one IDE (and will add a serial monitor as well as other tools). This can be helpful and it is the approach many professional developers will follow. I will continue to caution you on automating “too much”, prior to understanding how each tool works.
Going Forward#
This initial entry was designed to give you the ability to easily change code, compile/link it then load it on the processor and run it. In the above commands, one command “cll” would handle everything so the process becomes:
- Edit code and save it.
- Stop current execution (Ctrl-C) and run command “cll”.
- Continue execution with command “c”
I recommend making small edits and developing the muscle memory of edit-cll-c before moving on to the next entry.
Output of commands above from 3 screens#
Left half of screen#
cd /Documents/pico/pico-examples/hello_world/serial/
kate hello_serial.c
Tab 1 of top right quarter of screen#
cd Documents/pico/pico-examples/build/hello_world/serial
openocd -f interface/picoprobe.cfg -f target/rp2040.cfg
Open On-Chip Debugger 0.10.0+dev-g18b4c35-dirty (2021-08-21-09:05)
Licensed under GNU GPL v2
For bug reports, read
        http://openocd.org/doc/doxygen/bugs.html
Info : only one transport option; autoselect 'swd'
Warn : Transport "swd" was already selected
adapter speed: 5000 kHz

Info : Hardware thread awareness created
Info : Hardware thread awareness created
Info : RP2040 Flash Bank Command
Info : Listening on port 6666 for tcl connections
Info : Listening on port 4444 for telnet connections
Info : clock speed 5000 kHz
Info : SWD DPIDR 0x0bc12477
Info : SWD DLPIDR 0x00000001
Info : SWD DPIDR 0x0bc12477
Info : SWD DLPIDR 0x10000001
Info : rp2040.core0: hardware has 4 breakpoints, 2 watchpoints
Info : rp2040.core1: hardware has 4 breakpoints, 2 watchpoints
Info : starting gdb server for rp2040.core0 on 3333
Info : Listening on port 3333 for gdb connections
Info : accepting 'gdb' connection on tcp/3333
Info : RP2040 B0 Flash Probe: 2097152 bytes @10000000, in 512 sectors
Tab 2 of top right quarter of screen#
cd /Documents/pico/pico-examples/build/hello_world/serial
gdb-multiarch hello_serial.elf
GNU gdb (Ubuntu 9.2-0ubuntu1~20.04) 9.2
Copyright (C) 2020 Free Software Foundation, Inc.
License GPLv3+: GNU GPL version 3 or later <http://gnu.org/licenses/gpl.html>
This is free software: you are free to change and redistribute it.
There is NO WARRANTY, to the extent permitted by law.
Type "show copying" and "show warranty" for details.
This GDB was configured as "x86_64-linux-gnu".
Type "show configuration" for configuration details.
For bug reporting instructions, please see:
<http://www.gnu.org/software/gdb/bugs/>.
Find the GDB manual and other documentation resources online at:
    <http://www.gnu.org/software/gdb/documentation/>.

For help, type "help".
Type "apropos word" to search for commands related to "word"...

warning: No executable has been specified and target does not support
determining executable automatically.  Try using the "file" command.
0x10000e60 in ?? ()
Reading symbols from hello_serial.elf...
(gdb) load
Loading section .boot2, size 0x100 lma 0x10000000
Loading section .text, size 0x42a8 lma 0x10000100
Loading section .rodata, size 0xef8 lma 0x100043a8
Loading section .binary_info, size 0x28 lma 0x100052a0
Loading section .data, size 0x260 lma 0x100052c8
Start address 0x100001e8, load size 21800
Transfer rate: 15 KB/sec, 3633 bytes/write.
(gdb) monitor reset init
target halted due to debug-request, current mode: Thread
xPSR: 0xf1000000 pc: 0x000000ee msp: 0x20041f00
target halted due to debug-request, current mode: Thread
xPSR: 0xf1000000 pc: 0x000000ee msp: 0x20041f00
(gdb) c
Continuing.
^Ctarget halted due to debug-request, current mode: Thread
xPSR: 0x01000000 pc: 0x0000012a msp: 0x20041f00

Thread 1 received signal SIGINT, Interrupt.
time_reached (t=...) at /home/lkoepsel/Documents/pico/pico-sdk/src/rp2_common/hardware_timer/include/hardware/timer.h:116
116         uint32_t hi_target = (uint32_t)(target >> 32u);
(gdb) k
Kill the program being debugged? (y or n) y
[Inferior 1 (Remote target) killed]
(gdb) cll
[  0%] Performing build step for 'ELF2UF2Build'
[100%] Built target elf2uf2
[  0%] No install step for 'ELF2UF2Build'
[  0%] Completed 'ELF2UF2Build'
[  0%] Built target ELF2UF2Build
[  0%] Built target bs2_default
[  0%] Built target bs2_default_padded_checksummed_asm
Scanning dependencies of target hello_serial
[  0%] Building C object hello_world/serial/CMakeFiles/hello_serial.dir/hello_serial.c.obj
[  0%] Linking CXX executable hello_serial.elf
[100%] Built target hello_serial
`/home/lkoepsel/Documents/pico/pico-examples/build/hello_world/serial/hello_serial.elf' has changed; re-reading symbols.

Thread 1 received signal SIGINT, Interrupt.
time_reached (t=...) at /home/lkoepsel/Documents/pico/pico-sdk/src/rp2_common/hardware_timer/include/hardware/timer.h:116
116         uint32_t hi_target = (uint32_t)(target >> 32u);
Loading section .boot2, size 0x100 lma 0x10000000
Loading section .text, size 0x42a8 lma 0x10000100
Loading section .rodata, size 0xef8 lma 0x100043a8
Loading section .binary_info, size 0x28 lma 0x100052a0
Loading section .data, size 0x260 lma 0x100052c8
Start address 0x100001e8, load size 21800
Transfer rate: 15 KB/sec, 3633 bytes/write.
target halted due to debug-request, current mode: Thread
xPSR: 0xf1000000 pc: 0x000000ee msp: 0x20041f00
target halted due to debug-request, current mode: Thread
xPSR: 0xf1000000 pc: 0x000000ee msp: 0x20041f00
(gdb) c
Continuing.
Bottom right quarter of the screen#
minicom -b 115200 -D /dev/ttyACM0
Welcome to minicom 2.7.1

OPTIONS: I18n
Compiled on Dec 23 2019, 02:06:26.
Port /dev/ttyACM0, 09:09:15

Press CTRL-A Z for help on special keys

Hello, world!
Hello, world!
Hello, world!
Hello, Lief!
Hello, Lief!
Hello, Lief!