Where I discuss what to do once you’ve downloaded a repository from Github.
Introduction#
I’ve advocated using the AVR_C (among others) repository to learn how to use C instead of the Arduino “C++” language. (I write C++ in quotes as while the language used is C++, there are some extensions which some people assume are part of the language, causing more confusion.) In this post, I want to start a short series on using Git as it is extremely helpful, once you begin to develop code. And it becomes mandatory, once you begin using someone’s git repository.
I am not a git expert and I try not to stray too far from status->add->commit-push…
Big Picture#
Git is a version management application. It allows you to make incremental changes in your code, saving and commenting those changes then providing the capability to roll-back your changes should you desire. It is also the version management system used by software professionals to manage extremely large software deployments with teams measuring in the thousands. I’m describing git from the former example…
The Process#
In a nutshell, you will download a repository, make it your own and add it to GitHub. Once its created, you’ll edit the files, add the new ones to the repository, commit them with a message and send them back up to Github to your repository.
Let’s begin!
Download the code#
I’m going to use Dashboard as my example as it is simple with minor changes.
NOTE: I WILL ADD A SMALL “t” TO THE NAME, SO I CAN CREATE THIS TUTORIAL, DON’T DO THAT UNLESS YOU WANT A SMALL “t” ON YOUR REPOSITORY NAME AS WELL.
For the entire process to work, you will need to have an account with Github. Please do so now, if you don’t have one already. I also recommend adding an SSH key to your account which will make it very easy and secure. I’ve added more information as to SSH access at the bottom of this entry.
In your CLI (terminal), go to a folder where you want to place your repository, Documents, for example. Open a browser window and go to Dashboard. You have two ways to obtain the code, both start with clicking on the green square with a dropdown, called Code. If you have SSH access, use the SSH method, otherwise the HTTPS method.
# SSH
git clone git@github.com:lkoepsel/Dashboard.git
Cloning into 'Dashboard'...
remote: Enumerating objects: 135, done.
remote: Counting objects: 100% (135/135), done.
remote: Compressing objects: 100% (87/87), done.
remote: Total 135 (delta 71), reused 108 (delta 45), pack-reused 0
Receiving objects: 100% (135/135), 39.70 KiB | 514.00 KiB/s, done.
Resolving deltas: 100% (71/71), done.
# or HTTPS
git clone https://github.com/lkoepsel/Dashboard.gitAt this moment, the repository will be connected to my Dashboard repository. If we were part of a team, that would be fine. However, we’re not, so we need to make this repository, yours.
Remove the current tracking#
There is a better way to do this, called forking, which I’ll cover in a subsequent entry. To keep it simple, we’ll simply delete the .git folder which removes the tracking of the code by git. It is simply a folder, nothing more and nothing less.
cd Dashboard
ls -al
total 32
drwxr-xr-x   8 lkoepsel  staff   256 Mar 31 07:20 .
drwxr-xr-x   5 lkoepsel  staff   160 Mar 31 07:20 ..
drwxr-xr-x  12 lkoepsel  staff   384 Mar 31 07:20 .git
-rw-r--r--   1 lkoepsel  staff   150 Mar 31 07:20 .gitignore
drwxr-xr-x  19 lkoepsel  staff   608 Mar 31 07:20 Dashboard
drwxr-xr-x   4 lkoepsel  staff   128 Mar 31 07:20 LFS_util
-rw-r--r--   1 lkoepsel  staff  8388 Mar 31 07:20 README.md
drwxr-xr-x   4 lkoepsel  staff   128 Mar 31 07:20 blink
rm -rf .git
ls -al
total 32
drwxr-xr-x   7 lkoepsel  staff   224 Mar 31 07:22 .
drwxr-xr-x   5 lkoepsel  staff   160 Mar 31 07:20 ..
-rw-r--r--   1 lkoepsel  staff   150 Mar 31 07:20 .gitignore
drwxr-xr-x  19 lkoepsel  staff   608 Mar 31 07:20 Dashboard
drwxr-xr-x   4 lkoepsel  staff   128 Mar 31 07:20 LFS_util
-rw-r--r--   1 lkoepsel  staff  8388 Mar 31 07:20 README.md
drwxr-xr-x 4 lkoepsel staff 128 Mar 31 07:20 blinkInitialize the repository#
To make the repository yours, enter git init, git add -A and git commit -m “Initial commit”, as shown below. This will create a repository under your name.
If you haven’t configured git to be your own, you might get an error message. You will need to add your user name and email.
git init
Initialized empty Git repository in /Users/lkoepsel/Documents/temp/Dashboard/.git/
git add -A
git commit -m "Initial commit"
[main (root-commit) e806390] Initial commit
 29 files changed, 1006 insertions(+)
 create mode 100644 .gitignore
 create mode 100644 Dashboard/Dashboard.ino
 create mode 100644 Dashboard/Makefile
 create mode 100644 Dashboard/card_0.cpp
 create mode 100644 Dashboard/card_0.h
 create mode 100644 Dashboard/card_1.cpp
 create mode 100644 Dashboard/card_1.h
 create mode 100644 Dashboard/card_2.cpp
 create mode 100644 Dashboard/card_2.h
 create mode 100644 Dashboard/card_3.cpp
 create mode 100644 Dashboard/card_3.h
 create mode 100644 Dashboard/data/favicon.png
 create mode 100644 Dashboard/data/index.html
 create mode 100644 Dashboard/data/lightbulb.svg
 create mode 100644 Dashboard/data/script.js
 create mode 100644 Dashboard/data/style.css
 create mode 100644 Dashboard/data/switch-closed.svg
 create mode 100644 Dashboard/data/switch-open.svg
 create mode 100644 Dashboard/home.cpp
 create mode 100644 Dashboard/home.h
 create mode 100644 Dashboard/processor.cpp
 create mode 100644 Dashboard/processor.h
 create mode 100644 Dashboard/serve.cpp
 create mode 100644 Dashboard/serve.h
 create mode 100644 LFS_util/LFS_util.ino
 create mode 100644 LFS_util/Makefile
 create mode 100644 README.md
 create mode 100644 blink/Makefile
 create mode 100644 blink/blink.ino
Create a remote on Github#
In your browser, login to github to your page. In the black bar at the top of the page, will be a “+”, click on it and you will see:

Plus Sign on GitHub
Click on New repository.
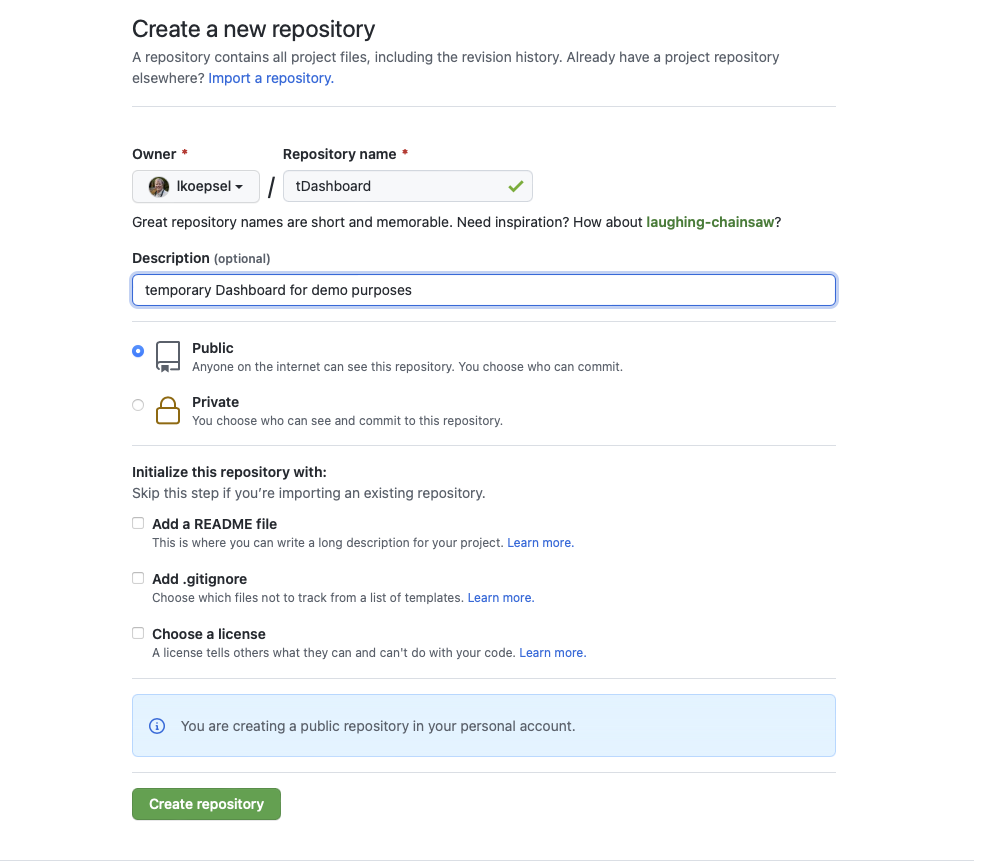
Plus Sign on GitHub
Large Version to see detail Confirm your image looks similar to the one above.
Make sure NONE of the Initialize this repository with: are checked, as those files already exist.
Push your code to your repository#
Github does a nice job of advising you of your next steps. In this case, we will be using the “…or push an existing repository from the command line” option. Simply follow their directions:
git remote add origin git@github.com:lkoepsel/tDashboard.git
git branch -M main
git push -u origin main
Enumerating objects: 33, done.
Counting objects: 100% (33/33), done.
Delta compression using up to 8 threads
Compressing objects: 100% (33/33), done.
Writing objects: 100% (33/33), 14.72 KiB | 2.94 MiB/s, done.
Total 33 (delta 2), reused 0 (delta 0), pack-reused 0
remote: Resolving deltas: 100% (2/2), done.
To github.com:lkoepsel/tDashboard.git
 * [new branch]      main -> main
Branch 'main' set up to track remote branch 'main' from 'origin'.
Make changes to the code#
Now you can begin to be creative! Edit the code, add files, make some changes to see what happens. Do it incrementally, meaning work for about an hour, confirm the changes that you made still allow the code to work. Or if the code isn’t working, and you want someone to check your code…
status/add/commit/push files to the repository#
This part will become the basis of your interaction with git. You will want to confirm the files you’ve created are to become part of git, you will add them, commit them then push them to your remote repository. The process will be the following steps:
- git status - confirm the files shown are the right ones
- git add -A - add the new versions to the repository
- git commit -m “message” - commit them with a message as to the change
- git push -u origin main - send them to the remote repository
The four steps become the “wash-rinse-repeat” of your programming world. :)
I made a change to the delay in blink, I’ll perform the process with this change:
git status
On branch main
Your branch is up to date with 'origin/main'.

Changes not staged for commit:
  (use "git add <file>..." to update what will be committed)
  (use "git restore <file>..." to discard changes in working directory)
	modified:   blink/blink.ino

no changes added to commit (use "git add" and/or "git commit -a")
git add -A
git commit -m "Increased the delay from 200 to 1000 milliseconds in blink"
[main 9ec456d] Increased the delay from 200 to 1000 milliseconds in blink
 1 file changed, 2 insertions(+), 2 deletions(-)
git push -u origin main
Enumerating objects: 7, done.
Counting objects: 100% (7/7), done.
Delta compression using up to 8 threads
Compressing objects: 100% (4/4), done.
Writing objects: 100% (4/4), 414 bytes | 414.00 KiB/s, done.
Total 4 (delta 2), reused 0 (delta 0), pack-reused 0
remote: Resolving deltas: 100% (2/2), completed with 2 local objects.
To github.com:lkoepsel/tDashboard.git
   e806390..9ec456d  main -> main
Branch 'main' set up to track remote branch 'main' from 'origin'.Adding SSH#
Working with SSH for the first time, can be confusing. Here are the steps to follow to add your SSH keys to GitHub to enhance your security and ease of use:
- Open one tab in your browser to your main page -> Settings (in black bar, far right dropdown, just above Sign Out) -> SSH and GPG keys (on left hand side, second section Access)
- Open a second tab to the instructions
- In your CLI, follow the instructions. This will create a SSH key, only use the .pub (for public) on GitHub.
- Follow these instructions to add the key to your account. (the first tab you were asked to open above)
- The easiest way to test is to execute this command:
ssh -T git@github.comYou will see either a “you’ve successfully authenticated…” message or not, if the latter, you will need to retrace your steps.