Where I demonstrate your first embedded application, much like the C Language “Hello, World” program, blink.
A simple program, Blink#
To begin to understand how to program in Forth, I’ll iterate over several versions of blink.
Light the LED#
First, let’s interactively light the built-in LED. On an Uno, we know it is pin 13, which corresponds to Port B, bit 5 on our microcontroller, the ATmega328P.
This is lesson one, all references in Forth, are references to the ATmega328P, which is the microcontroller on the Uno, and not the pins on the Uno. This is why the data sheet for the ATmega328P is so important. I’ll call out the specific references as we go, however, the more you use FlashForth, the more you will come to read and understand the ATmega328P datasheet. As you begin to write more Forth programs, you will be able to create the words necessary to reference the Uno, just as you did with the Arduino framework.
How do we know?#
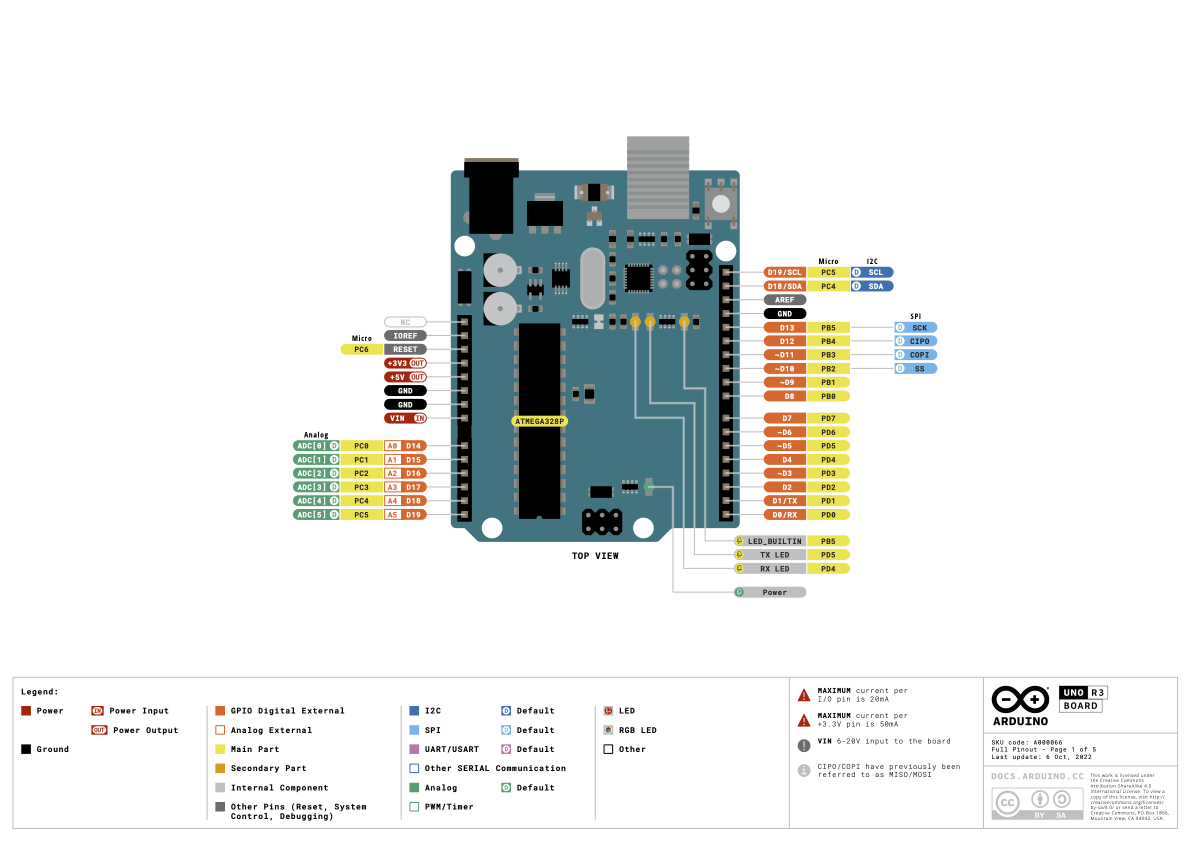
Arduino Uno R3 Pinout
We know, because the Arduino documentation tells us! In the lower right-hand side of the image above, you see a green bubble with “LED_BUILTIN” and to the right of it, an orange bubble with “PB5” and this is an abbreviation for Port B, Bit 5. This what we want to reference in our Forth program.
Its important to begin to feel comfortable with referring to this image, as we will do it in future entries.
Lighting the LED#
To light the board’s LED (PB5), we must accomplish two tasks:
- Make Port B, bit 5 an Output
- Set Port B, bit 5 to “1” or “high”
Coding in Forth#
Enter the code below and I’ll explain what it means after you see the results.(You may copy all three lines and paste them all at once, into CoolTerm.)
%00100000 $24 2constant LED
LED mset
LED 1 + mset
When you paste the code, whether its line by line or all at once, each line will have an “ok<#, ram>” after it. It needs to look like this:
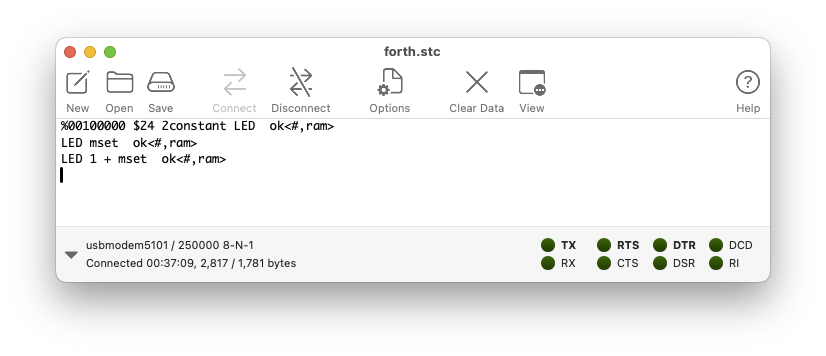
Forth Turn LED On
If you have the response above, your LED will be lit. And to turn the LED off:
LED 1 + mclrAnd to turn the LED back on, simply use one command:
LED 1 + msetSo what does this mean? (Other than its the world’s slowest and most labor intensive blink program!)
Good and bad, this shows the value of Forth. Good? It is interactive, so we can type a command and immediately see the result. Bad? It is low-level, so we need to understand our microcontroller a bit more than before, in order to be effective.
Explanation#
In the code above:
- Our first command
%00100000 $24 2constant LEDcreates a constantLEDfor our LED, it is the specific location, bit (5) of port (B). - The “%” means this is binary data and the “$” is hex data. The binary data indicates bit 5 and the hex data is the physical address of DDRB.
- This corresponds to the 5th bit in the Data Direction Register for PortB.
- By setting LED as a two value constant, we are able to simplify our commands using the word
LED, instead of ``%00100000 $24`.
ATmega328P I/O Registers#
(for details see the ATmega328P datasheet, DS40002061B-page 100)
Technical data on the ATmega328P’s ports, each port on the ATmega328P has 3 registers:
- PORTn - the output value on the port, whether it is set high or low, address $25
- DDRn - the data direction register, sets the port to be an input or an output, address $24
- PINn - the input register, is the value on the port as an input, address $23
As we are dealing with Port B, we have the register PORTB, DDRB and PINB. The registers’ addresses are sequential, which means if we define the middle port DDRB to be our constant port, we can reference the one above (PORTB), by adding 1 to the DDRB address or the 1 below (PINB), by subtracting 1 from the DDRB address.
We have an additional command called mset, takes two parameters, a bit and an address and it sets (or clears, in the case of mclr) that bit.
When you add it all together, the same commands, now annotated:
\ identify the LED by bit and Port
%00100000 $24 2constant LED
\ set LED to be an output, by setting the bit of DDRB (data direction)
LED mset
\ turn the LED on, by setting the bit of PORTB (output value is high)
LED 1 + mset
\ turn the LED off, by clearing the bit of PORTB (output value is low)
LED 1 + mclr
This might seem overwhelming and at the moment, don’t be too concerned as to the register details. I’ll cover this more in a subsequent entry.
Version 2, Creating words#
In Forth, instead of writing functions, you write words. A program in Forth is a series of words. This provides two values, first, one can test each word to ensure its integrity (bug-free) and second, when you write Forth well, the words, act as a user interface as well as a program. We can turn the commands above into words, which we know work and are easy to use:
empty
%00100000 $24 2constant LED
: out ( bit port -- ) mset ;  \ set pin as output
: on ( bit port -- ) 1 + mset ;  \ set a pin high
: off ( bit port -- ) 1 + mclr ;  \ set a pin low
In CoolTerm, enter empty to clear the words, which we have previously defined. This is a command you’ll use often to set the dictionary of Forth back to its pristine condition. Copy and past the four lines above into CoolTerm. Again, after every line, you need to see a “ok<#, ram>”, after it.
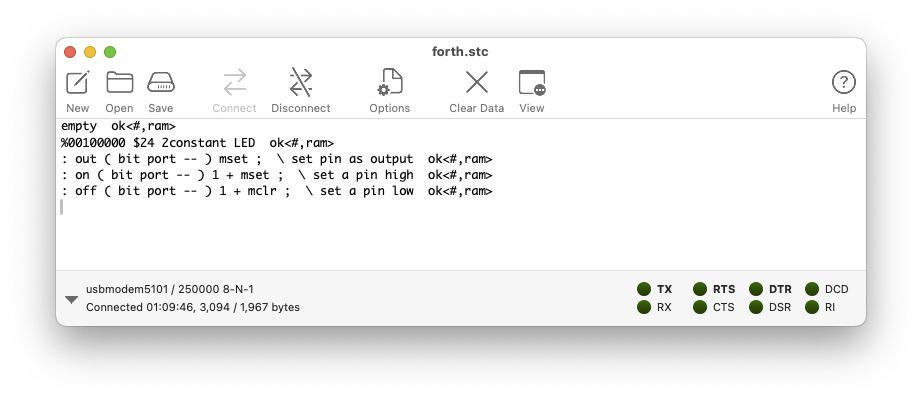
Forth Words to Control LED
Now use the new words, like this. Does the LED light and turn off, respectively?
LED on
LED off
Cool!
Now let’s assume we attach a blue LED to pin 4 of Port B and a red LED to pin 3 of Port B (both with a 220 ohm resistor to ground), we could do the following:
%00010000 $24 2constant BLUE
%00001000 $24 2constant RED
Then to make the the two LED’s work as outputs, we do this:
BLUE out
RED out
And to make them turn on and off…
BLUE on
RED on
BLUE off
RED off
How easy is that?!!!
Version 3, A program#
The above was great, except completely manual. We want to have a program, blink the led, not us.
The blink algorithm, regardless of language is this:
- Make the LED pin an output
- Turn the LED on
- Delay
- Turn the LED off
- Delay
- Repeat steps 2-5
Given what we know so far, we can enter the code for each step like this:
- Make the LED pin an output -
LED out - Turn the LED on
LED on - Delay
- Turn the LED off
LED off - Delay
- Repeat steps 2-5
We’re missing the words for delay and repeat.
In Forth, the word for a delay in milliseconds is ms ( n -- ). We haven’t spoken about the "( n – )" yet, this would be a good time to explain. The parentheses are a comment indicating what is expected on the stack, prior to executing the word (on the left) and after executing the word (on the right). Which introduces another concept, the stack.
The stack#
The stack is a feature of Forth and is the principal method of passing parameters. When a number is entered, it is pushed on to the stack. When a word is executed, if it requires a parameter(s) then it pulls it from the stack. So in this case, we push “n” or the number of milliseconds we wish to delay, then call ms. However, ms has nothing after the ‘–’ in the parentheses, which means it leaves nothing on the stack. To deal with this we call dup, prior to calling ms, which duplicates the top number on the stack. So the delay looks like this for 100ms, 100 dup ms.
Repeating#
As in most languages, an infinite loop is typically while(true), which repeats for ever. In Forth, this loop is begin again, with the words in between executed forever. So our loop could look like this:
begin
  LED on
  100 ms
  LED off
  100 ms
again
We need to add our LED out command and it would be nice to have the 100ms changeable at invocation of the word. So let’s update our program to look like this:
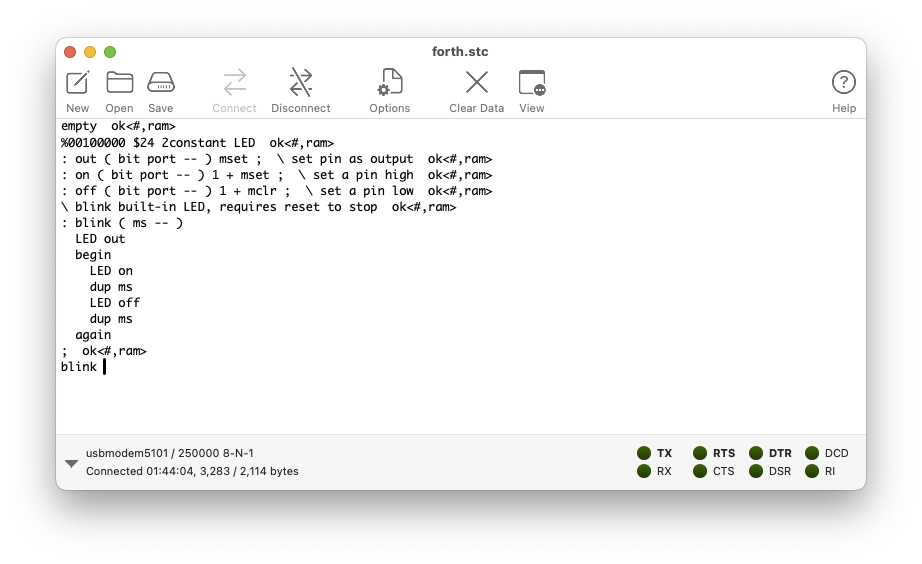
\ blink built-in LED, requires reset to stop
: blink ( ms -- )
  LED out
  begin
    LED on
    dup ms
    LED off
    dup ms
  again
;
Its probably best to do the following to test this:
- Enter
emptyin CoolTerm - Copy and paste the four lines setting up the LED (LED, out, on, off)
- Copy and past the blink program, immediately above
- Enter
blinkin CoolTerm to begin running the program
If you have a blinking LED, congratulations! If not, go back and look for lines which do not end in “ok<#,ram>” to identify your error. Try to match the image below:
Forth blink
You will need to press the Reset button to return control back to the console. As we said, this is an infinite loop!
Debugging#
This is probably a good time to provide some tips on debugging. Mistakes will be made. Debugging a Forth program tends to be very simple. I recommend following these rules to start:
- Fix the first error and ignore the rest, particularly if its a copy/paste.
- A successful entry ends with “ok<#,ram>”.
- A bug ends with a question mark, it will typically print the first bad letter or word as in “LEE out LEE ?.”. I entered LEE, instead of LED.
- Get used to viewing the output of
words, and recognizing the ones you are defining. They will be added aftermarker, at the end of the list. Here is a correct listing of the words which we’ve added (marker is from Forth):
....partial list of words
literal int! ;i di ei ver warm empty rx0? rx0 tx0 load- load+ busy idle exit
blink off on out LED marker  ok<#,ram>
One last iteration, not an Infinite Loop#
Having to press Reset to exit the loop, at the least isn’t elegant and is a bit of a pain. The better way to do this is to add a check for a key pressed in the loop, so that a simple Enter will exit the loop. The word to do this is key? ( -- f) this word will check the key board and if a key is pressed, it will return True. Thus the “f” for flag in the stack comments. We have a loop which exits on true called begin until, so making the changes required, results in:
\ blink? built-in LED, quit on key press
: blink? ( ms -- )
  LED out
  begin
    LED off
    dup ms
    LED on
    dup ms
    key?
  until
  drop
;
The drop at the end, is a good programming practice. As we duplicate “n” for each loop, we want to make sure we don’t leave it on the stack. So just before we exit blink?, we drop the top item on the stack.
Optimize with toggle#
We can do one more bit of optimization, further simplifying our program. It turns out the ATmega328P will toggle an output port, if you attempt to write a “1” to its input port. Which adds to our repertoire of LED words. We’ll also add an input word to set a pin as an input, to make everything symmetrical:
%00100000 $24 2constant LED
: out ( bit port -- ) mset ;  \ set pin as output
: in ( bit port -- ) mclr ;  \ set pin as input
: on ( bit port -- ) 1 + mset ;  \ set a pin high
: off ( bit port -- ) 1 + mclr ;  \ set a pin low
: tog ( bit port -- ) 1 - mset ; \ toggle the pin
And we add our optimized blink? program:
\ blink? built-in LED, quit on key press
: blink? ( ms -- )
  LED out
  begin
    LED tog
    dup ms
    key?
  until
  drop
;
If the program isn’t working properly, first make sure all words have compiled properly (no “?” or the word, “COMPILE ONLY”). Be sure to check and make sure that your serial program is simply sending “<CR>” for Enter. If it is sending “<CR><LF>”, then “key?” won’t work properly in Forth.
Forth Words for this page#
%00100000 $24 2constant LED
: out ( bit port -- ) mset ;  \ set pin as output
: in ( bit port -- ) mclr ;  \ set pin as input
: on ( bit port -- ) 1 + mset ;  \ set a pin high
: off ( bit port -- ) 1 + mclr ;  \ set a pin low
: tog ( bit port -- ) 1 - mset ; \ toggle the pin

\ blink built-in LED, requires reset to stop
: blink ( ms -- )
    LED out
    begin
        LED tog
        dup ms
    again
;

\ blink? built-in LED, quit on key press
: blink? ( ms -- )
    LED out
    begin
        LED tog
        dup ms
        key?
    until
    drop
;