Where I begin to develop code in C on the RP2040 in the Windows environment.
Sources#
- Raspberry Pi Pico SDK: Raspberry Pi Pico SDK
- Getting Started with Pico
- Raspberry Pi Pico Pinout
- Shawn Hymel on Digikey
- Git Bash Tutorial
Download Sources#
Introduction#
If you haven’t read it, please read Read This First… before you continue.
As I have said before, I do not like to use VS Code, nor do I believe that it is a good tool for students beginning to learn how to develop embedded C. My approach will be to follow that of Shawn Hymel’s without the VSCode part as well as what has already been published via the Guide. In the place of VS Code, we will use Notepad++.
Process#
Installing on Windows is more complicated than installing on Linux or macOS. I recommend going slow and following the steps exactly. These steps will be identical to Shawn’s, however, I’ll point out any issues which I found. Having both Shawn’s site and this page open (use tabs) helps, as well as following his directions. Check on this page for any issues, I found.
Directory Setup#
Use File Explorer to create a folder structure as recommended. As we are not using VS Code, I made the base folder C:\ARM and created:
- C:\ARM\armcc
- C:\ARM\lib
- C:\ARM\mingw
- C:\ARM\sdk
Install GNU Arm Embedded Toolchain#
As of August 31, 2021, the Windows toolchain is gcc-arm-none-eabi-10.3-2021.07-win32, I ran the installer and gave it C:\ARM\armcc as the installation folder. I also checked the box “Add path to environment variable”, which meant all four boxes on the Finish step were checked. After clicking Finish, a command window opened, I closed it and continued on.
Install MinGW-w64#
On Shawn’s page, his reference is to the downloads page has changed and it now needs to be https://www.mingw-w64.org/downloads/. On that page, there is an link entry in the table MingW-W64-builds with a host of “Windows”. Click on that link, then click on Sourceforge, which appears under Mingw-builds. Once the installer is downloaded, double-click on it to begin installation. The installation folder is C:\ARM\mingw and use the defaults shown below:
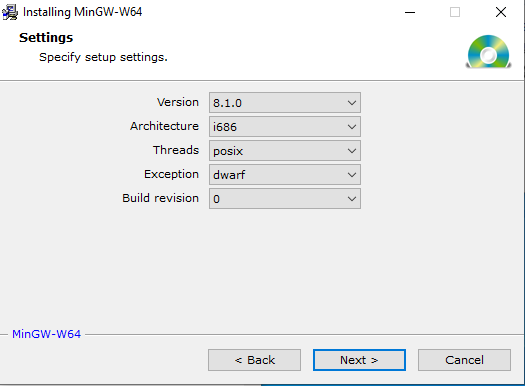
MinGW_Setup defaults
echo mingw32-make %* > C:\ARM\mingw\mingw32\bin\make.batInstall CMake#
Go to the second section Binary distributions: and download the msi file for Windows. As we are installing version 3.21 (past 3.20), you can ignore the “bug in CMake version 3.20” message and download 3.21.
Make sure you click on the second option “Add CMake to the system PATH for all users” and have it install to the default location “C:\Program Files\CMake".
Install Python#
Click on the Python Downloads on Shawn’s site then in the blue box at the top of the screen, right under “Download the latest version for Windows”, click on Download Python 3.9.6”. Your version might be different based on when you are following these instructions.
Double-click on the installer and BEFORE installing be sure to check the box Add Python 3.9 to PATH. Then click on “Install Now” (big white box, not really a button) and after installation, “select the option to disable the MAX_PATH length limit”. (it too is a big white box, not a button)
Install Git#
I had to manually click to allow Git to download the installer. I accepted all of the defaults with the exception of “default editor used by Git” where I selected Notepad++.
It is also easier to go ahead and click the box “Open Git Bash” to go to the next step.
Download Pico SDK and Examples#
I strongly agree with Shawn in using git to download the sdk and Examples content. This will make it much easier to update it when desired. That said, Git (via Git Bash) can be confusing for long-time Windows users. Yes, you can do some of this in Explorer, however, its a good learning experience for developing in C.
Reading a Git Bash Tutorial and a bash command Tutorial can help prevent problems. Remember that the “\” is now a “/”. Which means you will need to do the following to setup the folders properly:
Note
- The lines with “#” are comments, do not type them in
- Enter the text (or copy and paste) the text in the lines which are highlighted (darker)
- The lines below the highlighted lines are output from the system
- “..” (two periods) refers to the folder up one level from current folder
- “.” (one period) refers to the current folder
|
|
Update Environment Variables#
Shawn’s instructions on the environmental variables is very good. Once you’ve entered env in the search bar and a window appears, click the button “Environment Variables”

Click on Environment Variables
Once you’ve confirmed you have the paths setup correctly, open a command prompt (cmd in the Windows search bar is the easiest way to do it) and check that all 3 instructions are found. (The errors aren’t important, what is important is that all three commands attempted execution or worked.)
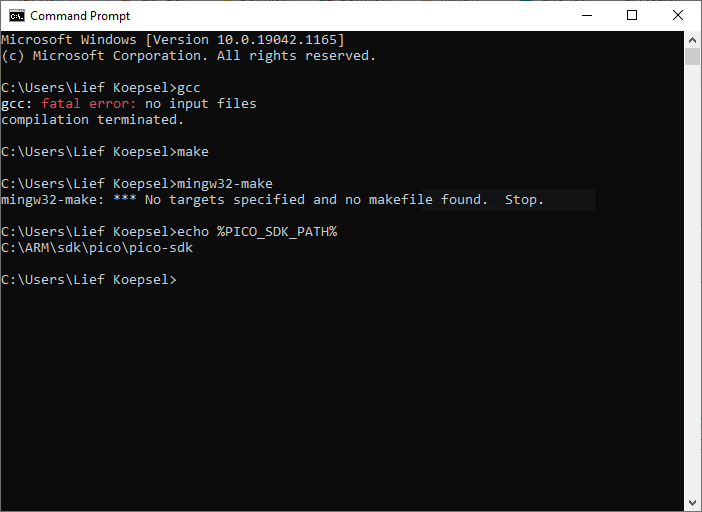
Test the Commands to ensure they work
FINALLY Build Blink Example#
Don’t worry about installing VS Code, we’ll use Notepad++ or you may use your favorite code editor. You do want to use Git Bash and not the command prompt. To use Git Bash, simply type “Git” in the Windows search window and you will see Git Bash as an Application. Hit return and go to the window opened.
Follow his instructions as to making the alias in the .bashrc file. Make sure you perform the second command “source ~/.bashrc” as this command will execute the .bashrc file immediately, otherwise you will need to logout and login.
Follow his instructions to the letter as it is easy to attempt to execute them in the wrong folder. When you do so correctly, you will end up in the “c:/ARM/sdk/pico/pico-examples/build/blink” folder with a blink.uf2 file in it.
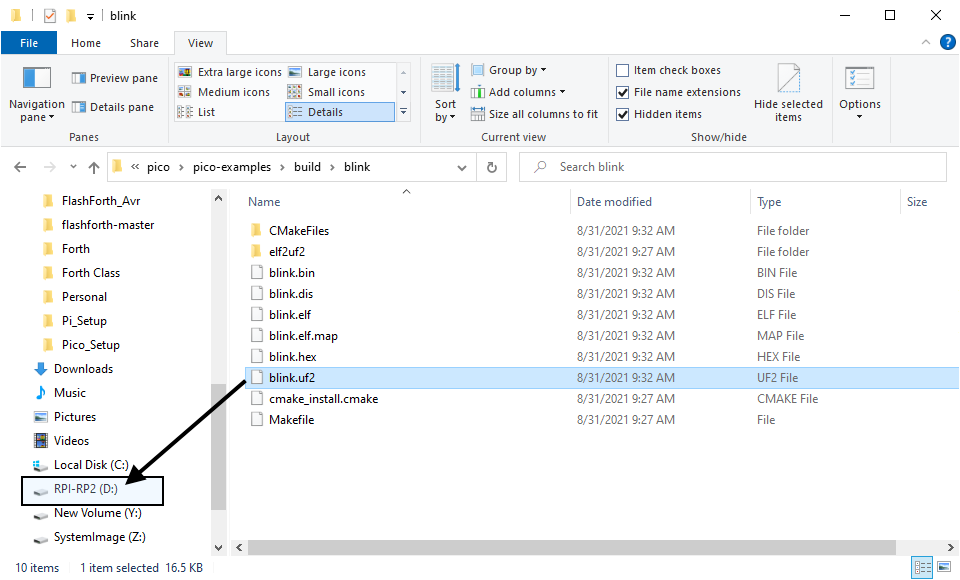
Drag and drop blink.uf2 file to RPI-RP2
Watch your LED blink!
Start Editing!#
Go to Notepad++ and open the file c:/ARM/sdk/pico/pico-examples/hello_world/usb/hello_ USB.c On line 13, there is a printf statement for “Hello, World”, try changing it to “Hello, USB” then follow a similar set of commands as above:
|
|
- Hold down the BOOTSEL button on the Pico board
- Plugin the USB cable
- Release BOOTSEL Drag and drop the hello_usb.uf2 file on to the RPI-RP2 device in Explorer.
To view the output of the program, you will need to use a serial monitor program. A good one for Windows is Putty.
Once downloaded and installed, you will need to determine the COM port number being used. In the Windows search bar type “dev” for device manager then in the window that appears, click on Ports (COM & LPT). This might show several ports, if you are unsure of which one is the Pico, unplug the cable to the Pico then plug it back in. The port which disappears and reappears is the COM port you want to use. Be sure to change the Speed to 115200 and click the radio button “Serial”.
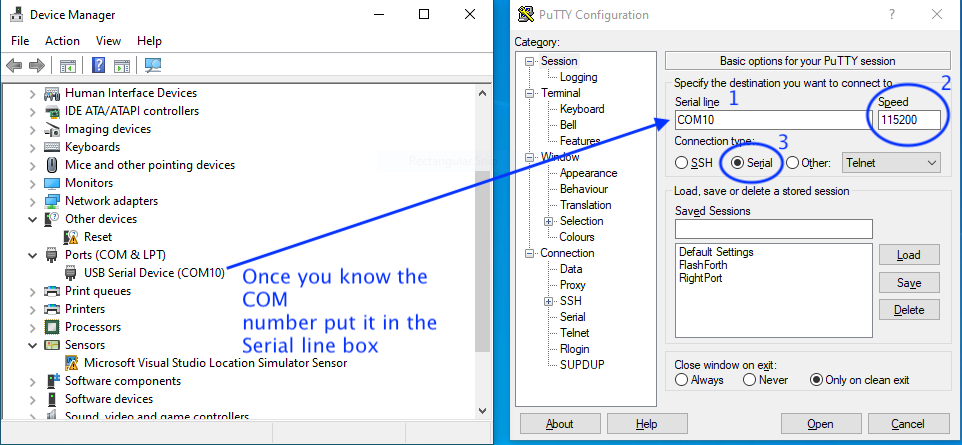
Follow 1-2-3 in Putty
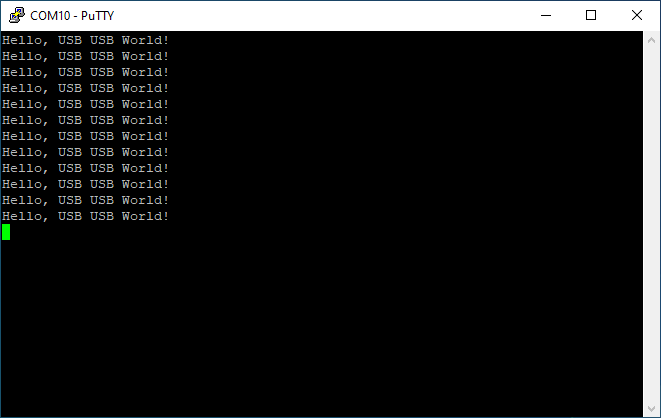
Putty window with the text from hello_usb.uf2 file to RPI-RP2
From here you may also use the information on other RP2040 entries such as creating a new project. The gdb content won’t be applicable until I show how to add the OpenOCD and gdb_multiarch tools to Windows.
Hint for Easier Installation of Code#
If all of this worked, the most important comment in this chapter is 3.2.4: “To enter BOOTSEL mode on your Raspberry Pi Pico, and load code over USB, you need to hold the BOOTSEL button down, and then reset the board in some way. You can do this by unplugging and plugging the USB connector, or adding an external button to pull the RUN pin to ground. [emphasis mine]”
I’ve found you don’t even need a button, you can do the following:
- Plug a wire into Pico’s pin 30 on the breadboard
- Press and hold BOOTSEL
- Connect the wire to GND then disconnect from GND
- Release BOOTSEL and the board will appear as a drive