The beginning of a short course on setting up a webserver on a Raspberry Pi.
Introduction#
It is helpful to understand how to setup a webserver from scratch. As doing so, gives you complete control as to what that server can do. For example, using a low-cost Raspberry Pi, it provides a local cloud server for you to safely learn how to program a webserver. Using a public cloud can be problematic as it will be much easier for someone to hack into your cloud software.
Components of the Server#
I’ll be using the following hardware and software:
- Raspberry Pi B+ Version 3 (RPi3)
- High quality microSD card
- Ethernet cable to connect the RPi3 to my network
- Raspberry Pi Debian Bullseye (lite) operating system
- Raspberry Pi Imager software
- Apache2 web server software
- PHP 8.1 server-side programming software
- SQLite 3 database software
My reason for using PHP is that I wish to use server-side control (as opposed to client-side as in Javascript), as its easier to integrate database operations using server-side. I am using SQLite instead of MySQL, as it too is easier to use. I could have used NGINX, instead of Apache, however, I understand Apache a bit more than NGINX.
There are three main steps to setting up the RPi3:
- Setup the Raspberry Pi 3 as a functioning command line environment
- On the RPi3, setup the webserver software, Apache, PHP and SQLite
- Fine tune specific aspects for greater efficiency, easier debugging etc
Step 1: RPi3 Setup#
TODO: Record video “Setup the RPi3”
Use Raspberry Pi Imager to create an image for the Pi 3:
- Use Raspberry Pi OS (other) -> Raspberry Pi OS Lite (32-bit) “A port of Debian Bullseye with no desktop environment”
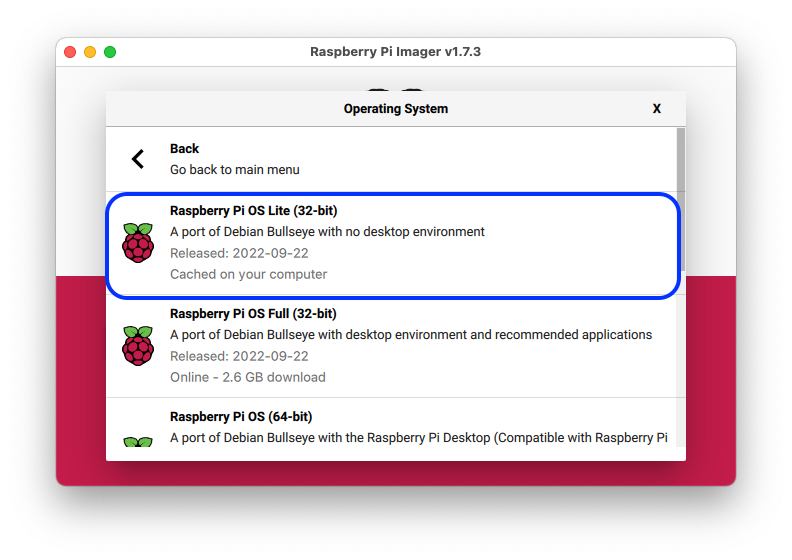
Pick the correct image as shown
- Click on the gear in the lower right corner and set the following:
- Image customization…”to always use”
- Enable SSH -> Use password authentication
- Set username and password (be sure to write down both)
- Set locale settings -> America/Los_Angeles or as appropriate
- Keyboard layout -> us or as appropriate
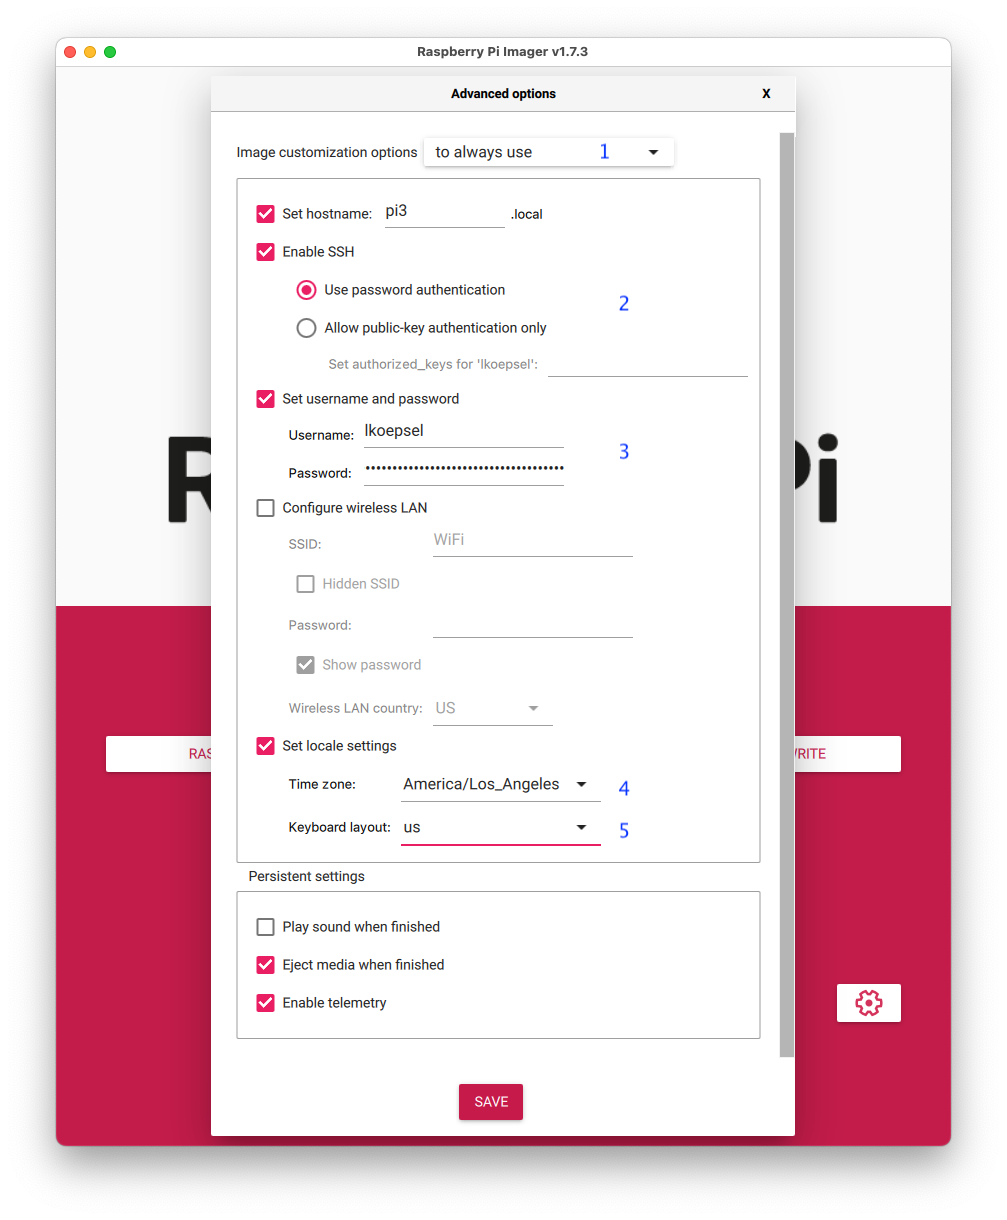
Fill out the image options and click save
- Storage -> Be sure to select your microSD card, NOT YOUR MAIN DRIVE!
- Click on Write, you will need to enter your computer (not the RPi) password
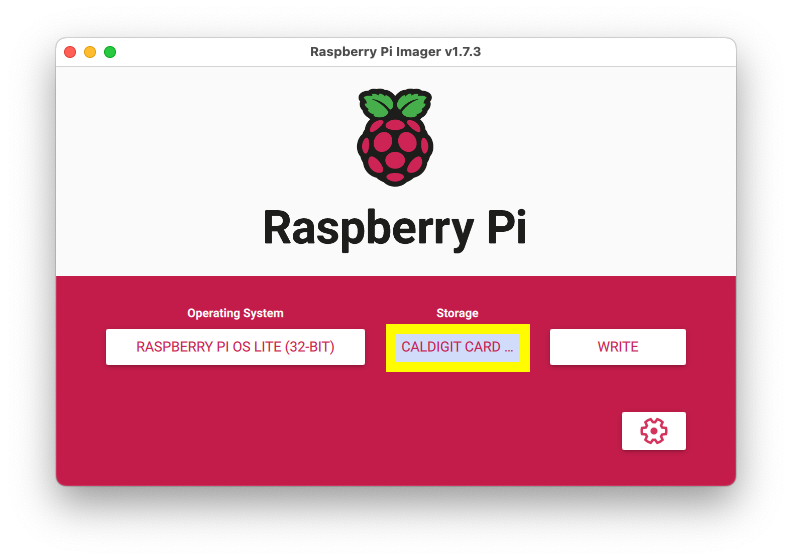
Confirm you are writing to the correct disk!
Start up RPi 3#
- Remove the microSD card from the carrier
- Place in the RPi3,
- Plug in ethernet than power.
- Wait about a minute than attempt to connect
Connect to RPi 3#
All of this work will be performed using a terminal program on your computer to interact with the RPi3. None of the work will require the RPi3 to be connected to a monitor and keyboard. The connection between the two computers will be a networking connection, via an ethernet cable.
I do this for several reasons:
- This is the easiest method of setting up server, its mainly a copy and paste activity
- When you need to do this with a server in the cloud, this is the only way it can be performed.
- It reduces the clutter of attaching multiple keyboards or a keyboard/monitor switch to both your computer and the RPi3.
If you have Windows and need a terminal program, use the Microsoft Terminal application. Its ideal for this and is downloadable from the Microsoft App Store. Both Linux(Konsole) and macOS (Terminal)have their own terminals which work great. Ultimately you will need to get to a terminal prompt…
TODO: (Need a way to confirm IP address, for this use 192.168.1.12)
- Open a terminal program and enter (for more context see Complete Listing)
ssh 192.168.1.12
yes
password
Complete Listing#
ssh 192.168.1.12
The authenticity of host '192.168.1.12 (192.168.1.12)' can't be established.
ED25519 key fingerprint is SHA256:yJjnn0JUW3H97eXO+Ap9kqcKZPq2Q/zihS59YpS0sk4.
This key is not known by any other names
Are you sure you want to continue connecting (yes/no/[fingerprint])? yes
Warning: Permanently added '192.168.1.12' (ED25519) to the list of known hosts.
lkoepsel@192.168.1.12's password:
bash: warning: setlocale: LC_ALL: cannot change locale (en_US.UTF-8)
bash: warning: setlocale: LC_ALL: cannot change locale (en_US.UTF-8)
We’ll fix the warnings as we go.
Configure RPi3#
sudo raspi-configThis will bring up a limited GUI which looks like this:
GUI to configure RPi3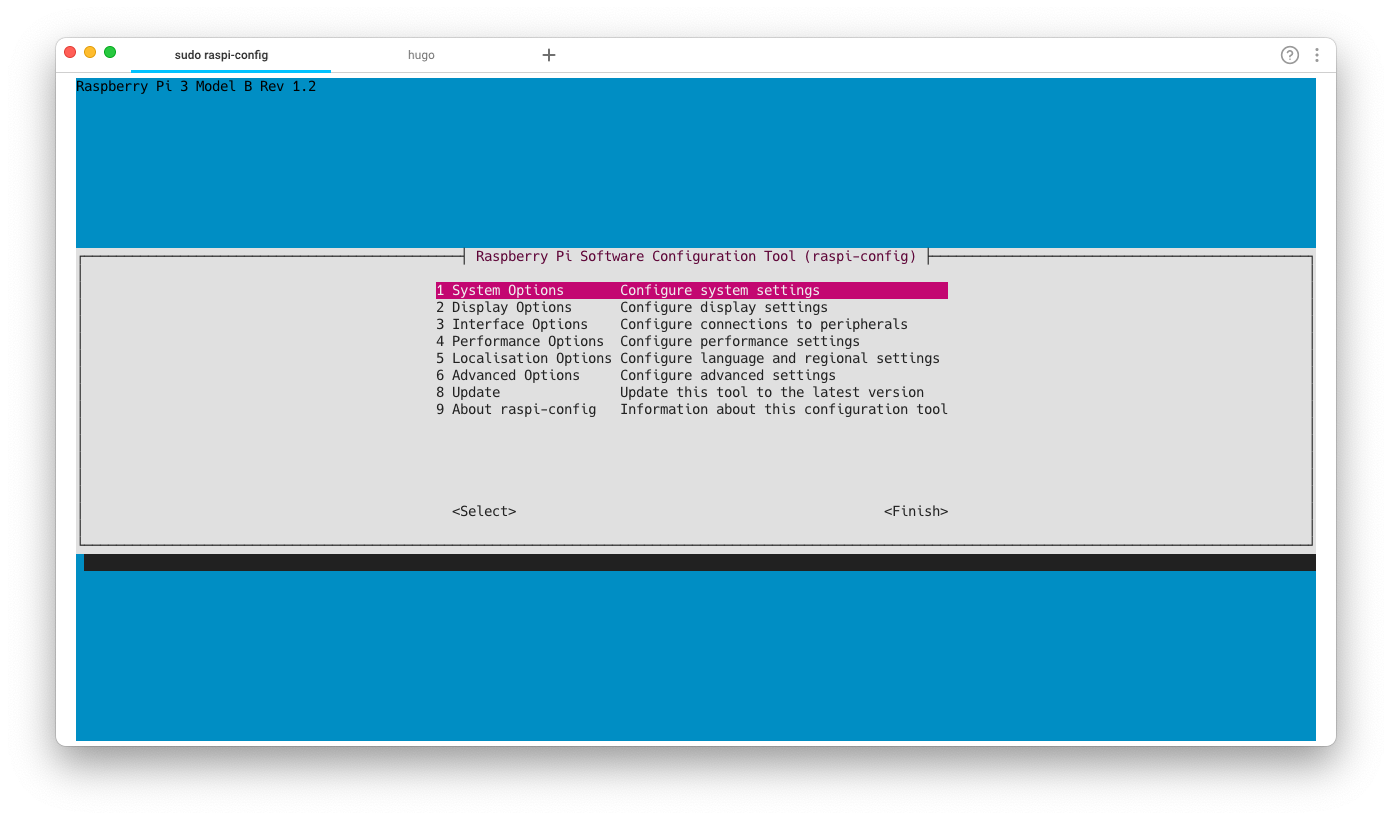
To move around you do the following:
- Use arrow keys to navigate
- Type return to enter
- To check or uncheck a selection, type spacebar
- Use tab to move between text in “< >” as in <Select> and <Finish>
Set Locale to US UTF-8#
- Go down to 5. “Localisation…” type return
- With “L1 Locale” highlighted, type return
- Uncheck en_GB.UTF-8 UTF-8 (The * will disappear when you hit spacebar)
- Check en_US.UTF-8 UTF-8 (This time hit spacebar to make an * appear)
- Tab to <Ok> and type return
- Configuring locales Press Down Key to highlight en_US.UTF-8 UTF-8
- Tab to <Ok> and type return “Generating locales (this might take a while)…” then main window will show
#
- Arrow key down to 6 Advanced Options and type return
- With A1 Expand Filesystem highlighted, Tab to <Select>
- Type return
- With message “Root Partion…” type return
- In Main Window, tab to Finish and type return
- Type return with <Yes> selected and allow RPi 3 to reboot
Reconnect after Reboot#
ssh 192.168.1.12
# Update Operating System
sudo apt update && sudo apt full-upgrade -y
Step 2: Server setup#
Now we get into the cut and paste part of the installation. This can go pretty fast, only held back by the speed of the RPi3’s ability to process. That said, don’t rush and if errors occur, backtrack to make sure that step is successful prior to going forward. If something doesn’t appear to be fixed, start all over by reburning the image on the microSD card and starting at Step 1.
Instructions as to how to do this:
- Any line which starts with an “#” is a comment and does not need to be copy and pasted
- Copy and paste line by line, wait for the execution to stop and a prompt to appear before you paste the next line.
- Make sure there are no errors before going to the next line. The source of most errors is not properly copying and pasting the line, so if an error occurs, look at the line executed and make sure it is identical to the one on this page.
- Lines which contain “sudo nano…” are a command start an editor with a specific file.
- Once in that file, the nano editor has help text at the bottom.
- Copy/paste the text following the “sudo nano…” line all the way to the line starting # end of edit (don’t include “# end of edit” text)
- Press Ctrl-X to exit
- Press Y save the modified buffer
- Press return to save with current filename
Install and test Apache2#
sudo apt install apache2 -y
# test the install and configuration
sudo apache2ctl configtest
# if "could not reliably...fully qualified..." error
sudo nano /etc/apache2/apache2.conf
# at the bottom of the file
ServerName 192.168.1.12
# end of edit
# retest, restart and confirm using browser
sudo apache2ctl configtest
sudo systemctl restart apache2
# browse to 192.168.1.12 and confirm "Apache2 Debian...Page"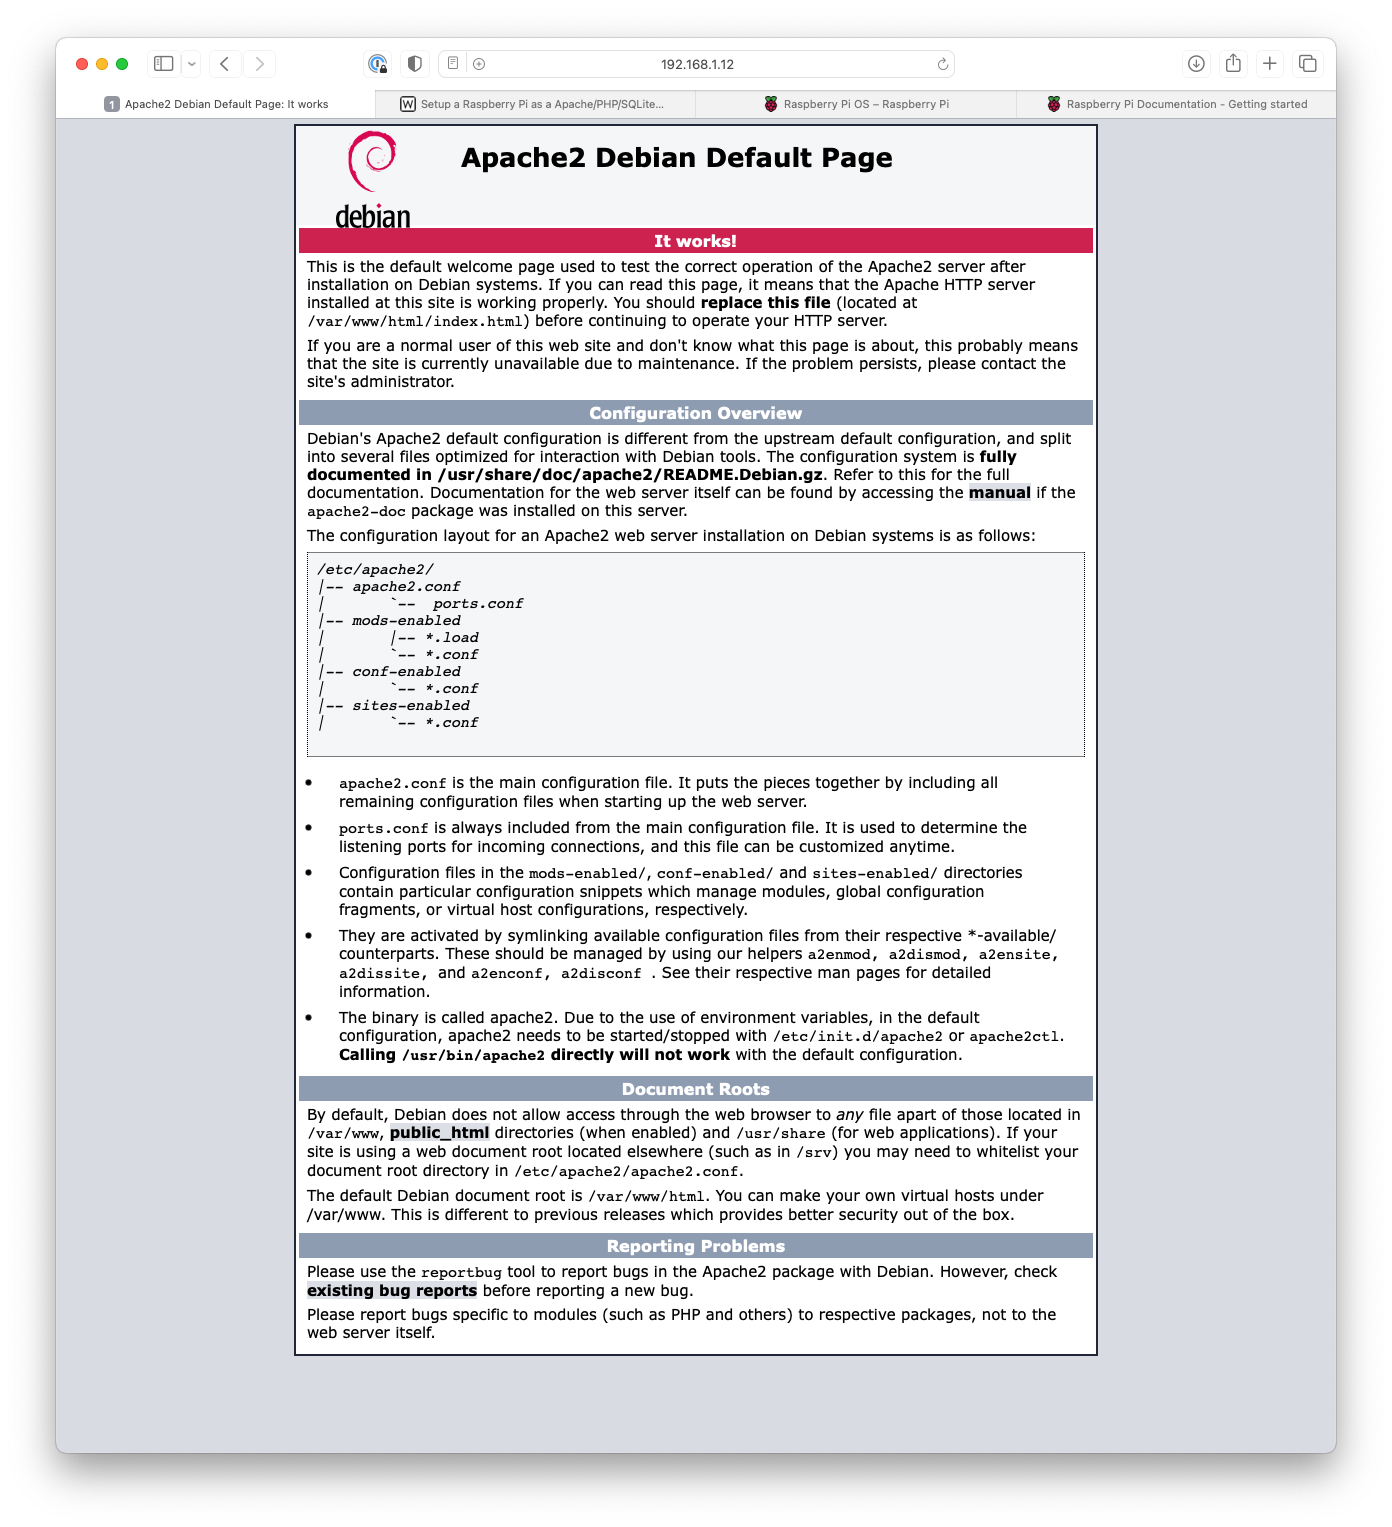
A successful Apache install will show this page in your browser at 192.168.1.12
Debian (the Linux for the RPi3, has a signficantly downlevel PHP version, we have to jump through a few hoops to get an updated version)
Install and test SQLite and PHP#
# install the database application
sudo apt install sqlite3

sudo apt update
sudo apt install lsb-release
# copy entire line to ".../null"
curl https://packages.sury.org/php/apt.gpg | sudo tee /usr/share/keyrings/suryphp-archive-keyring.gpg >/dev/null
# copy entire line to "...php.list
echo "deb [signed-by=/usr/share/keyrings/suryphp-archive-keyring.gpg] https://packages.sury.org/php/ $(lsb_release -cs) main" | sudo tee /etc/apt/sources.list.d/sury-php.list
sudo apt update
sudo apt install php8.1 php8.1-sqlite3 php8.1-fpm
sudo a2enmod proxy_fcgi setenvif && sudo a2enconf php8.1-fpm
sudo systemctl reload apache2
sudo nano /var/www/html/1911.php
<!DOCTYPE html>
<html>
<head>
	<title>
		<?php
			echo $_SERVER['HTTP_HOST'];
		?>
	</title>
</head>
<body>
<?php
date_default_timezone_set('America/Los_Angeles');
echo 'IP: ', $_SERVER['SERVER_ADDR'];
echo '  LOCATION: <a href="index.php">', $_SERVER['HTTP_HOST'], '</a>';
echo '  DATE: ', date("r");
echo exec( 'groups' );
phpinfo();
?>
</body>
</html>
# end of edit
# Close and Browse to 192.168.1.12/1911.php
# check if PHP is running
"IP: 192.168.1.12 LOCATION: 192.168.1.12..."
"PHP Version 8.1.13...."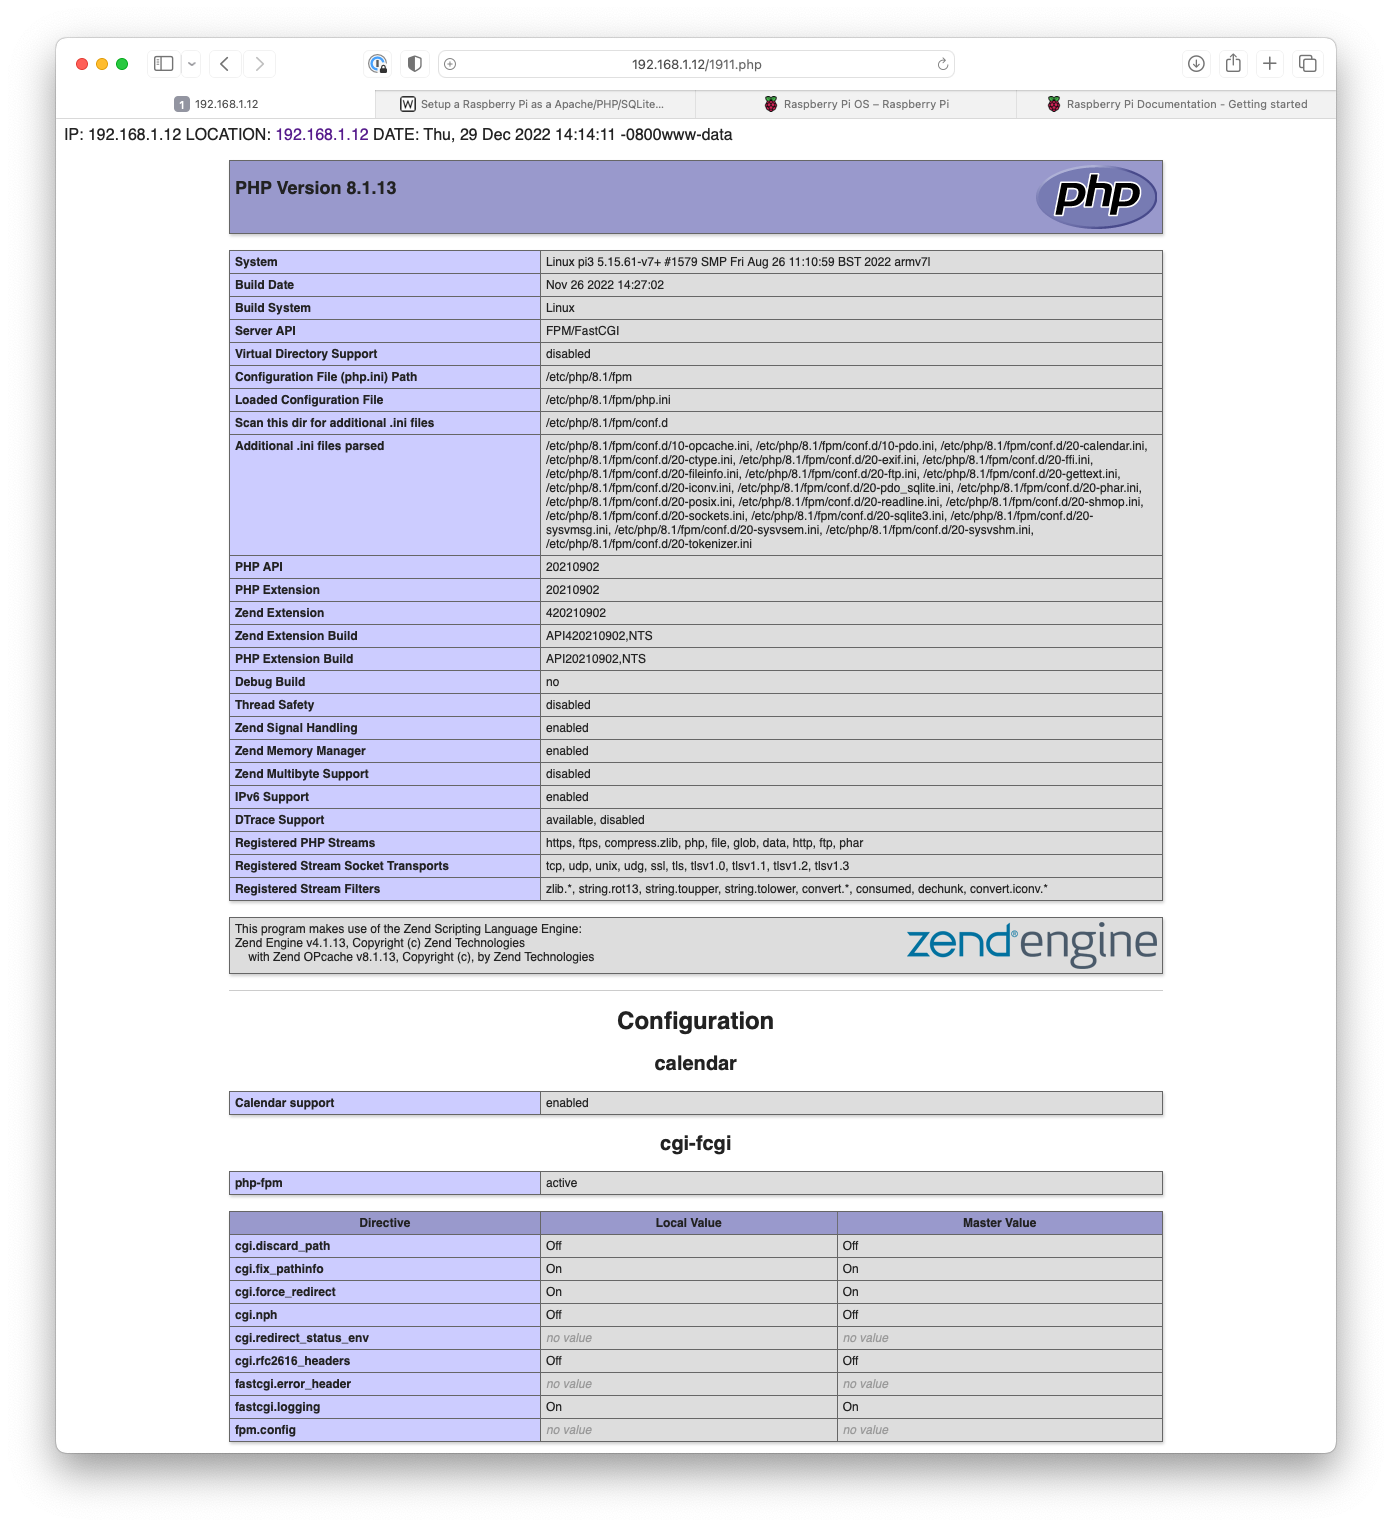
A successful PHP install will show this page in your browser at 192.168.1.12/1911.php
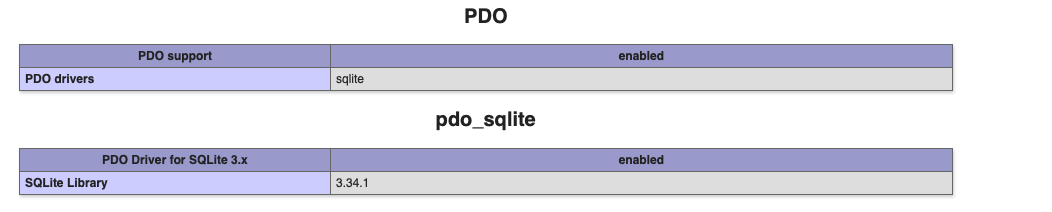
Scroll down the page to find the pdo section, confirm it looks like this

Scroll down the page to find the sqlite3 section, confirm it looks like this
Setup and Confirm PHP error logging#
sudo nano /etc/php/8.1/fpm/php.ini
# display errors as we have a local webserver
# goto ~line 503 by the two keys, control and "-" then 503
# change the Off to On for display_errors
# use arrow keys to move then overwrite
display_errors = On
# also just log errors
# goto ~line 590 by the two keys, control and "-" then 590
# remove starting ";" then add the text as below
error_log = /var/log/php/error.log
# end of edit
sudo mkdir /var/log/php
sudo chown www-data /var/log/php
sudo service apache2 restart && sudo service php8.1-fpm restart
# helpful alias for tracking down PHP errors
alias tpe='tail /var/log/php/error.log'
TODO: Record video How to Use tpe to find PHP errors
Upload the PHP site to be used#
To go back to your computer’s command line, you can enter exit, this will exit the ssh environment logged into the RPi3 and return to your computer environment. We will do this in this step, in order to copy the website files from your computer to the RPi3.
# leave the RPi3 site and go back to your computer
# move to the directory containing the MPC project
cd Sites
# change username to the name you used in the install
scp -r mpc username@192.168.1.12:
Using the scp command copied the mpc folder from your computer to the RPi3. As we didn’t specify a folder, it will be in your home folder when you login to the RPi3. When you enter ls, the command will list the the files and as you just logged in your are automatically in your home folder, otherwise known as “~” or /home/username.
# log back on to the RPi3
ssh 192.168.1.12
# confirm the mpc folder is there
ls
# copy it to the server folder
sudo cp -r mpc /var/www/html
# use your browser to confirm a successful move
# 192.168.1.12/index.php
A successful web server installation!