Where I demonstrate how to use the ATmega328PB Xplained Mini from Microchip to understand how to program in Standard C.
Sources#
- ATmega328PB Xplained Mini
- ATmega168PB Xplained Mini
- Adding support for ATmega328PB to avr-gcc and avrdude
- Bloom (replaces avarice) (Linux only)
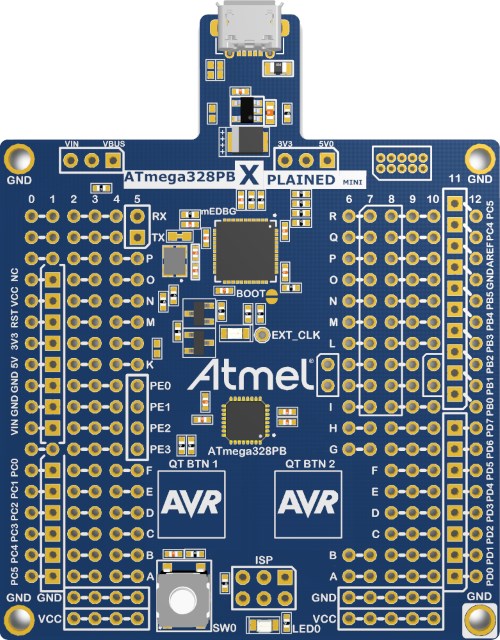
ATmega328PB XPLAINED Mini Board Image
Introduction#
Due to its size and shape, I’m conflicted on this board. For the price, its fantastic! Why the conflicting thoughts? The good is that this board has an embedded hardware debugger which solves the controller board/debugger tool issue and it only costs $12! The bad is the board is physically large without adding extra value, thus it requires two breadboards to easily interface. All this said, I would recommend this board over any other, if you plan to do any hardware debugging.
The Atmega328PB is an enhanced version of the P version (note the ending has a PB), it adds an UART, the ability to handle capacitor buttons and 2 extra timer/counters. Elliot Williams has a nice Overview of the chip.
The board is shaped to mirror the Uno form-factor. I prefer the more Nano-shaped boards which fit on a small, narrow breadboard. In this case, the Xplained Mini boards (328PB and 168PB) are able to use Uno shields to extend their capabilities.
I’ve also started working with the ATmega168PB Xplained Mini as well. You will need to take the same steps as below on the 328PB, except replace the numbers 32 with 16, the remaining file names were the same. Be sure to update the change in the io.h file, right below 168PA, add a similar entry for 168PB.
If you’ve installed the latest version of avrdude which is 6.4.1 (or 7.0), it already has the changes required for both the 168PB and 328PB.
Add to avr-gcc and avrdude#
Here is a good description of how to add support for ATmega328PB to avr-gcc and avrdude. Just in case, it disappears, here is the text as well, along with my comments:
avr-gcc#
- Download ATmega’s support pack from Microchip’s website. Simply search for “mega_DFP”, typically near the top.
- Unzip the relevant files.
- Linux: I wasn’t able to use unzip. I used Ark, a GUI file extractor and extracted the three individual files to the Desktop.
- macOS: I needed to change the filetype from .atpack to .zip and I was able to double-click on the file to unzip it. Once unzipped, I opened the folder in Finder.
Files to manage (from support pack your version number might differ):#
- Atmel.ATmega_DFP.2.0.401/gcc/dev/atmega328pb/avr5/crtatmega328pb.o
- Atmel.ATmega_DFP.2.0.401/gcc/dev/atmega328pb/avr5/libatmega328pb.a
- Atmel.ATmega_DFP.2.0.401/include/avr/iom328pb.h
Actions to take:#
Linux: I used sudo cp… to copy the files into /usr….#
-
Place the .o and .a files in /usr/avr/lib/avr5/
-
Place the .h file in /usr/avr/include/avr/.
-
Add the following to /usr/avr/include/avr/io.h, just below the 328P.
#elif defined (__AVR_ATmega328PB__) || defined (__AVR_ATmega328__)
#  include <avr/iom328pb.h>
macOS: I used Finder (Go -> Go to folder…) to open another window pointing to:#
- /opt/homebrew/Cellar/avr-gcc@9/9.3.0_3/avr/lib/avr5
- /opt/homebrew/Cellar/avr-gcc@9/9.3.0_3/avr/include/avr
- Add the following to /opt/homebrew/Cellar/avr-gcc@9/9.3.0_3/avr/include/avr/io.h*, just below the 328P.
#elif defined (__AVR_ATmega328PB__) || defined (__AVR_ATmega328__)
#  include <avr/iom328pb.h>
All set. Ready to compile.
avrdude#
The best thing here is to install avrdude 7.0, it already has 328PB support.
If you are unable to use the latest version of avrdude, add the following to /etc/avrdude.conf (on the Mac, /opt/homebrew/Cellar/avrdude/6.4_1/etc), right below the definition for ATmega328P.
part parent "m328"
	id          = "m328pb";
	desc        = "ATmega328PB";
	signature   = 0x1e 0x95 0x16;

	ocdrev      = 1;
;
Switching between environments#
For switching between Uno and 328PB environments, you will need this env.make file:
# Environmental variables for specific boards
# Uncomment entire block less top line of block
# After switching boards, Library must be re-compiled
# Use "make LIB_clean" to force a re-compile of the Library

# Arduino UNO et al using Optiboot (standard Arduino IDE approach)
# MCU = atmega328p
# SERIAL = /dev/cu.usbmodem5101
# F_CPU = 16000000UL
# BAUD  = 250000UL
# SOFT_RESET = 0
# LIBDIR = $(DEPTH)Library
# PROGRAMMER_TYPE = arduino
# PROGRAMMER_ARGS = -F -V -P $(SERIAL) -b 115200
# TOOLCHAIN =
# OS = mac
# TC3_RESET = 0

# Microchip 328PB Xplained Mini board
MCU = atmega328pb
SERIAL = /dev/cu.usbmodem3102
F_CPU = 16000000UL
BAUD  = 250000UL
SOFT_RESET = 1
LIBDIR = $(DEPTH)Library
PROGRAMMER_TYPE = xplainedmini
PROGRAMMER_ARGS =
TOOLCHAIN =
OS = mac
TC3_RESET = 0
Test Bed#
I created a test bed using the 328PB board along with two breadboards. The finished product looks like the image below:
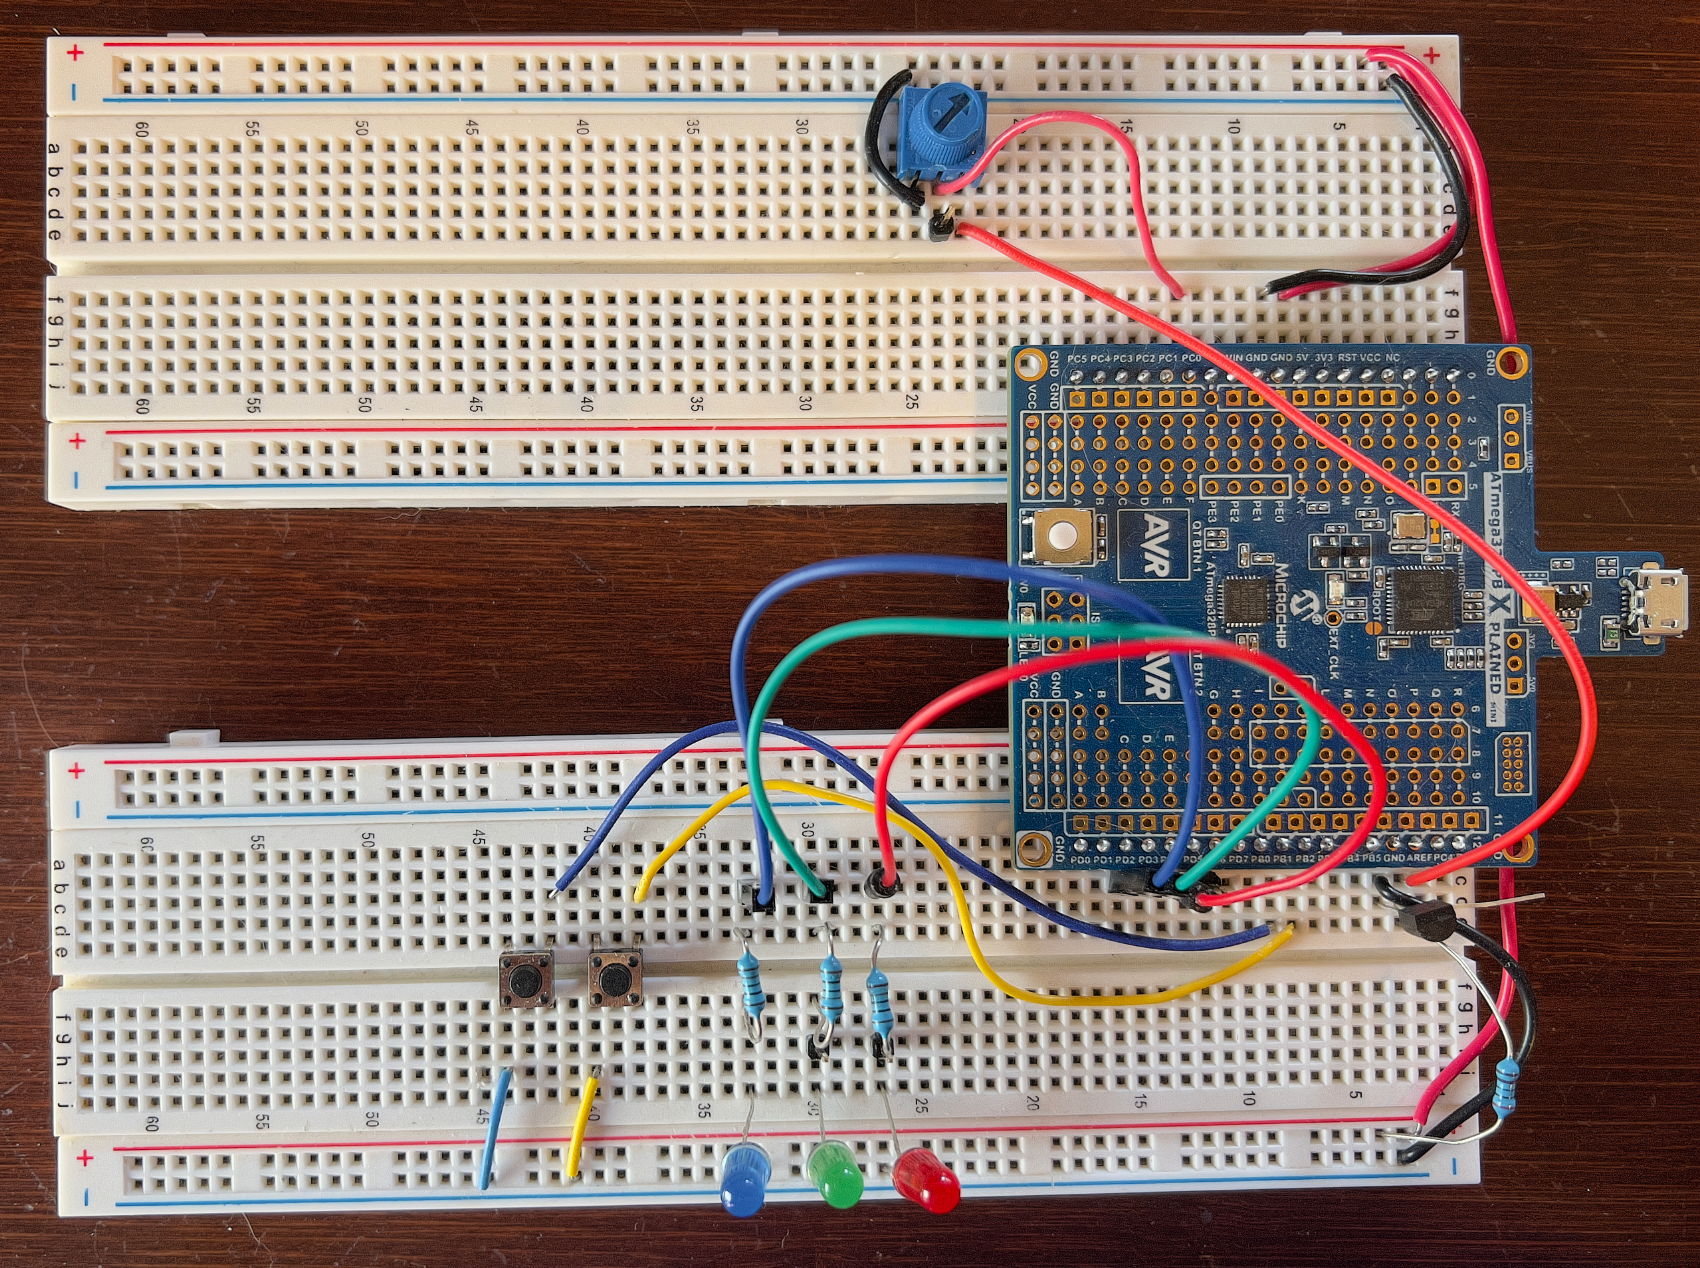
ATmega328PB Xplained Mini Test Bed
Large Version to see detail This test bed allows me to test all of the examples in the AVR_C folder. Not including the peripherals on the Xplained board itself, the test bed has:
- (2) push button switches
- (3) LEDs with current limiting resistors
- (1) 4.096 Voltage reference (LM4040C10ILP, wiring changed in photo)
- (1) 10K potentiometer as a voltage divider across the rails to provide 0-5V adjustable input
- (1) thermistor/10K resistor as a voltage divider across the rails (not shown)
- (1) photocell/5K resistor as a voltage divider across the rails (not shown)
In addition the Xplained board has:
- (2) capacitive switches
- (1) user push button, setup as a Reset button using sysclock_2
- (1) user LED
Which means I have the following:
- (2) digital inputs
- (3) digital light outputs (red, green, blue)
- (3) analog inputs, adjustable voltage, light as a voltage and temperature as a voltage